
Version control & Salesforce
Why am I writing this?
Long story short, I searched high and low for GOOD and PRACTICAL instructions on how to do this, and pretty much came up empty, so here we go. Now, I’m not exactly junior in IT anymore and my googling skills equate to a few dans, and if I don’t find it, well, then most of the other seekers won’t find it either.
While looking and eventually giving up and starting to do it the hard way, i.e. learning a bunch of different things about like git, Github and Bitbucket & whatnot, I figured it doesn’t have to be all that difficult for everyone, so grab a cuppa and sit comfortably & let’s go.
Who am I writing this for?
For anyone who wants to learn. But because I wrote this out of frustration of not finding “do this for dummy test crash people” level instructions, bear in mind that this is v e r y basic level guide - the sort I was looking for, and the writing of which forced me to figure out these things.
So, well, if you’re more advanced student of this particular piece of this art style, well, what you’ll likely end up doing is cringing about stuff that I skip entirely (like 99% of things that relate to security, and of which I’m very aware of) or do “wrong”.
The point was to write nuts & bolts instructions on how to do this from the ground up, with very basic tools and building on a very low set of basic skills with those tools, because that’s what was missing - not to amuse gurus
I am aware of the things I skipped, like all of the security aspects; important as they are, they’re not the focus here - the focus is to learn the nuts and bolts of this thing, to which security things can then be applied.
If you have constructive feedback, shortcuts &cetera are welcome; comments like “not like this”, or “wrong” - go do something else.
Why, though?
By the time you reach the end of this you’ve figured out that it’s going to be a lot faster to skip the whole version control stuff and just move configurations between orgs with VS Code or directly SFDX command line.
But, but, what’s the point then?
That is an excellent question. Say that you’re working with several people, editing multiple things at the same time in the same org. Happens all the time in projects, at least on those where I’ve been involved - there’s a deadline that needs to be met and things need to be done in a hurry, so the company throws in people, ‘cos more hands is always better, right?
Well, anyone who’s done any kind of coordinated effort with multiple people knows that there needs to be communication, coordination and sometimes even control. This is where version control comes handy even with metadata (clicks not code) development.
Never even mind that when the customer is advanced enough in managing their IT infrastructure, they’ll want all kinds of newfangled CI/CD processes & whatnot.
Now, most, if not all of those more technologically advanced companies have some kind of version control / release management / deployment tool such as Gearset, Copado or the like, some very newcomers to Salesforce may even use Salesforce’s own CI/CD tool (which, btw also relies on git).
But we’re not talking about those now, we’re talking about the smaller setups where this would be super handy and awesome, but the customer doesn’t have the will, cash or both to set any of this up.
Maybe it’s an org where you have one or three developers and a few consultants working on a project and then move on and you’ll be left to administer that. Maybe you’re just now starting a green field setup and want to be progressive about this, maybe you’re just looking to learn the nuts and bolts of this thing.
Before you start setting up any repositories or installing any applications, please discuss this with the powers that be at the customer / employer, as it is possible that using an external repository (private or not) may expose org metadata to outsiders, should someone at the repository company make a mistake. Or maybe even you.
Before going further, I also suggest you take a look at the Salesforce Trailhead unit “Org Development Model”. If the link doesn’t work, use search functionality to look it up; it has some good things in it, like the picture below.

Source: Salesforce Trailhead
The picture is great and illustrative, but unfortunately it is woefully unrepresentative.
Thing is - most organizations I’ve worked with have not had Developer Pro and Full Copy sandboxes available. The most common case is the Enterprise licensed org that has 25 dev sandboxes, one partial copy sandbox - and production.
So rather than the fine representation in the picture and in the Trailhead guide, the development to production path is very often markedly shorter, and in most cases like this:
Dev Sandbox => Partial Copy Sandbox => Production.
Mind - there’s nothing wrong with that, just something to be cognizant of.
Getting started with Salesforce version control
There’s a few moving parts here, so let’s take a look at them.
First is the version control system, which itself consists of the version control application, the most commonly used is git, followed by local and remote repositories, the former of which will reside on your computer and the latter will, in most cases, be on a cloud hosted service.
Other components of the equation are SFDX, Salesforce command line tools and Visual Studio Code, which is an IDE tool published by Microsoft.
Github, Bitbucket bithubwhatnow?
Both Github and Bitbucket are services that provide much the same functionality; they are online code repository services.
Github is nowadays owned by Microsoft, while Bitbucket is owned by Atlassian, which also owns Jira and Confluence. Could be that there are some others out there, but those two seem to be the most commonly used ones.
Which one to use?
Should it happen that the customer / employer you’re working with has a version control set up, use that. If not, you get to choose, and it often pays to go with the one that you’re more familiar with.
While both seem to be fully compatible with git version control, there may be some subtle differences in setting them up, but personally, once I’d run through a tutorial for Github, setting up an account to play with on Bitbucket wasn’t too difficult and I was able to get up and running pretty quickly.
Git basics
First, I heartily recommend you to get yourself familiar with Git version control as well as Github (or Bitbucket).
There are plenty of good existing tutorials for that, so I won’t cover that; head on to your favorite search engine and look for “git tutorial” and “github tutorial”.
I spent some of my own money for personal / career development and bought a five hour course from udemy.com; they offer quite good tutorials at reasonable rates, but there’s reasonably workable stuff available freely on e.g. Youtube and the other usual places as well.
Thing is though - you’ll need to understand - as in be able to use and improvise the use of - and be able to use with git are:
git command line basics, e.g.
add, commit, .gitignore, branch, stash
git branching (concept that’s used through the git branch command)
Creating a github (or bitbucket) account, repositories, branches etc.
git remote repository push / pull / clone functionality and pull requests
I will walk you through all of the basic steps to get you started, with screenshots, even, but it will be so much easier for you, if you spend some of your own time & elbow grease on
Being handy with SFDX will not hurt either, but as we can use VS Code UI to do things for us on that end, that’s not super necessary.
Mac computers come with git pre-installed; you can check that by opening up the terminal and typing in the command “git” or “git --version”.
For windows you’ll need to get the tool; the origin site of git is a good place to start: https://git-scm.com/download/win.
…and if you’re doing this in Windows and if you haven’t started learning powershell yet, it might also be a good idea to get some basics of that in hand.
I know for a fact that since git was initially developed by the same guy as linux, Linus Torvalds, it’s available on linux, as are the other tools, but unfortunately the just now I’m too lazy to start installing a virtual machine, ‘cos I don’t use linux in my day-to-day work
processes.
Repositories & Visual Studio Code + SFDX
If you haven’t yet started and this is your first time hearing about this stuff, well, no time like the present.
You can get started by taking a peek at this article:
How to Setup Visual Studio Code for Salesforce.
That should get you at least to somewhat familiar level with Visual Studio Code and its SFDX plugins.
Setting up the remote repository
So - how do we get there? I want to get my hands dirty already.
First, we create our online repository. This would also be known as the remote repository, as opposed to the local repository, which we’ll create after this.
Before you do that, you’ll need to decide whether you want to use Github or Bitbucket. For Reasons™️ I will use Bitbucket.
Shoo, g’on, go and create yourself an account on one of them. If you already have an account, feel free to use that.
In Bitbucket, things are organized into Projects, under which the repositories will live, but in Github, you can just start creating repositories right after you’ve logged in.
So, to do that, I’ve here logged on Bitbucket, then first create a project, then a repository under that project.
Here are some screenshots from my way towards creating these for this setup:
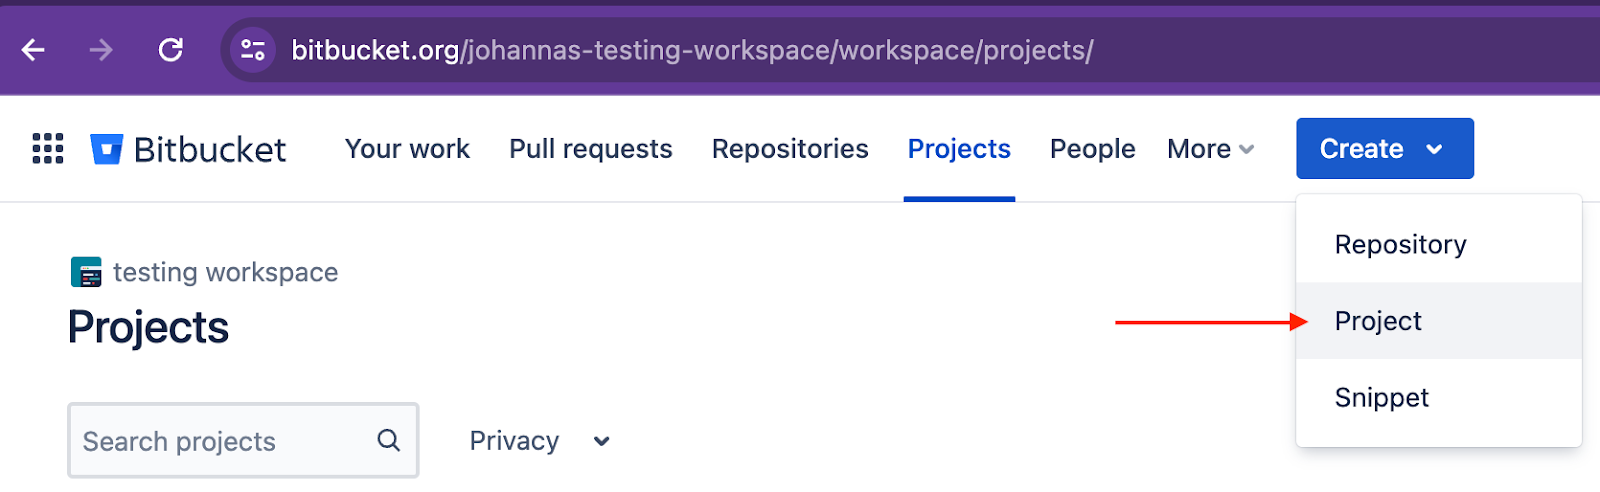
Once I have created a project, I can click on the “Create” button again and this time just select “Repository”. Be sure to select the right project.
Here we give the repository its name (in my experience, it pays to be descriptive) and the default branch name.
By long standing git convention, the main branch name is “main”. It used to be “master”, but as that has some negative cultural connotations, it got replaced.
Also be sure to select “No” on README and .gitignore; we want the repository to be empty.
If the repository is not empty, we’ll get a bit of a headache, so let’s make it so.
VS Code
Okay, so now we have the remote repository set up, so it’s time to fire up VS Code. If you have not, now would be a good time to install the Salesforce Extension Pack (Expanded) and all the other packages it brings along.
If you already happen to use VS Code to other miscreant pursuits, be sure to open a folder where you keep your VS Code projects.
My projects happen to reside in my $HOME/Documents/dev/ folder just so that I can find ‘em all, to rule them all and so on, but I suppose there’s exactly many ways to go about this as there are people using these tools.
So open up an empty folder. Or at least a folder where you don’t already have a project going on; my favorite way of doing that is cmd+o, but this would be one of those cases where the results matter more than the style.
Once there, we’ll first create a new project (Salesforce / VS Code project), so open up the Command Palette by either the magic combo CTRL/CMD + Shift + P or by clicking menus View -> Command Palette.
Then start typing “project”, and once the list shortens up a bit, select “SFDX: Create Project With Manifest”.

Note that there will be another prompt for you to select the type of the project; go with Standard, so just tap enter to proceed.

Then, give the project the same name as you gave to the remote repository we created:

You’ll then be prompted to select a parent folder for the project. I chose, once again, the folder where I keep ‘em all.
Local Repository
Okay - so now we have a repository in Bitbucket and a project in VS Code, but they aren’t talking to each other yet.
The next step is to create the local repository, as opposed to the remote repository we created earlier in the Bitbucket (or Github) service. Few ways to go about it; we can do it from the command line or we can do it from the VS Code.
Let’s first take a look at the VS Code approach:
First you’ll need to look for the Source Control pane in the VS Code; it should look like this; the branch there is a bit of a giveaway. Once you find that, click it, and you’ll see the options to initialize a repository in the folder or publish to Github.
Now, as we want to initialize the repository, we obviously want to click on the “Initialize Repository” button.
When we click on that, VS Code and its integration to git does its magic.
Alternatively, on the command line, we’d just need to be in the correct folder and issue the command “git init”.
The end results are the same - we see that the directories and files that establish this folder as a git repository are created. So in essence, we now have our local repository.
Now… this is about the time you really need to have the basic understanding of how git works. I’ll be explaining the steps to go ahead, but you’ll need to apply some elbow grease of your own here.
What just happened is that we have initialized a git repository, and we have a bunch of files in the same folder, but the files have not been added into the repository.
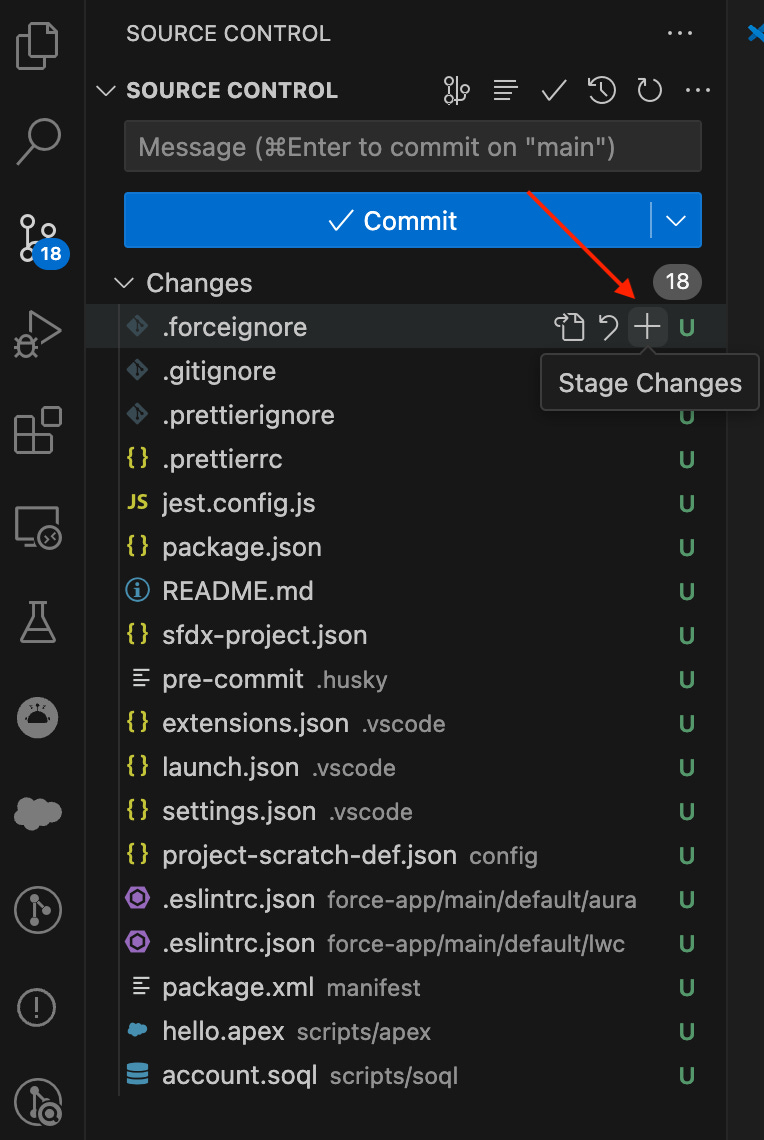
If we look at this in VS Code, we’ll see that all the files are tagged with the green U letter - it means untracked.
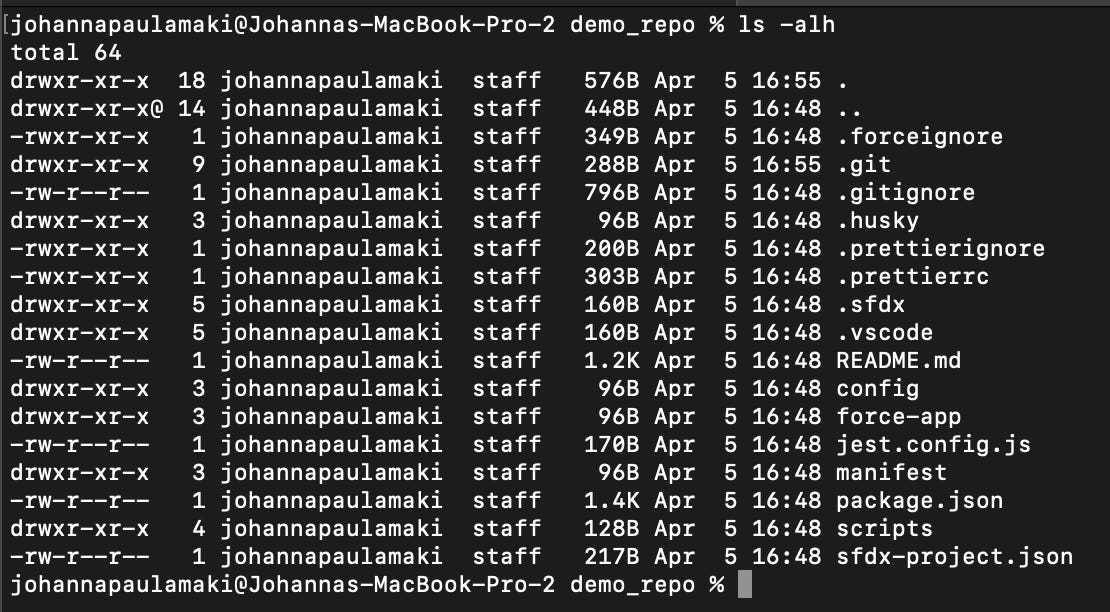
Issuing command “git status” on the command line, we’ll see the same, but with more color (clearer, if you ask me 😋):
git is even telling us what to do next; there’s the subtle hint of “git add” in the picture.
We could issue the command “git add .”, in the terminal, which would add all the files to the repository, or we can add them in VS Code.
Now, there’s a bit of (if you ask the neurodivergent literal thinker me) annoying departure in the terminology. The command in git is add - “git add file” will stage the file to the local repository so that it can be committed later on.
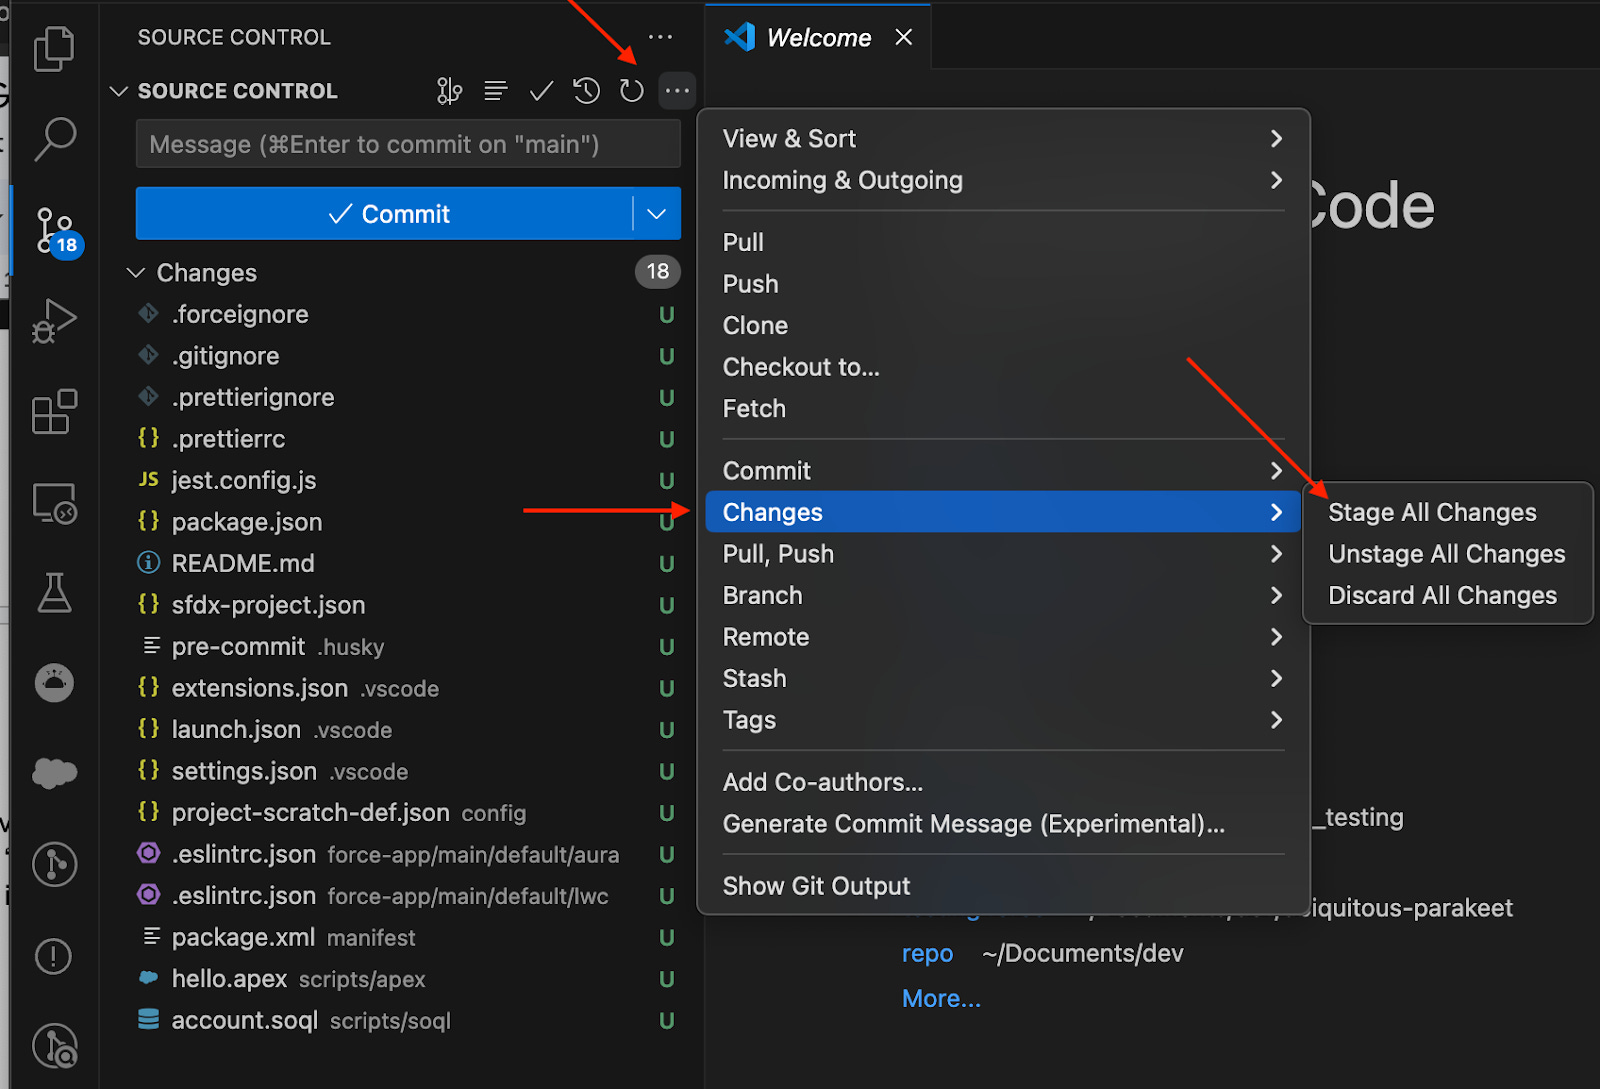
Anyway - as the terminology is “staging”, the VS Code follows that, and you can either stage individual files by clicking on the + sign next to them or you can go through the three dot menu on the top right to stage all files.
Woohoo! We’ve now added all files and folders to the repository, except, as you know, those ignored as defined by the .gitignore file.
Next step is to commit the changes to the local repository; “git commit -m “commit description” command will do the trick, as would doing the same from the VS Code.
Here’s a screen capture of the commit button, but let’s do it from the command line for a change; if you click on the “Commit” button, the VS Code will prompt you for a commit message.
Linking local and remote repositories
Aight. We now have the VS Code project files added to the local repository, which is awesome. How do we get them to the Bitbucket?
If we look at the Source Control pane now, we’ll see the “Publish Branch” button. Clicking on it, we’ll see options to publish it to Github. This happens, because I’ve used Github with VS Code.

So… because of my hard headedness and ‘cos for those aforementioned Reasons™️, I’ll first have to set up the Bitbucket as a remote repository in VS Code or in the git.
As it was in the early days of smart(er) phones, when folks used to say “there’s an app for it”, almost with nearly the same level of enthusiasm as TV Shop’s announcer goes “But wait, there’s more”, well, there’s a VS Code plugin for that.
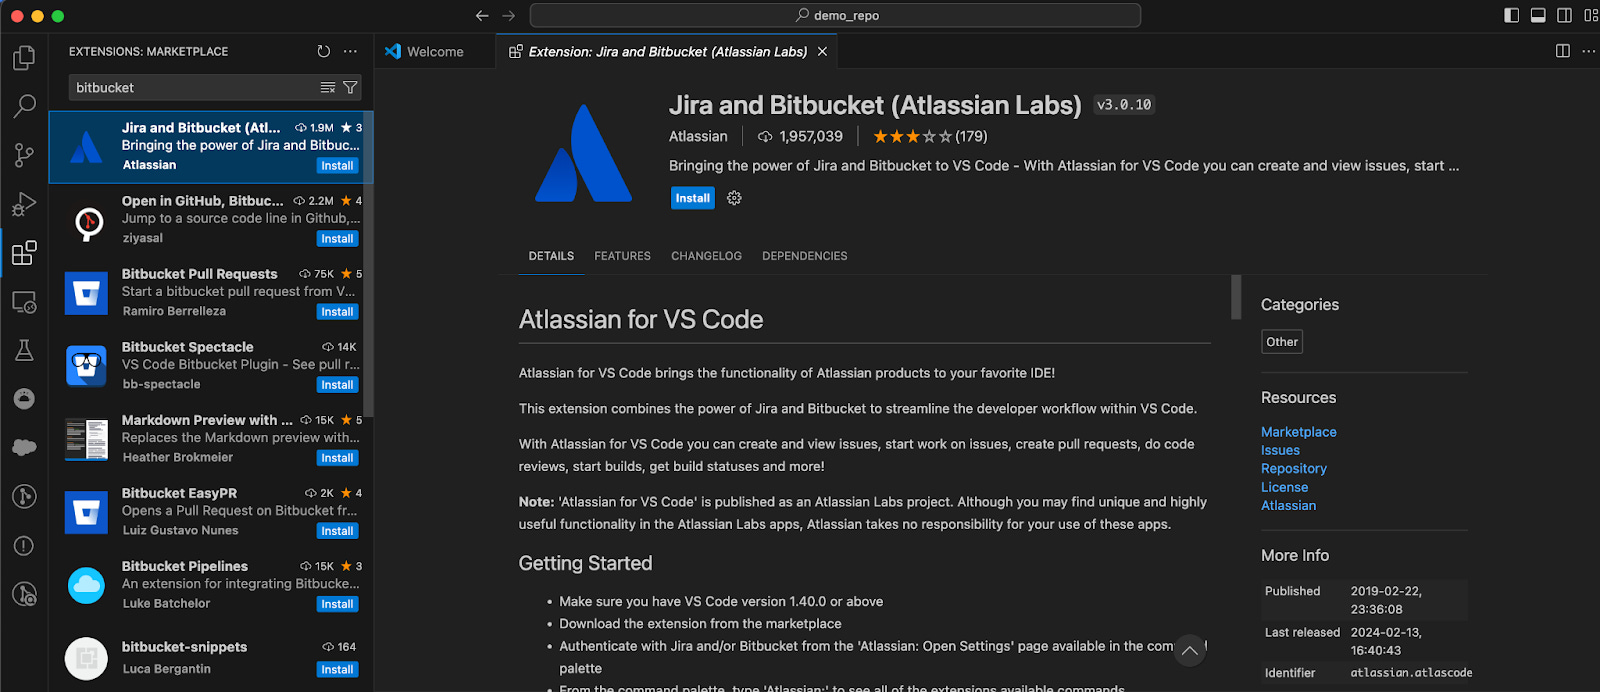
So back to VS Code - look for the Extensions pane on the left side menu, type in “bitbucket” and search. You should find this extension - click on “Install”.
Then, once the extension has been installed, based on your needs, you can enable either Jira, Bitbucket or both before proceeding to the authentication phase. Default is both and the page says you can enable / disable them later on.
Click on Next, then select Bitbucket Cloud, and you’ll be prompted to start up a web browser based login. Note that by default, at least on Mac, the latest web browser window you’ve used will be used to log in, so it might be a good idea to check that the last browser you used is the one that is linking to the Bitbucket account you want to hook up to.
Like, for example, here while writing this and walking through the steps, I’m running two Chrome profiles, one of my own, and one of my employer’s, which is hooked up to my workplace’s SSO, which in turn is hooked to the said workplace’s Atlassian instance (and the Reasons™️ just clarified, like a lot, right?) - while my own profile on Chrome is hooked to my private google account, which hooks me up to my own Bitbucket account.
Anyway. So open up the right browser, hit the reload page button, then click on the cloud login thing, and grant access to the right account.
Now we have access; then we’ll have to add the remote repository.
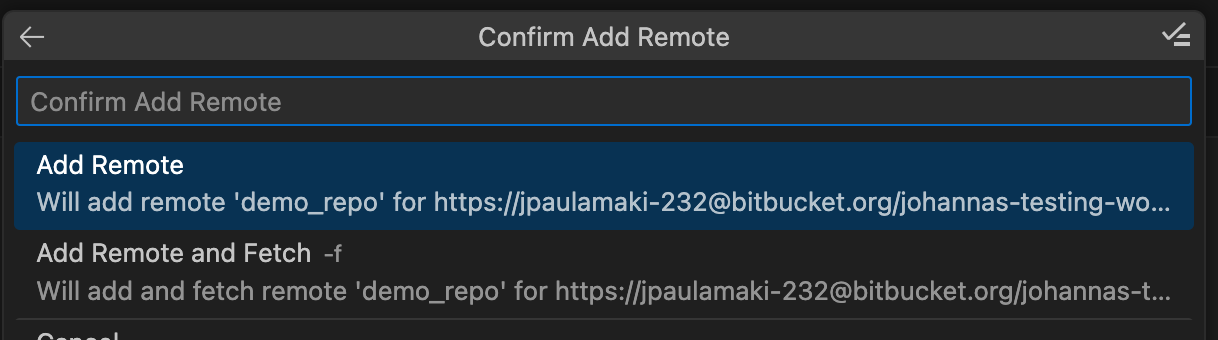
In VS Code this gets accomplished by first opening the Source Control pane, then at the fairly close to the bottom, we’ll find a small accordion tab with label “Remotes”. Expanding that, we’ll see a + icon, and when we click on that, we get first prompted for the name of the repository, then the URL for the repository, and then lastly, whether we want to do fetch operation to get files from the remote repository to our main branch. As we know that we created the repository empty, thus there are no files to add, we’ll select the “Add Remote”.
On the command line this would be in the lines of
“git remote <name of the repository> <url to the repository>”.
Then we get to click on the “Publish Branch” button, which will, without much ado, push all the files from the local repository to the remote repository.
Salesforce org metadata & version control
Now… how the heck does this help us with version control between orgs? Bear with me.
Yay! Now we have our local and remote repositories in sync, both have the same files.
How this works, more or less:
We have the SFDX project in both local and remote repositories
Alternative approach for this bit
We’ll clone the remote repository into a new local repository
We’ll link the new local repository with a salesforce org (presumably this would be a dev org) by using SFDX, optionally with VS Code
We’ll create a development branch off of the local repository main branch
We’ll make changes in the org, which will be reflected in the in the org metadata
We’ll download the changes in metadata that we’ve made into the local repository’s new development branch
We’ll push the development branch to the remote repository to be reviewed
We create a pull request to enable code review before we allow changes to the main branch
We’ll then review the changes and merge the changes made in the development branch into the main branch
Step 1: We have the SFDX project in both local and remote repositories
We’re here already, nothing to do.
But as there exists a shortcut for the whole thing that is a bit more straightforward and doesn’t require us to even create the remote repository as empty, I want to share an outline of that with you.
The only real difference between these approaches is that by default, VS Code will create the Salesforce Project in a subfolder of the folder you specify to it, i.e. if you specify folder “tmp” and define project name to be “force_project”, you’ll end up with a folder “tmp/force_project”.
But as the folder location is not what defines the Salesforce project, it’s the file & folder structure in a folder, you can simply move the contents from the “tmp/force_project” to the “tmp” folder if you want.
Anyway, so rather than first creating a remote repository, then local repository and then linking them, we could do this:
First, create remote repository, just as we did previously, except you don’t even have to create it empty
Second, rather than creating the Salesforce project in an empty repository folder, what you’ll do is to clone the remote repository to a local one, just as we’ll do later on (see step 4)
Third, we’ll use VS Code / SFDX to create the Salesforce project in the local repository we just cloned from remote repository
Fourth, we’ll add, commit & push the Salesforce project files to the remote repository’s main branch, optionally bypassing the pull request process, because we’re just setting up the project baseline
Step 2: We’ll clone the remote repository into a new local repository
First, fire up the browser and navigate to the Bitbucket repository. There, near the top right corner you’ll find a button labeled “Clone”. Click on that, and you’ll get a new dialogue window with a few different options.
There’s the very simple “copy” button to copy the “git clone <repository url>”, which you can use on the command line; all very simple.
For me, as I’m on mac, there’s also an option to clone it with Sourcetree, for windows it’s likely something else - but I expect that most platforms will also show the “Clone in VS Code” option.
Clicking on that will get you (or at least me) a dialogue window confirming whether I want the browser to be able to open VS Code; let’s say that we do, and click on “open app”.
As I’m in an existing folder that has version control set up and all that, I get prompted what I want to do - and as we want to clone a new copy, let’s just hit enter here.

Next, we’ll get prompted for a folder location. What will happen is that the repository we’re cloning from remote to local will use the same folder name as the original, which in this case is demo_repo, so because of that I created a new subfolder in my dev folder to keep these two separate and selected that as the place.
Then the VS Code will work some of its magic to clone the remote repository to be a(nother) local repository, and once it’s done, it will ask if we want to open the new local repository or add it to the current workspace.
To keep things simple & separate, let’s keep ‘em separate and click “open”, which will predictably open us the new local repository.
If you click on the Remotes accordion tab under the Source Control pane, you’ll see that the bitbucket account where we cloned this new local repository from is already set as its remote repository - to quote the A Team - “I love it when a plan comes together”.
Step 3: Link the new local repository with a Salesforce org with VS Code
Now we have a shiny new local repository. What are going to do with it?
We’re linking a dev org to it, is what.
Now - the process of linking VS Code to an org is the same regardless of the type of the org; the only real difference is between sandboxes and production orgs, where we’ll log in via either “test.salesforce.com” or “login.salesforce.com”, respectively.
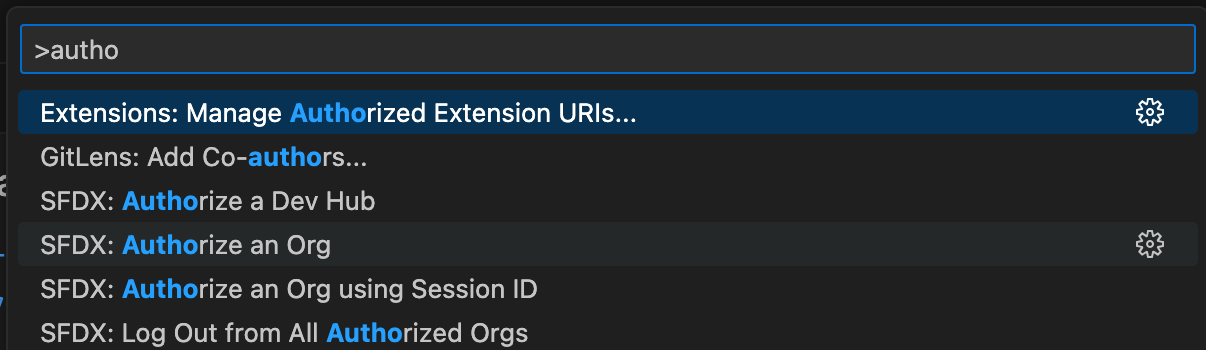
To get started, in VS Code, use your favorite method to pull out the command palette, then type in some initial version of “authorize” and once the list narrows down a bit, select the “SFDX: Authorize an Org” from the list.
Next you’ll be prompted to provide a name for the org - it’s just a label for you to recognize this particular org, so let’s for now go with demo-repo-dev-1.
Regardless of the org type, have your username and password available for that org, and again, remember that VS Code will fire up the login process in the most recent browser you had open.
Then we’ll select the type of the org; production or sandbox. For this exercise, I’m using a Trailhead org, which all are “production” orgs, so I’ll select “Production”.
Next we’re prompted for the username & password; any login option that will get you into the right org is valid. After username & password you’re still prompted to make sure you actually want to give Salesforce CLI tools from your local computer access to the org; perhaps unsurprisingly, we’ll select the grant access option.
…and here we are! The Salesforce dev org is now connected to the VS Code, which is also connected to the local clone of the repository we created.
Step 4: Create a development branch off of the local repository main branch
Right - now it’s time to create the new branch. This can be done in VS Code, but for the sake of the exercise, let’s do it in the command line:
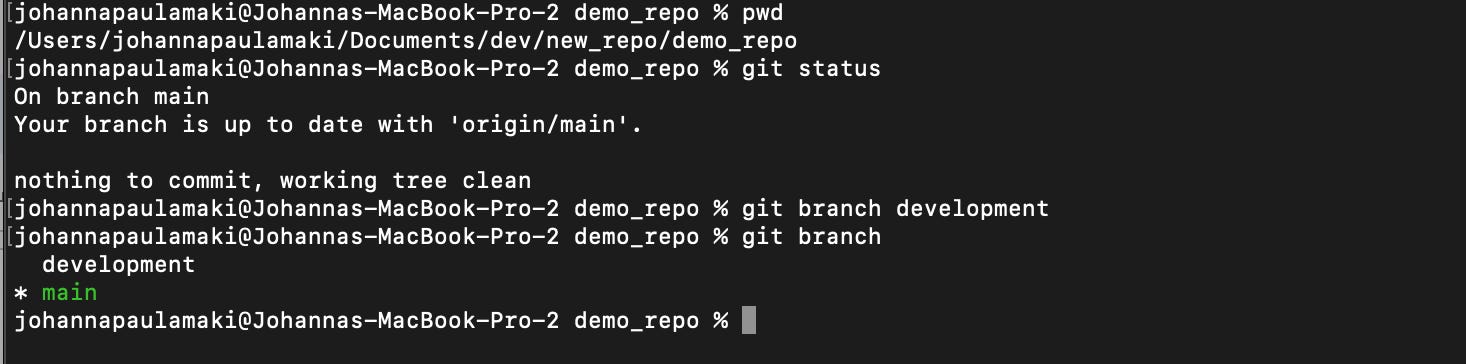
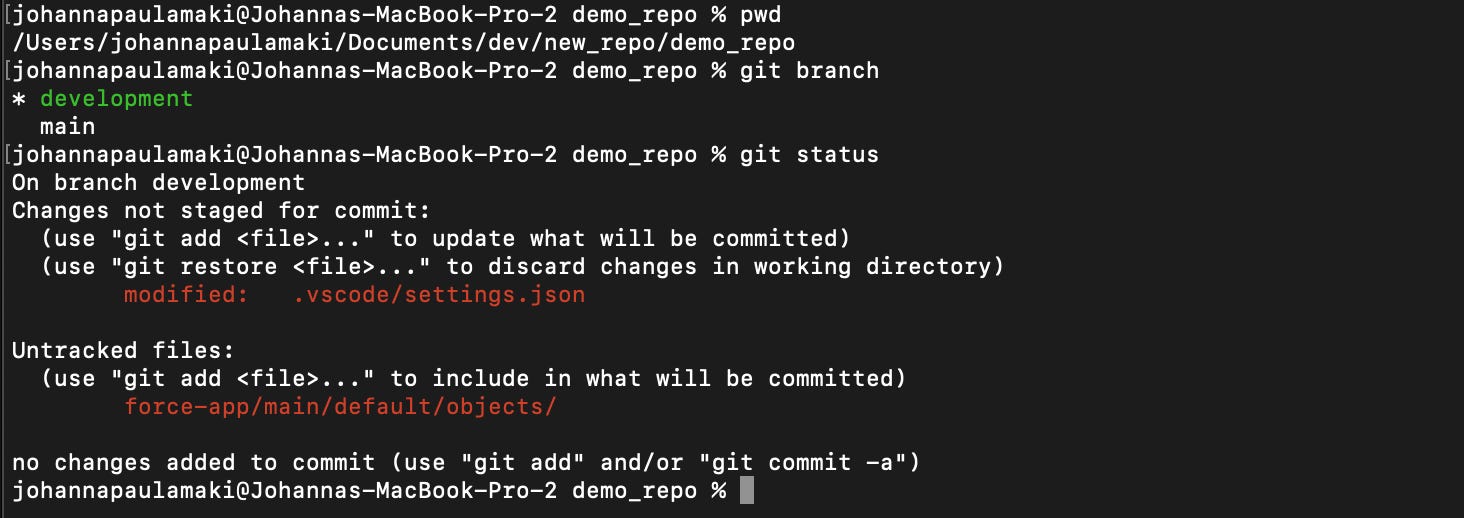
You’ll see that I start with “pwd” to make sure I’m in the right folder; this is the demo_repo folder under the new_repo folder I created for this purpose, to make sure I won’t make mistakes between the two.
Then I check with “git status” what’s going on; everything is exactly as it should be, so I create the new branch with “git branch <name of new branch>”, then check that the branch was created and which branch I’m on with “git branch”.
Now, again, let’s head to VS Code. There we can check in the Source Control pane the Branches accordion tab, where we’ll see that the current branch is Main, but the branch “development” we just created is visible there.
Then we’ll switch to the development branch, either command line “git switch development” or in VS Code; there are several options, for example click on the “development”, outlined in green in the pic, then the arrow symbol there that looks a bit like mirrored “enter” symbol on your keyboard. You’ll then be presented with a dialogue window to confirm that you want to switch to branch “development”.
So let’s hit enter there to confirm that we indeed want to switch to the development branch.
Let’s also go and see where we’re at on the command line:

And we’ll notice that we’re exactly where we want to be. So we’ve created a local branch and switched to it, so any edits or additions we make to / in this folder will now be registered against the development branch instead of the main branch.
Step 5: Make configuration changes in the org, which will be reflected in the in the org metadata
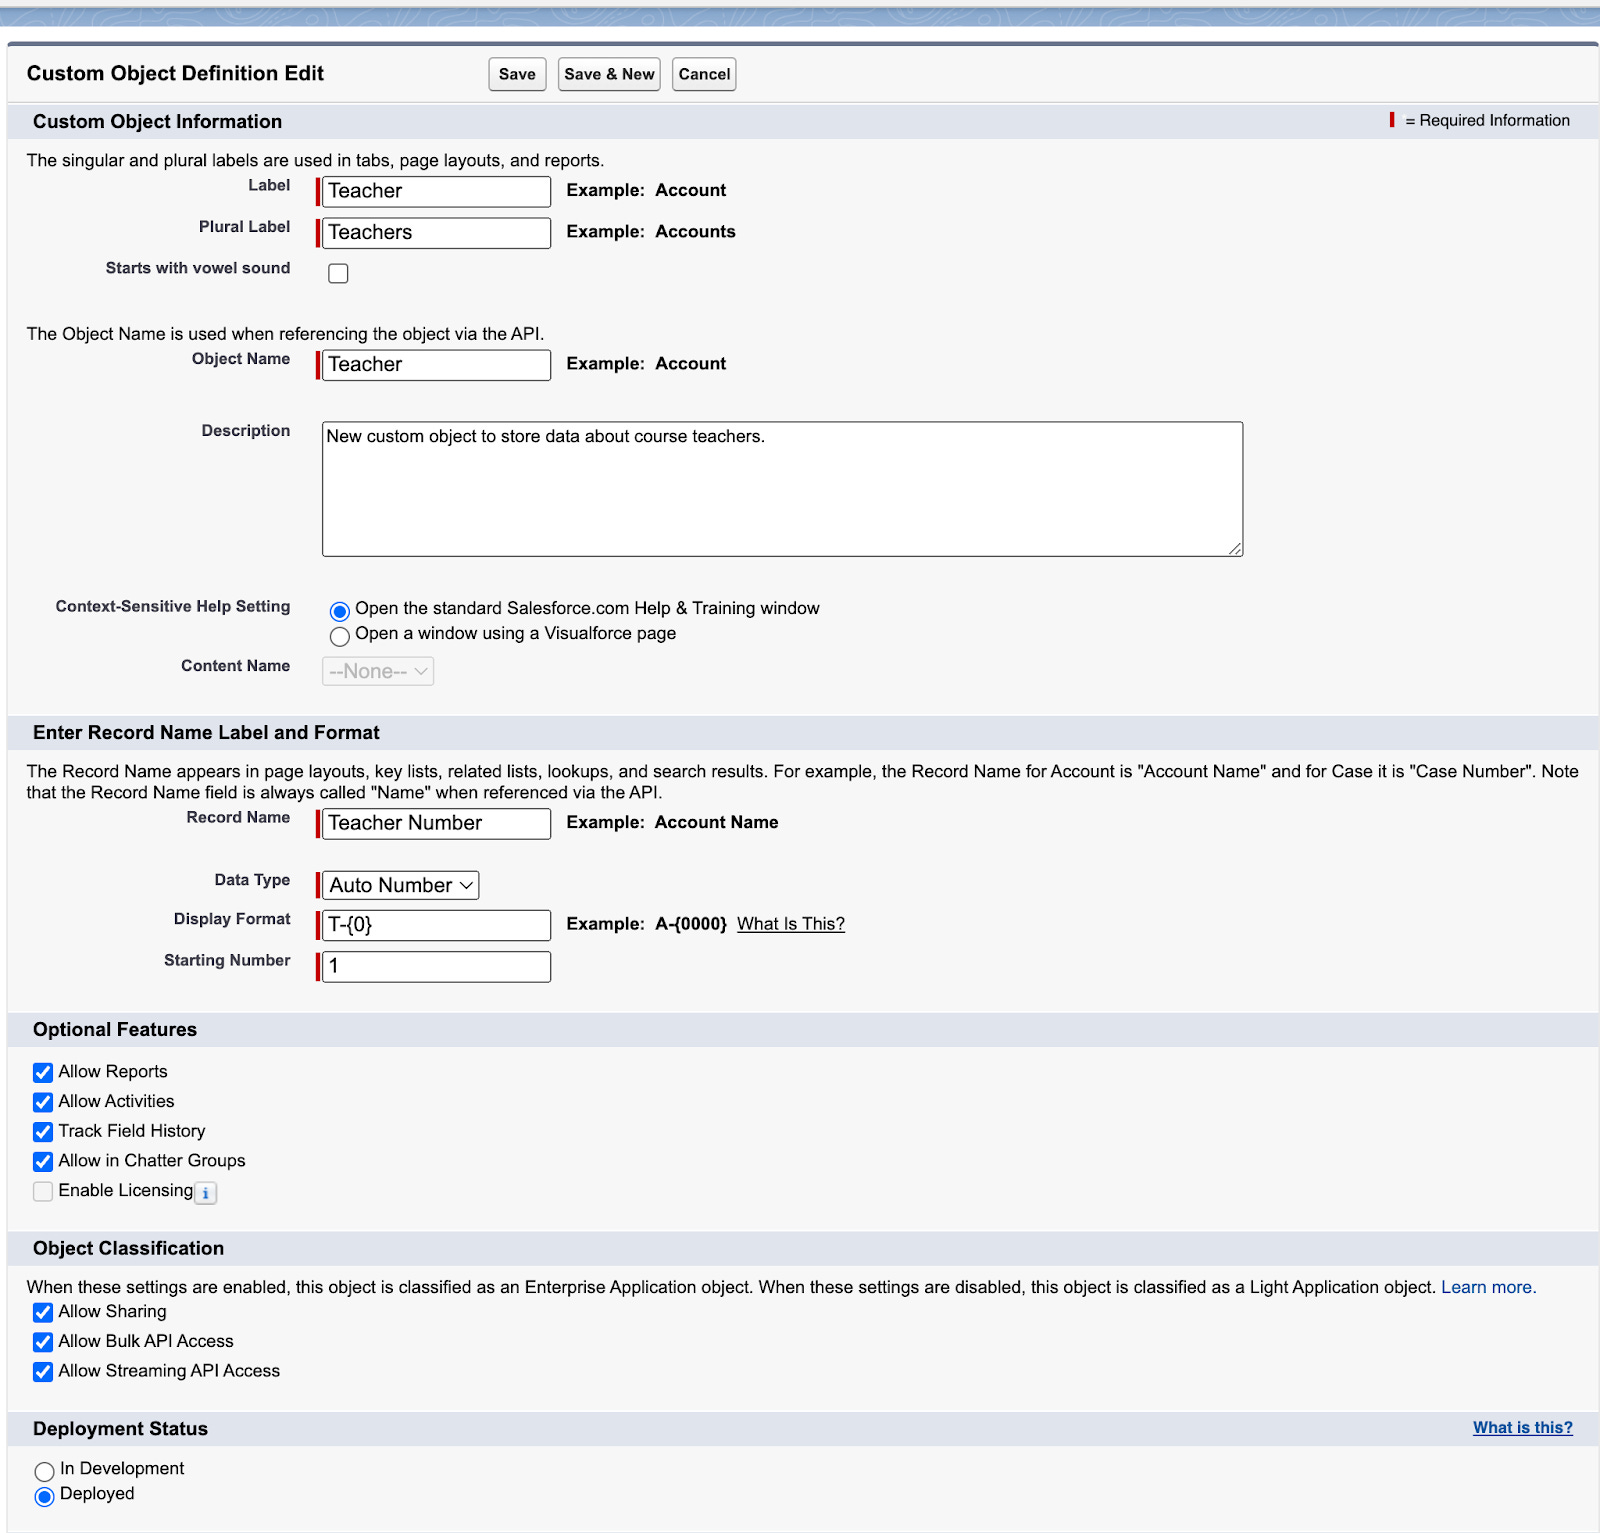
Let’s make some changes in the dev org metadata. I’ll create a new custom object and add a few fields to it.
In principle you can do all kinds of wizardry with SFDX command line tools, possibly even create objects, fields etc, or you could, if you remember the syntax well enough, just create new XML files and import them into the org, but for now, let’s go via the traditional route, i.e. through Setup, Object Manager and Create and Create Custom Object.
I’ll call the object Teacher, tag in plural Teachers etc, checking most boxes, except the vowel sound one, ‘cos T isn’t a vowel; all very basic stuff - if you’re reading this, you know all this by heart already, right?
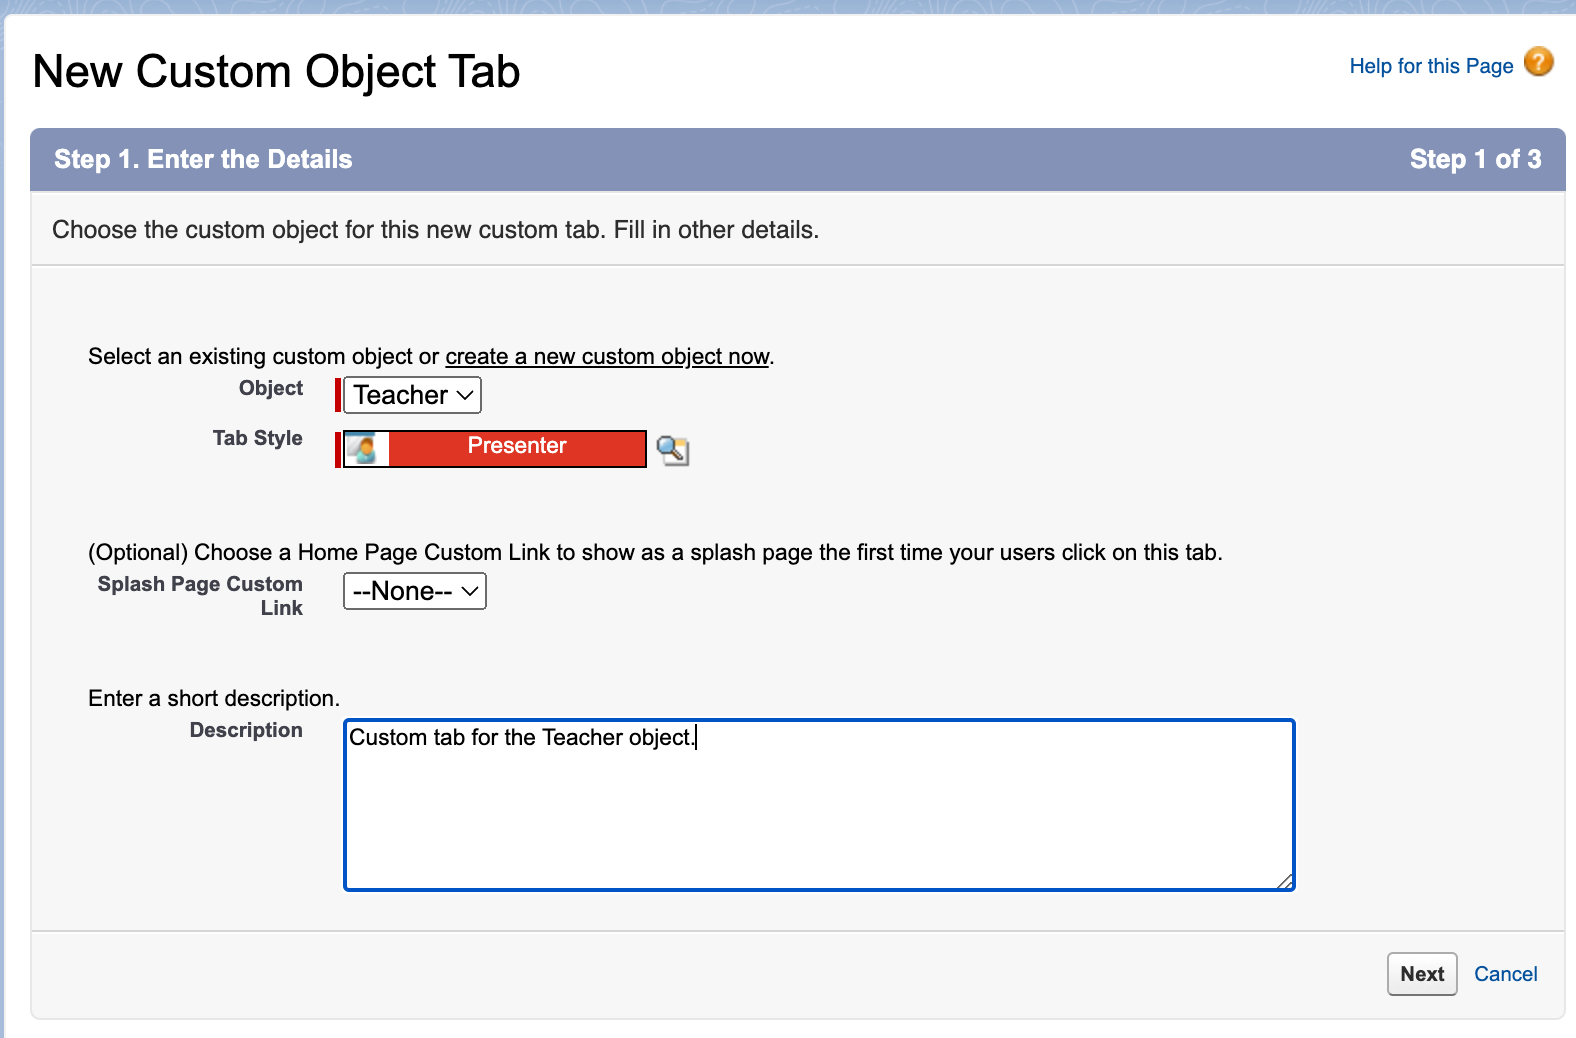
After I’d created the object, I also created a custom tab for it:
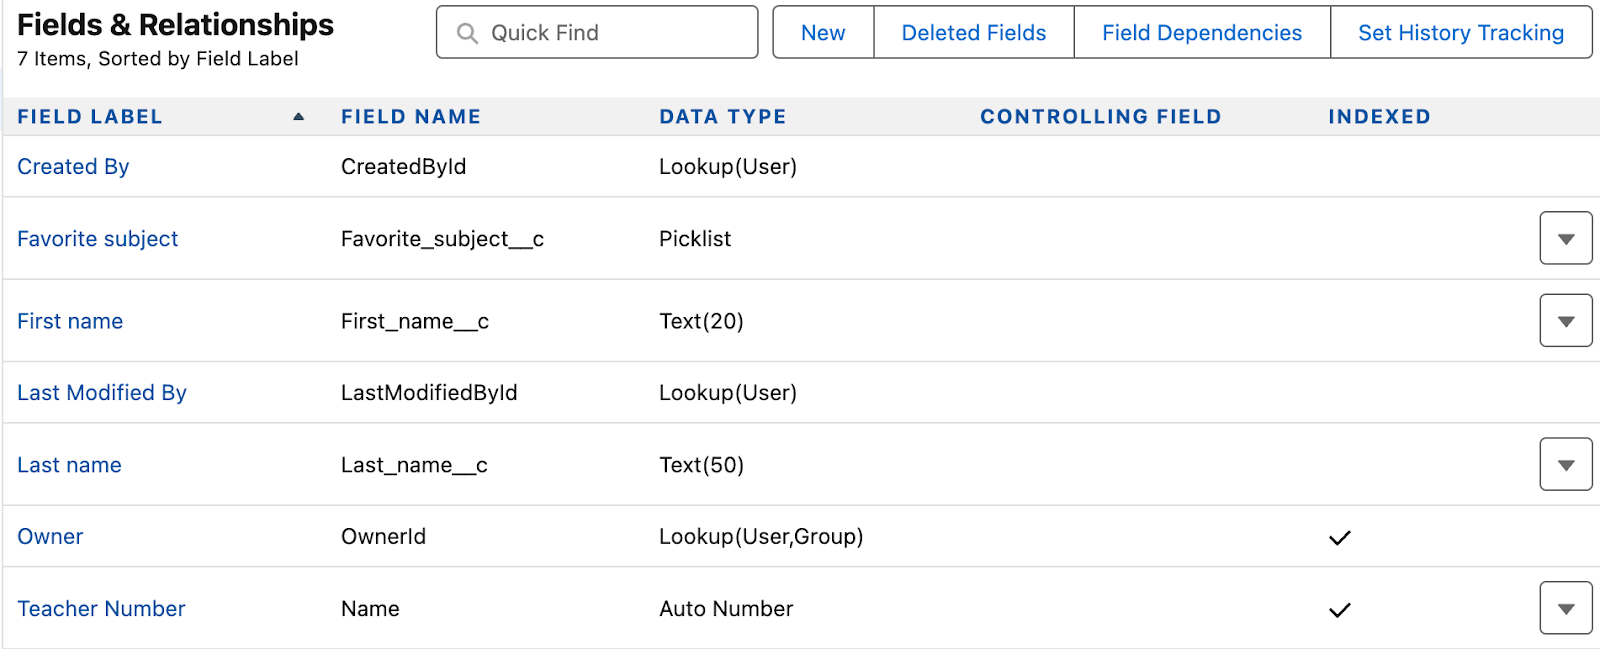
As most teachers are people (for now, at least), I also added a few custom fields to help identify them:
Now - as per Salesforce’s new sharing & visibility best practices, I wasn’t even able to define users CRED permissions while creating the object; fields yes, object no - but I didn’t grant any FLS for users through profiles, so let’s still go & create a permission set to go with this config:
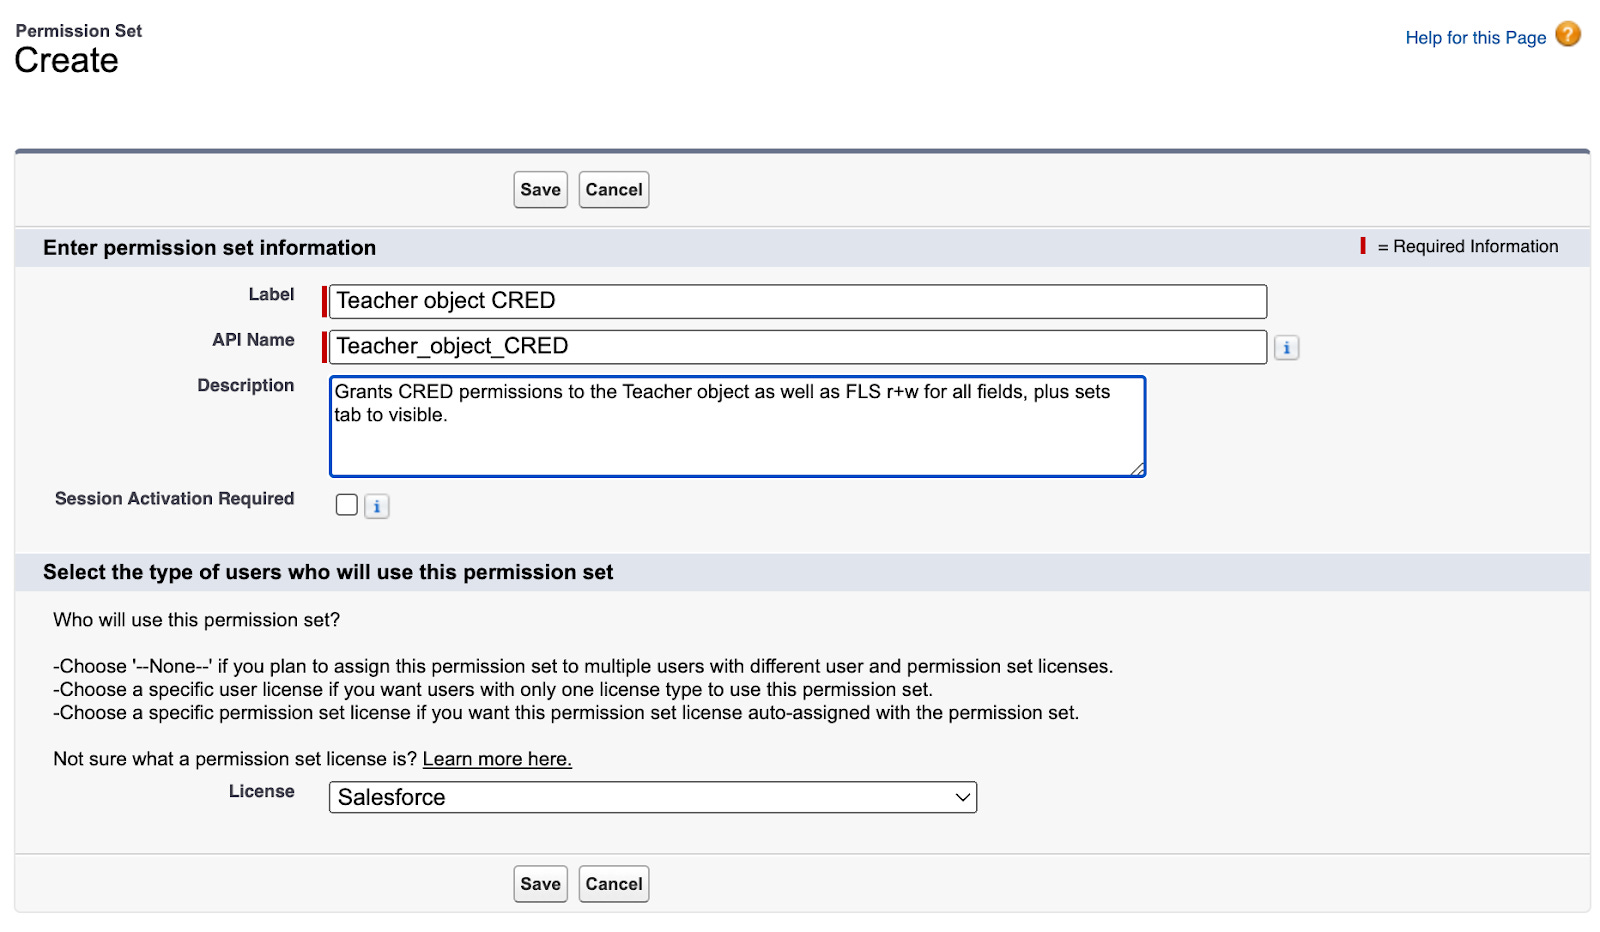
Yes, I really always fill in the description; call it a lesson learned the stupid way…
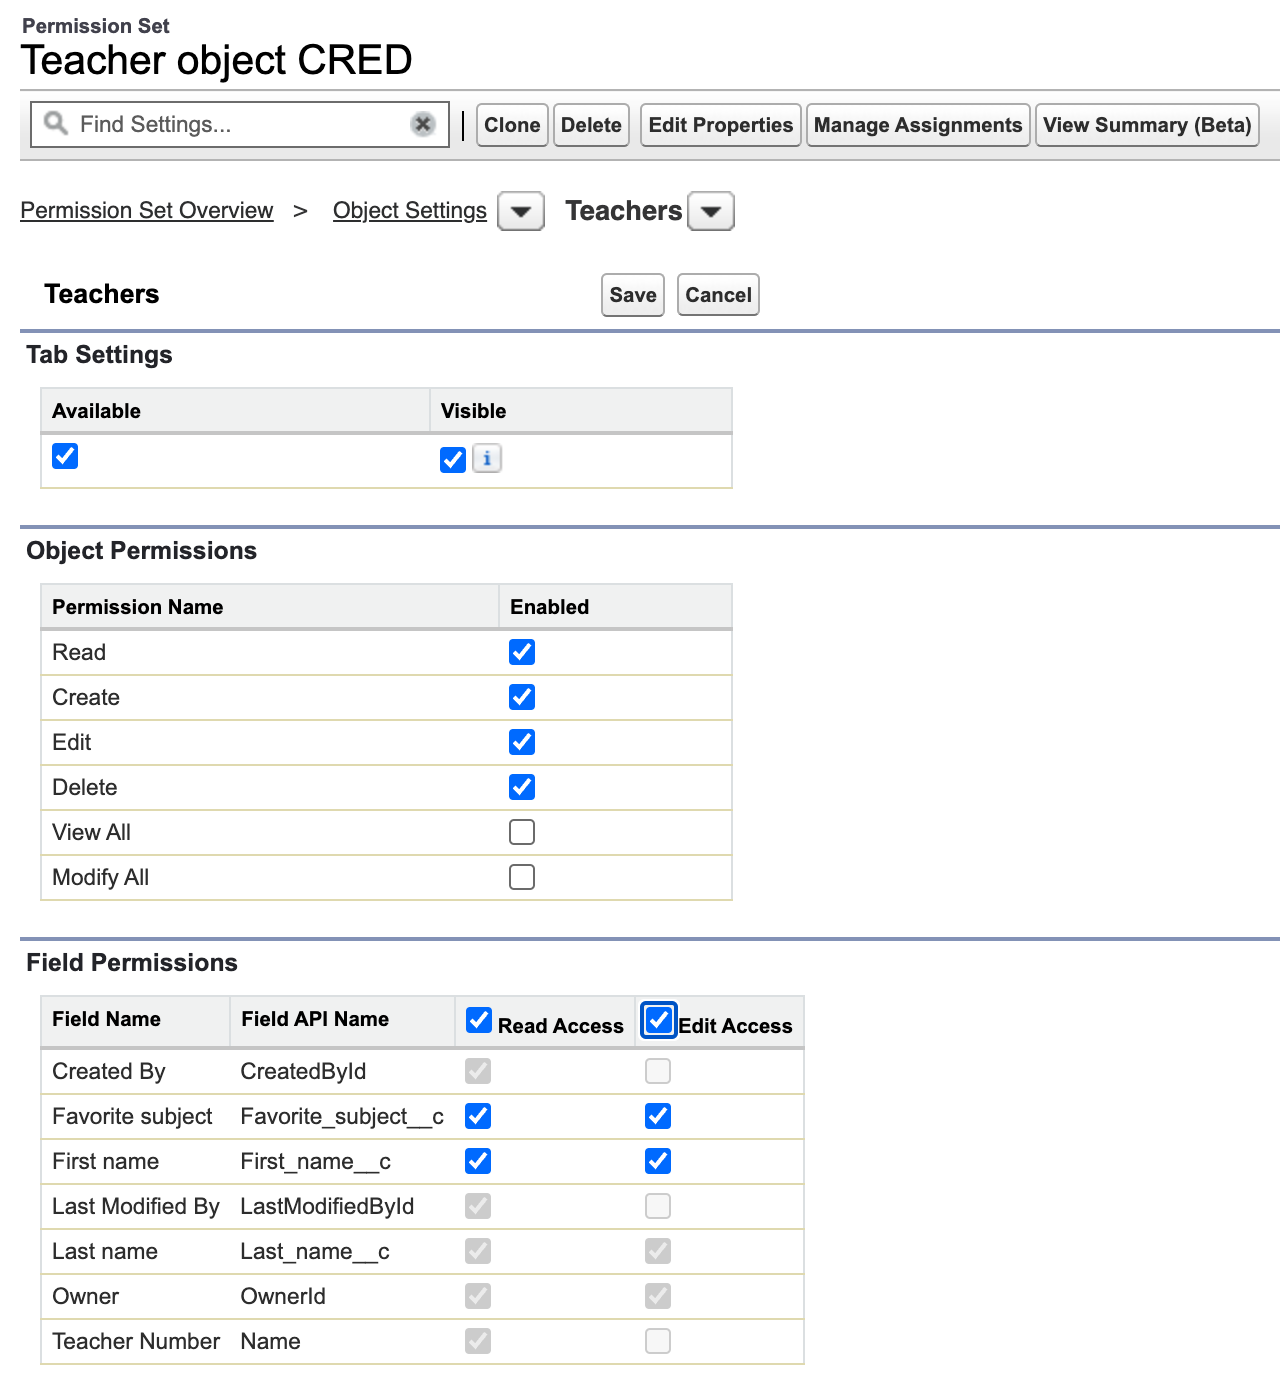
…and when you tag a License that may grant visibility to this object, you get to define the tab visibility nicely; if you don’t, then you can’t define that in the same permission set, so I set that to Salesforce.
…and once saved, I assign the permission set to my user to be sure I’ll avoid any inconveniences in the following steps.
Step 6: Download the changes in metadata that we’ve made into the local repository’s new development branch
Okay, now we have some updated configuration metadata in the org. The metadata isn’t yet reflected in the local repository’s development branch, because we haven’t added the configuration files there yet, so let’s do that next.
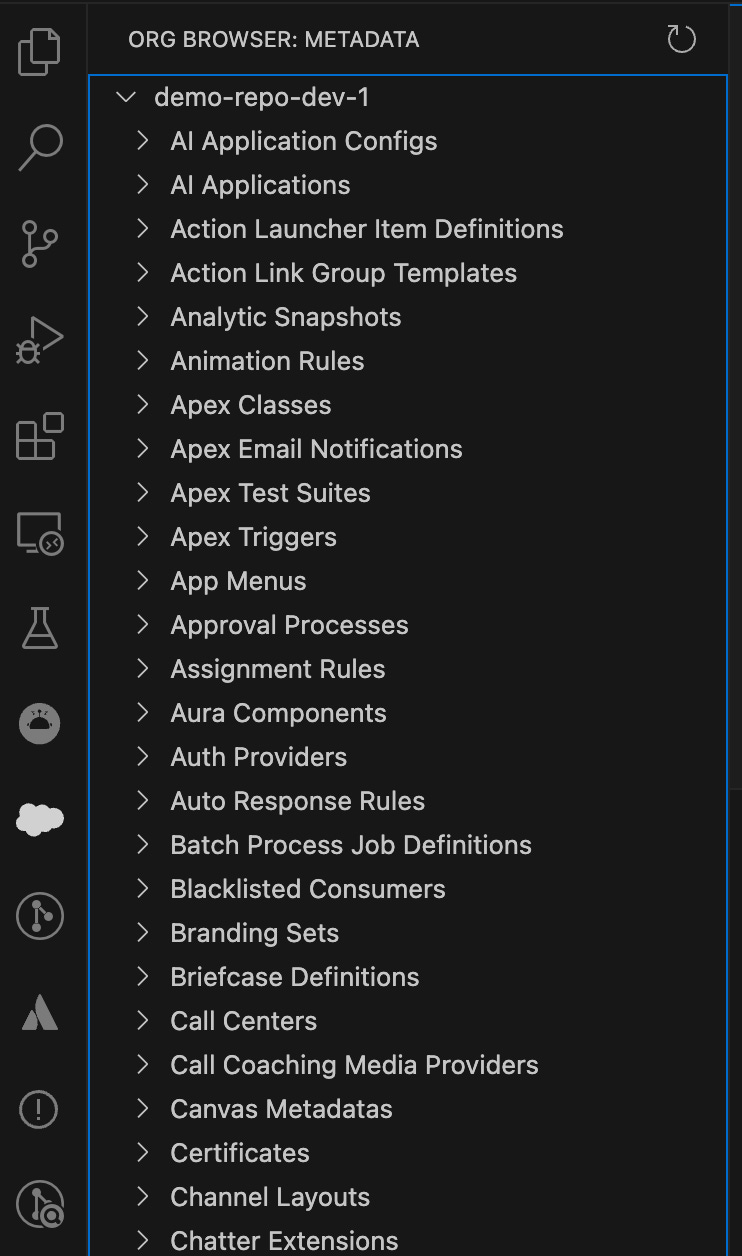
Fire up the VS Code once again, and locate the “Org Browser” pane; it’s the one with the cloud icon.
When you click on that, in the browser pane you’ll see the org metadata split into different categories. Look for a category “Custom Objects” and expand it from the left side arrow, then find the custom object you created (assuming you’re following along…).
Mind - once you expand the Custom Objects branch, you’ll also, with extreme logic, find most of the standard objects under the same branch; I don’t have any answer for you on that, but that’s where they are.
Now, when you expand your object, you’ll see that there are all the fields represented there. Not visible here, but included are also things like page layouts, list views and few other things that directly relate to the object and its function in the org.
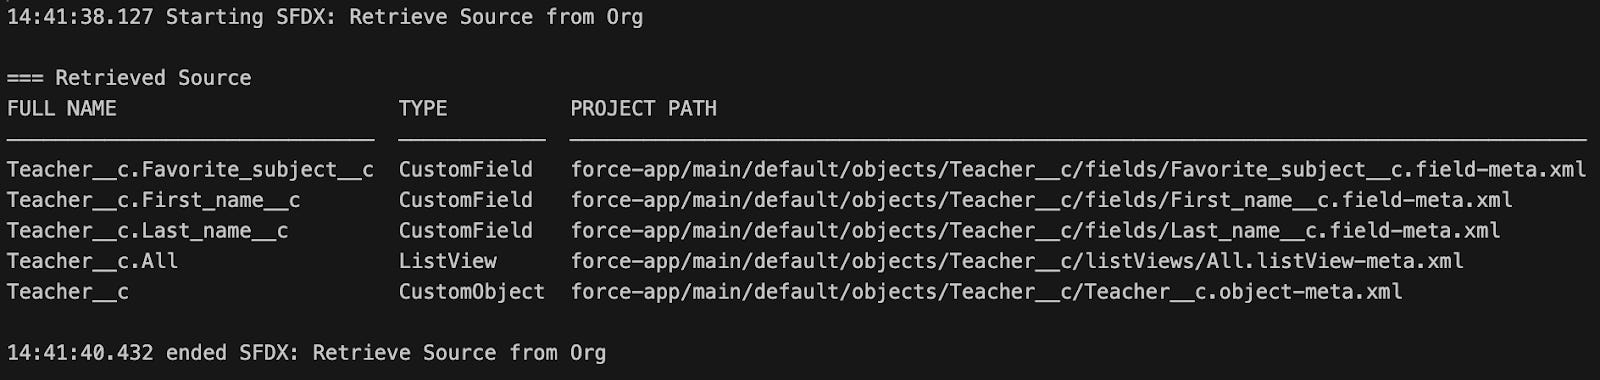
The subtle arrow points to an actionable icon that will download the source from the org; when we click on that, VS Code’s SFDX plugin translates our UI command to SFDX command line instructions…
…and when we look at the VS Code’s log view, we’ll see a flurry of activity, telling us how the operation of downloading the files to our hard drive is proceeding. Now, here the number of files is very limited and I’m on a fiberoptic line, so it’s quick, but here we are:
Looking at command line with “find”, we can see that files and directories that were created:
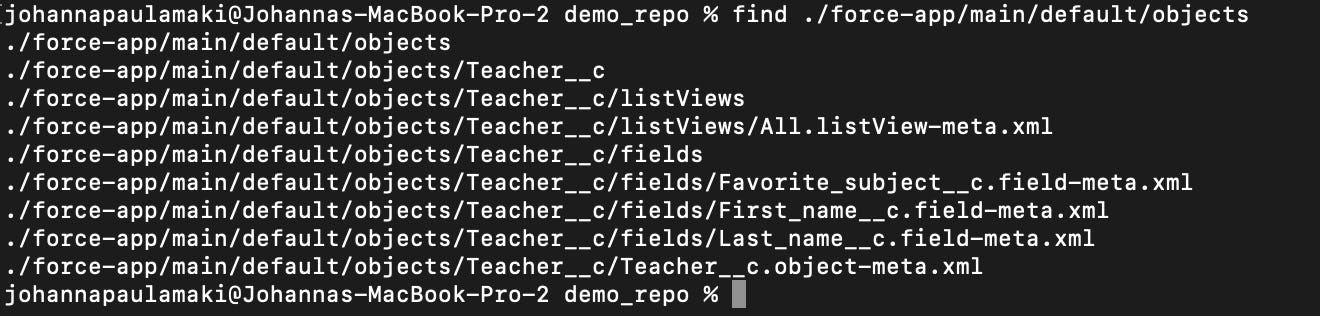
And “git status” on the command line tells us that we have new entries that are not tracked:
Now - here the “git status” shows us only the directory that was created, but as we saw in the previous pic, there’s the “Teachers__c” subdirectory in that “objects” directory, with its own subdirectories and files.
Whether we want to have VS Code config file(s) included in the repository is up to each of us; I think I’ll leave it in, just to have consistent experience in VS Code the next time I’m doing something like this.
So I’ll add (stage) the files with “git add .”:
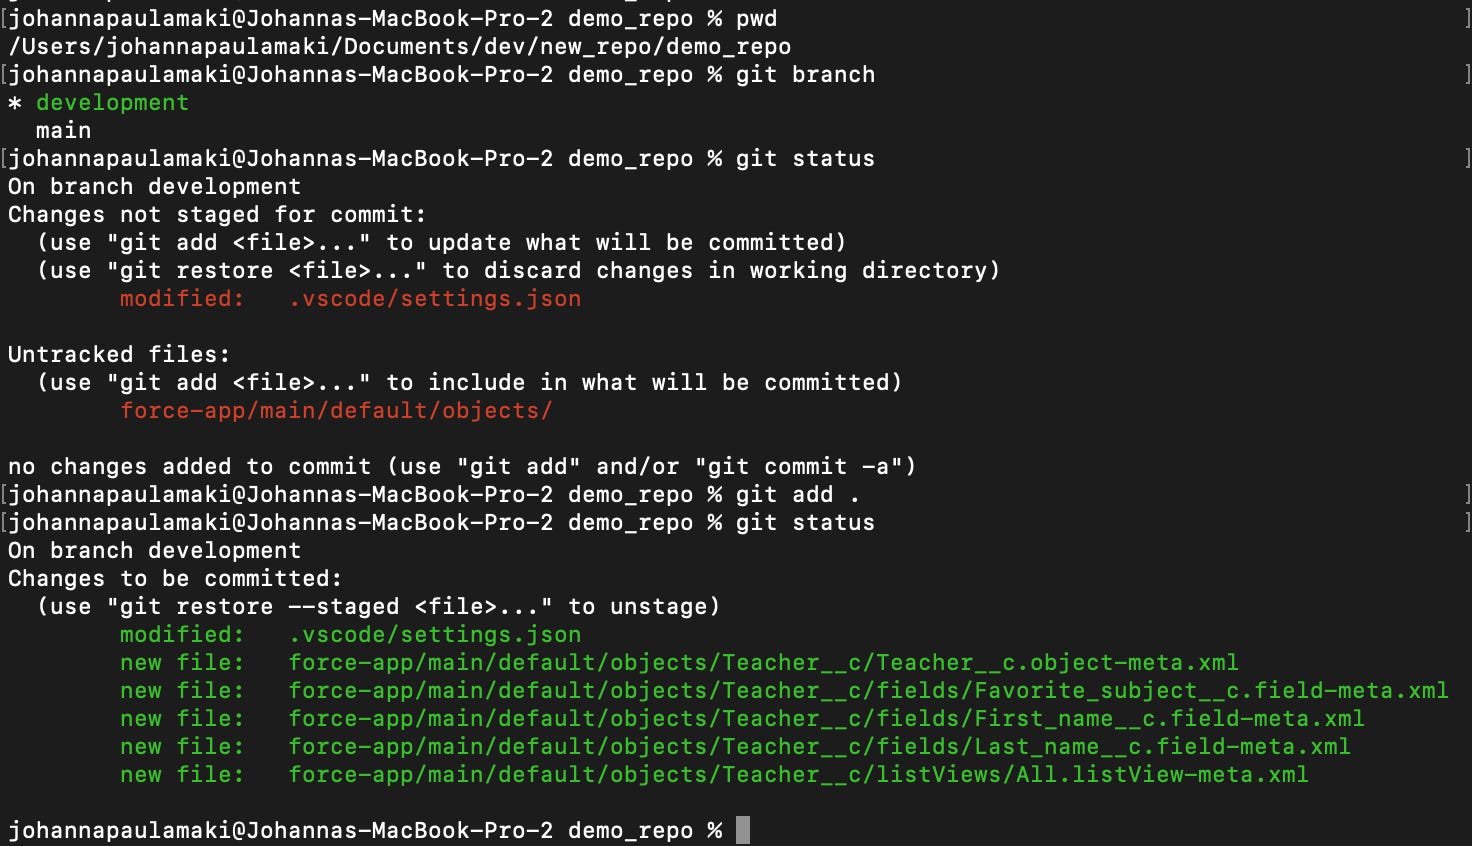
Plus I checked where I am, which branch I’m on, and made sure that the files and directories were actually added into the staging.
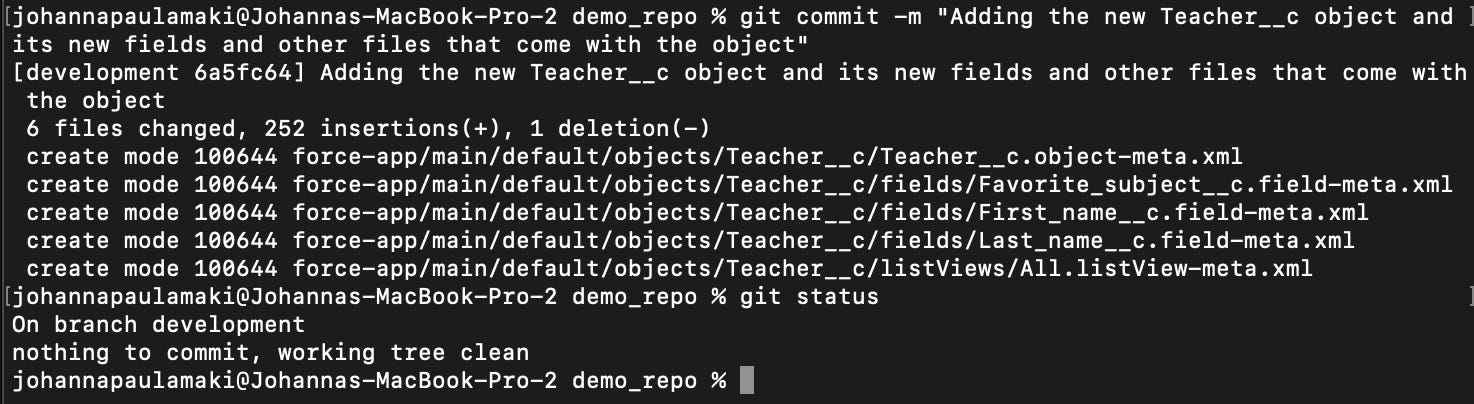
Next we’ll do a commit to add the files to the repository; you can do that with VS Code, for me the command line git is more intuitive - I’ve been tinkering with computers before GUIs were a big thing… which tells something about my age. Anyway, here we go:
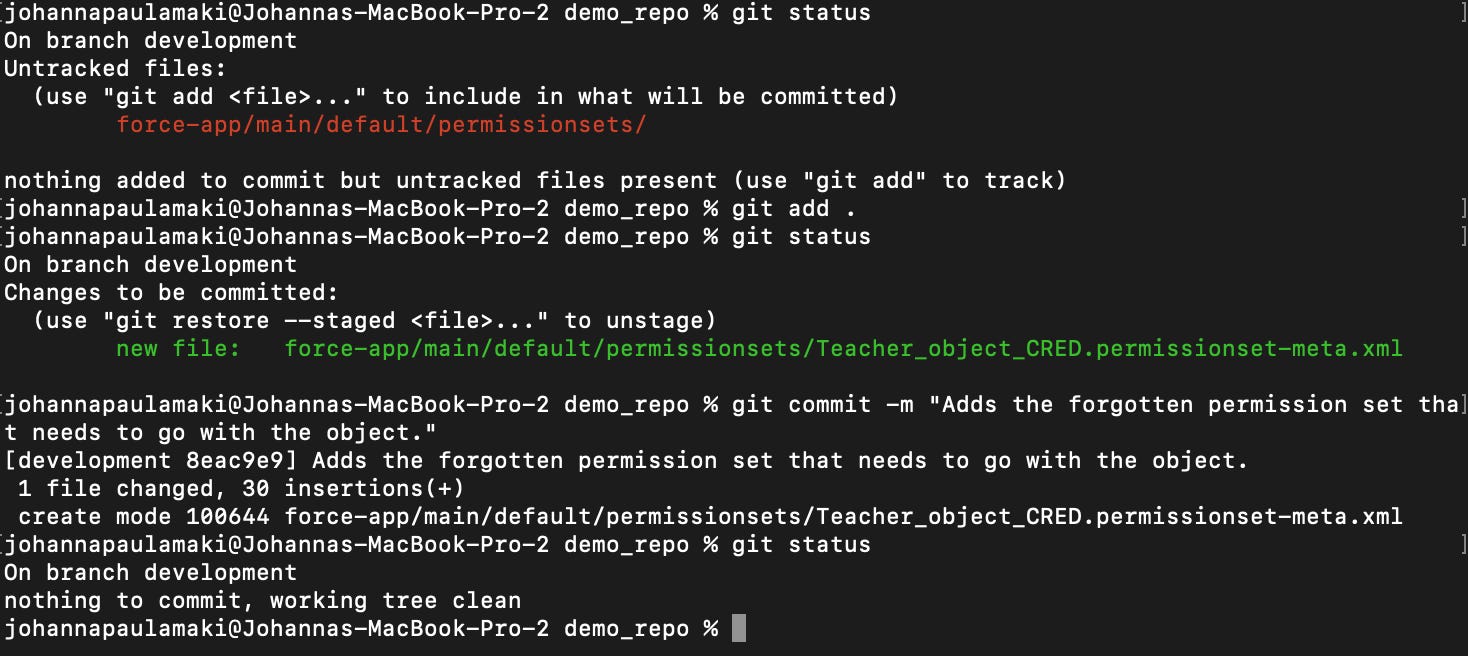
Now, of course, having gotten to this point, I remembered that we also created the darn permission set, so let’s wash, rinse & repeat a bit of what we just did.
The permission sets are found, predictably, under a section called “Permission Sets”. Won’t take screenshots from the VS Code download this time, you’ll find it, but here’s again the git’in part:
Step 7: Push the development branch to the remote repository
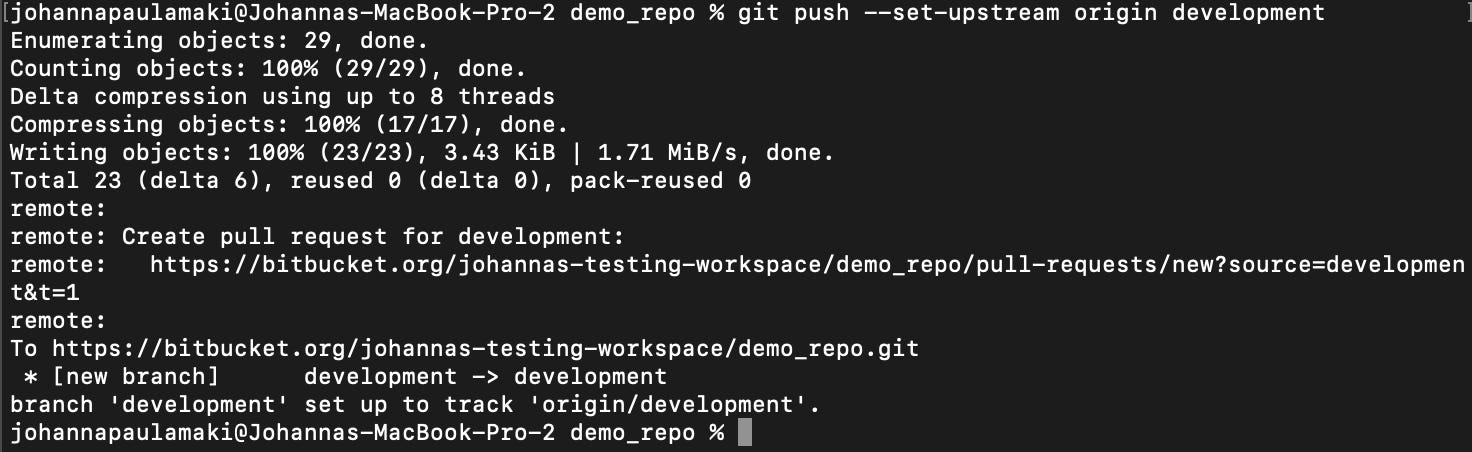
Time to push the changes to the remote repository. As we haven’t made any changes to the main branch (yet), effectively we’re just pushing the new branch into the remote repository.
With VS Code it’s just a click of the button “Publish Branch” in the Source Control pane; in the command line requires a few other bits to be included, because the development branch doesn’t exist in the remote repository, so we have to instruct git to first create the branch and then add the added items to the branch.
Step 8: Create a pull request to enable code review before merging changes to the main branch
Time to be creating a pull request, which is effectively a call for someone else to go through our code / configuration changes and accept the changes we propose to be made in the main configuration.
Head on to your version control site and project (or equivalent); I’m still using Bitbucket and here I have the demo project open, and I’ve clicked on the Branches navigation item on the left side, and it looks like this:
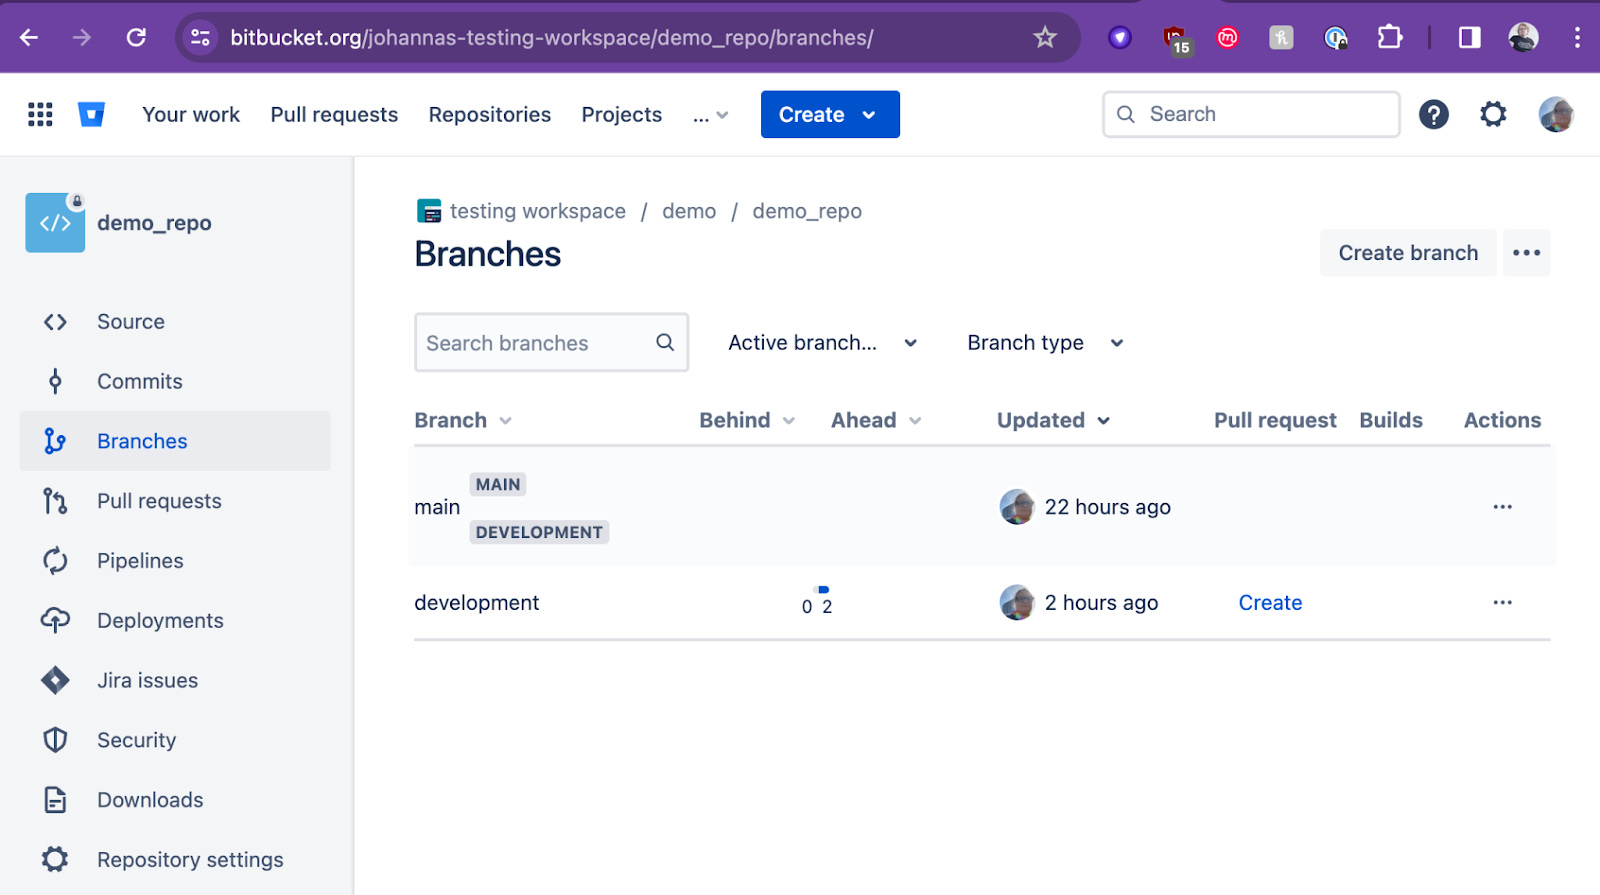
There we can see our two branches, main and development, main having been updated yesterday and development a while ago (had lunch in between here).
So what we’ll do is click on the “create” button on the “Pull request” column on the line that represents the development branch.
This will not immediately create the pull request; instead, it will open up a page where we can review nearly all details about the pull request: which branch will be merging to which, commits, commit comments in the description section, files, file contents, how each file has been changed - and so on.
Once we’re ready, click on the “Create pull request” button.
The display will only shift slightly, from a draft of a pull request to pull request review view; the two views are very similar, but the intent is different - creating view allows you to fill in and review information that you’re including in the pull request, but the review view’s function is to enable code (or configuration) review.
There is a lot of information going on in the user interface of the review view of a pull request.
You’ll see each file in the pull request, all their changes, whether the file is new to the branch it will be merged to, or whether it already existed and has just been modified.
We’ll see the file paths within the repository structure, there’s a possibility to comment the files and their content and so on.
For example, the file .vscode/settings.json file was edited, i.e. a version of it exists in the main branch, but we see that there are new and changed rows of information in the file, while all the other files were simply added - they’re new files, thus also all rows are new.
Step 9: Review the changes and merge the changes made in the development branch into the main branch
The whole point of this stage is to review the code, to make sure that we won’t allow bad code (or configuration) to enter the main branch; if you’ve ever coded, you know how easy it is to miss that one comma or typo that breaks everything - even with modern code assistance and AI tools.
So let’s review the code; for each file, we’ll take a look at it, then click on the “Viewed” on the headline of the file.
We know that these files are a-ok; they’ve been created through the Salesforce configuration UI, so in principle, they should be deployable from one org to another as they are, but there… are… people who may sometimes e.g. make changes directly to XML between org deployments to enable new functionality very quickly.
Like, for example, grabbing a country specific permission set group and its muting permission set , cloning the files, editing the XML files directly to refer them to a different country, have different names and so on, deployment time from country A to country B being approximately 10 minutes.
So - reviewing the changes might be more relevant in some cases than in some other cases.
Here I’ll just click on the “Merge” button and then again “Merge” in the dialogue window that pops up.
Okay, now what?
Righto. Now we have approved configuration / code in the remote repository. So how do we get that to the test & prod environments?
Easy way to do it is to pull changes from remote repository to a local repository, authorize VS Code to the next upstream org and use that to upload the updates there with VS Code.
And yess… we could have done it already with VS Code directly; do something in org X, download metadata, deploy the same metadata to org Y. I’ve done it many, many times.
Much faster than with all of this git business, for sure.
But then we miss out on the whole point of version control - and we haven’t even started touching into what happens when we have several people working on the same org, possibly even same objects, same code, and might end up in situations where we have to resolve conflicts between different development branches.
That is the why of all of this.
Some of the next items on my “learn new skills” include using more sophisticated tools to do some of the deployment stuff…
…so I’ll probably write more.