How to send emails from Flows to multiple recipients using Salesforce Email Templates

Aight. I had a problem, looked high, looked low and didn’t find a ready made solution, gave it some thought and elbow grease and now I have a solution, which I figure might be usable for some others - so here we go.
The Problem
Problem isn’t sending emails, nor is it sending emails with templates. Problem is, that when you use Salesforce Flow to send emails and toggle the Email Template, you can only enter a single recipient…
…and when you have multiple recipients to send the email to, well, that’s an issue.
Due to the limited number of emails to be sent in the particular use case I was working on, I was tempted to just stick the email action into a loop and be done with it, but that would have been all kinds of bad practice, so I decided that I need a better solution.
Another alternative I thought would’ve been to fetch the email template into the flow, insert it into a text template and try to work with that; I think that might have worked, but I decided against that too.
The Solution
The solution I came up with is that I created two flows; one to create Platform Events for the emails and another flow to listen to them and act on them.
The big picture is:
Create an email template
Create a custom platform event
Add custom fields to the platform event to contain the data we want to transmit
Create the flow to create the platform event
Flow fetches the recipients, identifying information for an email template and if needed, merge object record(s)
For each recipient, the flow defines a platform event record, each with unique recipient ID, ID for the email template and if needed, a merge record
The flow adds the individual events to a record collection and creates them
Create flow to send the emails
Flow receives a platform event and sends the email for each individual recipient
How, then?
Well, all of this is very standard in terms of functionality, and if you’re good with flows etc, you’re probably already good to go with The Solution part, but for those of us who are still learning some of the ins and outs of the platform, let’s dig deeper.
As a sidenote - Salesforce is very, very careful about not getting into spamming lists, for obvious reasons, and because I’m sending emails from dev orgs & such. Make sure that - especially for your production org - you have configured all the DKIM, SPF and DMARC settings correctly.
Platform Event setup
So, as I outlined in the Solution part, we’ll need a template, a custom platform event object and two flows.
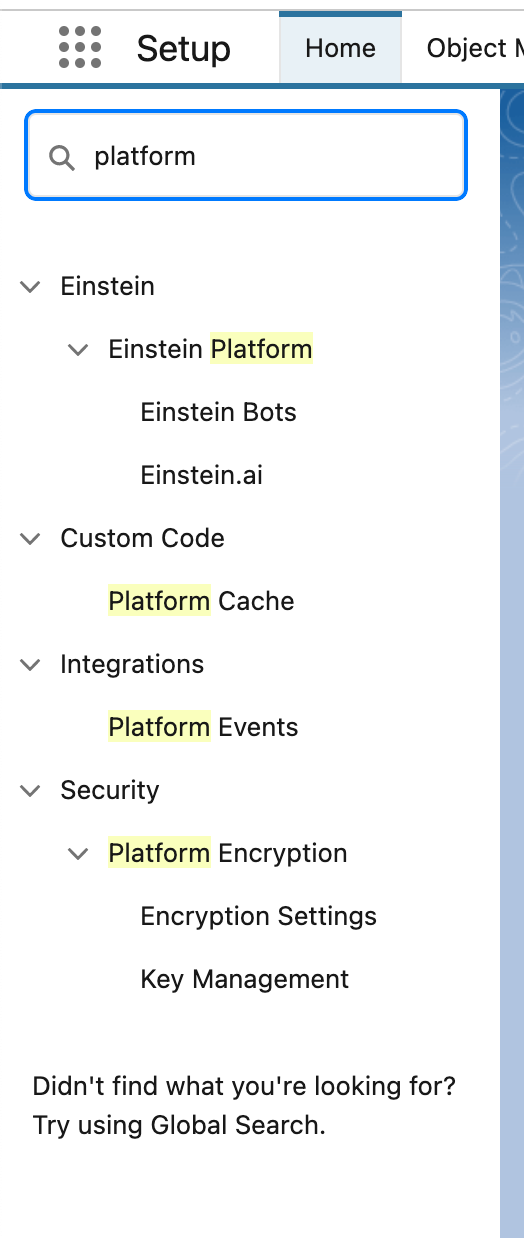
Let’s start with the platform event - just go to setup as you would normally, then hit “platform” in the Quickfind and click on the “Platform Events” link.
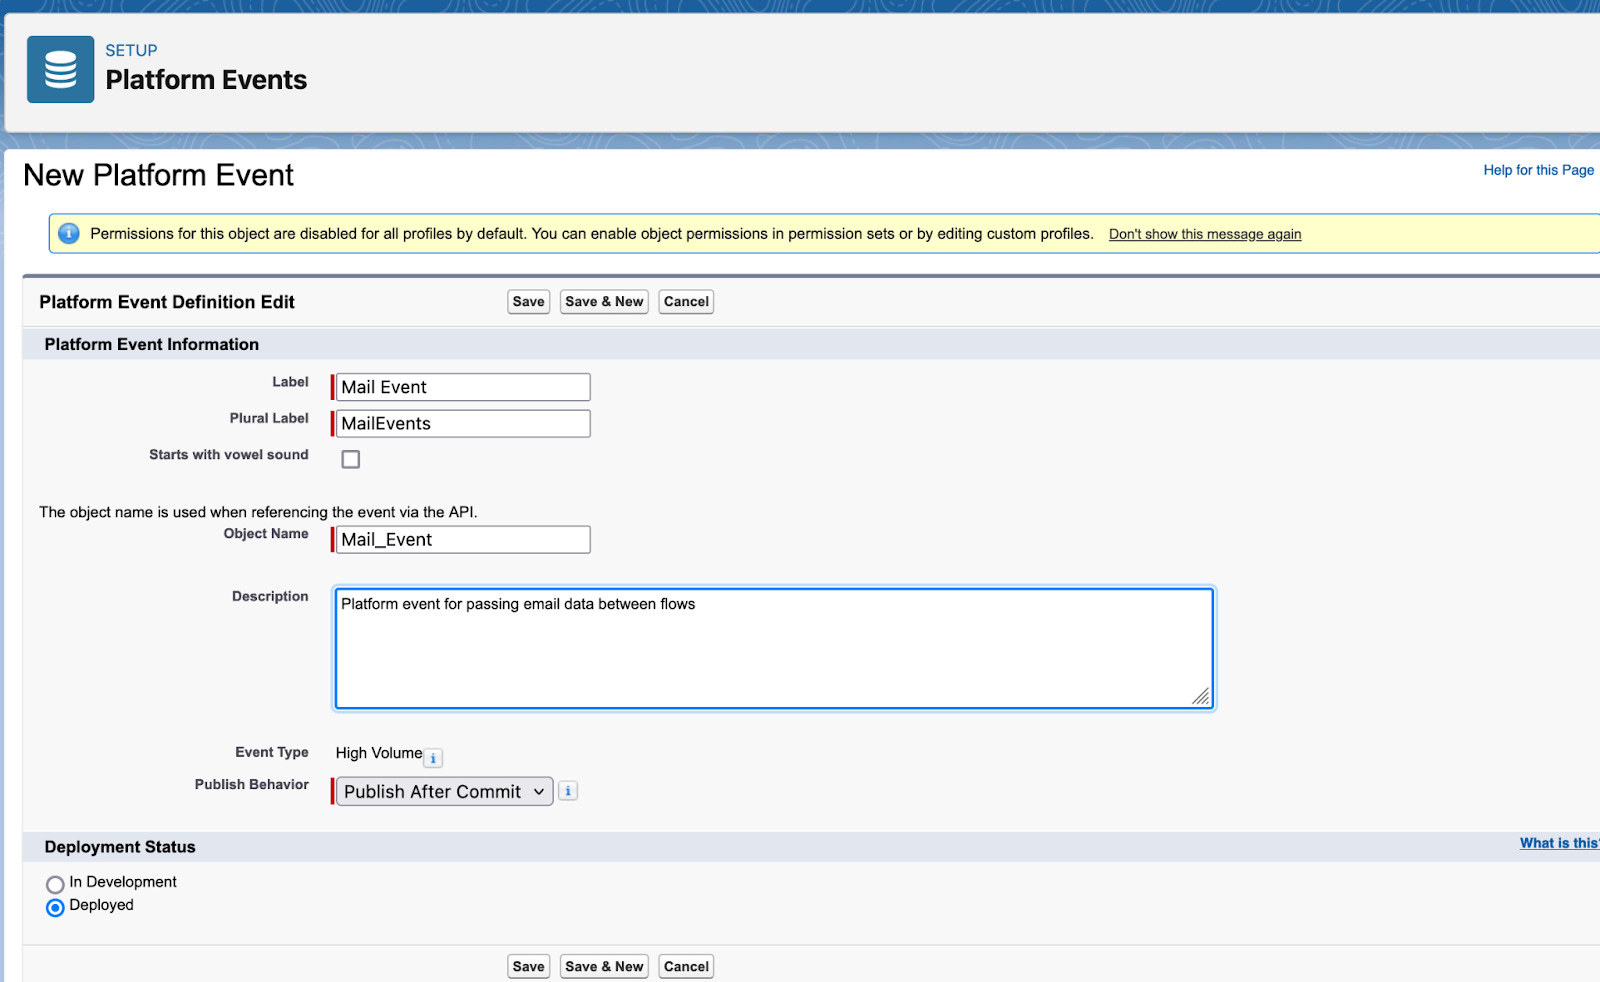
That’ll open up the Platform Events list, which in an out of the box trailhead org is empty, so let’s click on the New Platform Event button to create our own Platform Event; the screen will look approximately like in the picture below; much like creating a custom object or custom metadata objects.
Anyway - I’ve already typed in the Mail Event name - in some regards I’m a boring engineer, but do feel free to be creative, just remember to fill in the Description box for the org’s next admin or your colleagues :)
Now once you’ve hit Save, the view will be slightly different, a wee bit like an object’s view in Classic might be, or metadata object’s view is:

Okay, so we can’t (obviously) add standard fields, which are basically the same as most objects’ standard fields are, but we can create custom fields. Now, to make the platform event re-usable, let’s define three custom fields:
Recipient ID
Email Template ID
Related Record ID
Once you click on the New button, you’ll see that the options we have available are a lot more limited than what we would have on, say, an object:
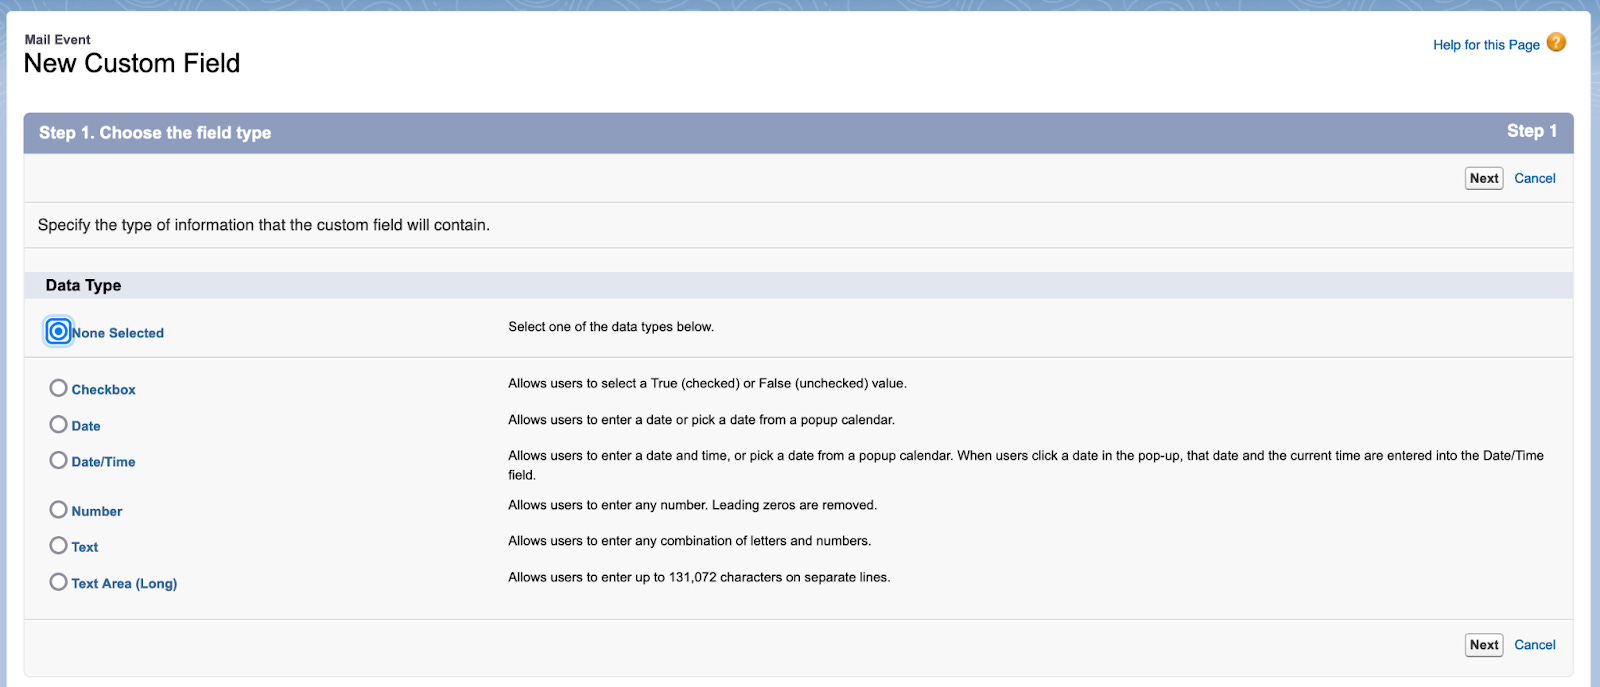
…and since we know that all of the fields will contain just ID values, we can define them as text:

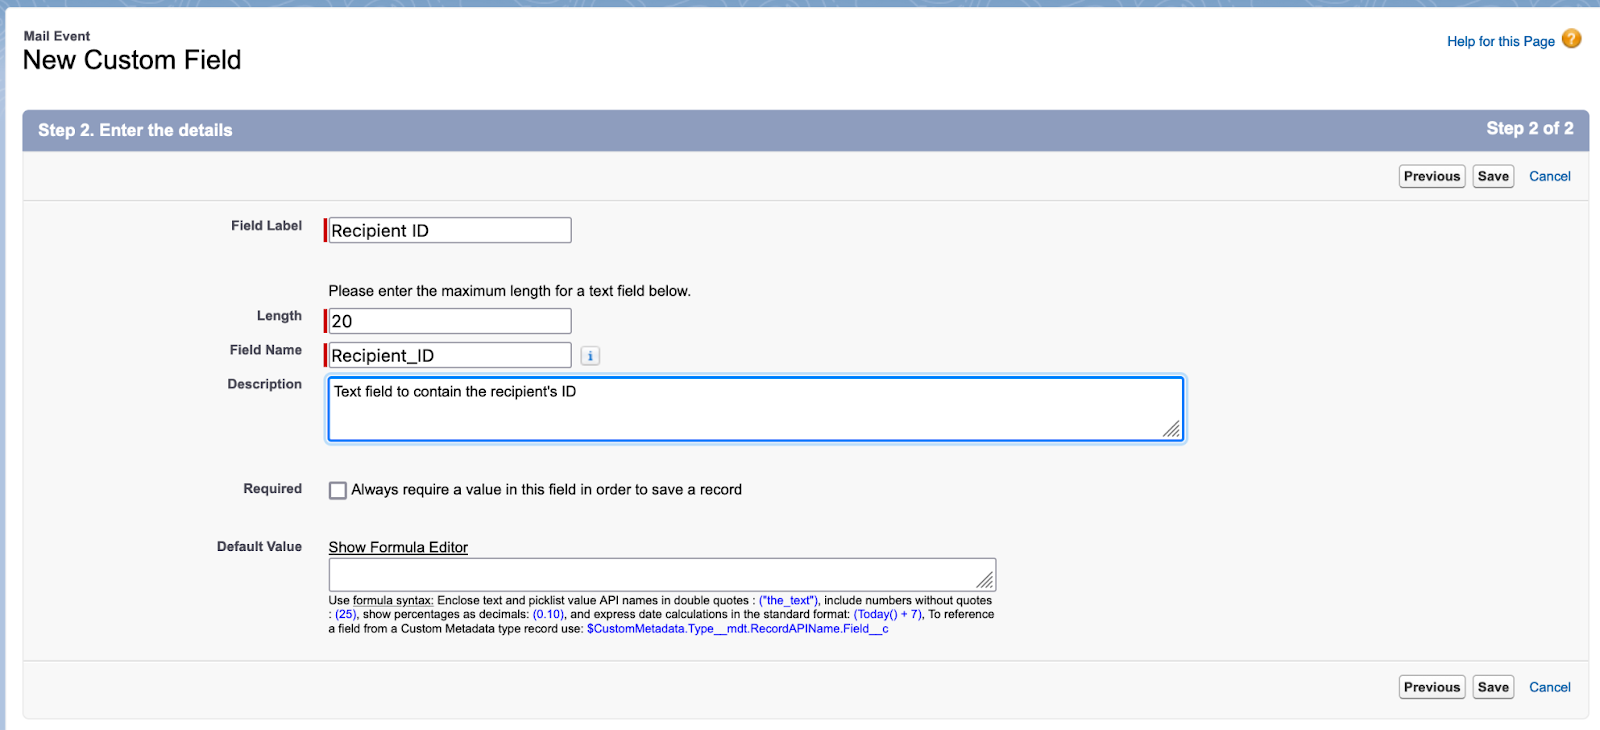
After hitting Next, let’s give the field a name and define its length, say, 20 chars, not wasting too many bits there:
…and then wash-rinse-repeat with the Email Template ID and the Related Record ID:

Permission Set
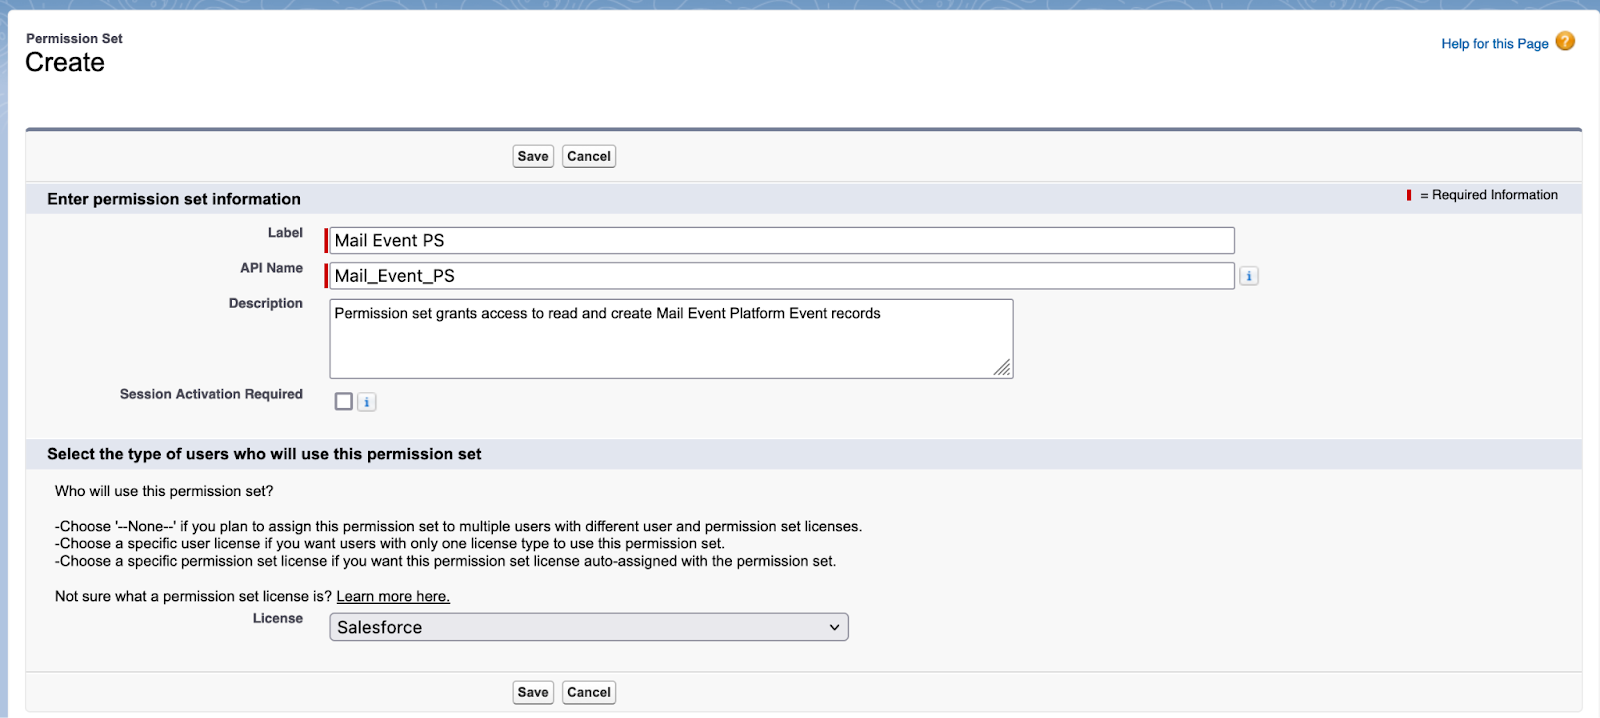
Okay, so now we have that all set up, so let’s take a peek at permission sets. You & I, as system admins should have the permissions to access the platform event, but the regular end user, as per best practice, using the Salesforce Minimum Access user profile, likely won’t, so - the usual drill: Setup, then hit permission in the Quickfind, click on Permission Sets, then click on New to start creating a new permission set.

Now - because I’m not lazy, but energy efficient, I’ll tag the license “Salesforce”, because that would allow me more options were I creating something else; not really needed here, but having it there guarantees that I get to define things like tab visibility and such through that permission set (should I need it, in this case I don’t).
Anyway - Permission set needs a name, API name and a description. Don’t skimp on the description, it’s a bad habit - other folks working on the org can’t read your mind, but they can read the description texts.
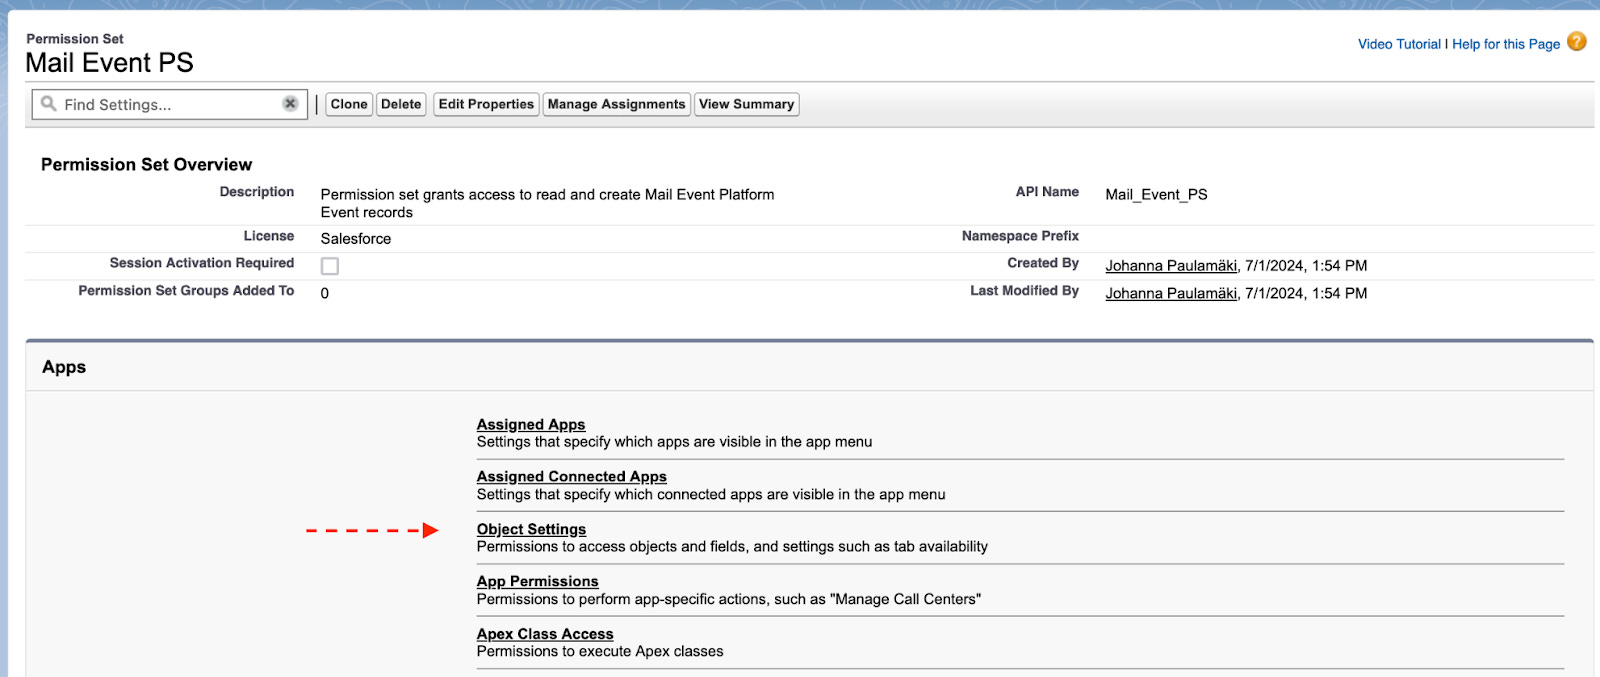
Save that, then go & define the object settings:
The list is long…
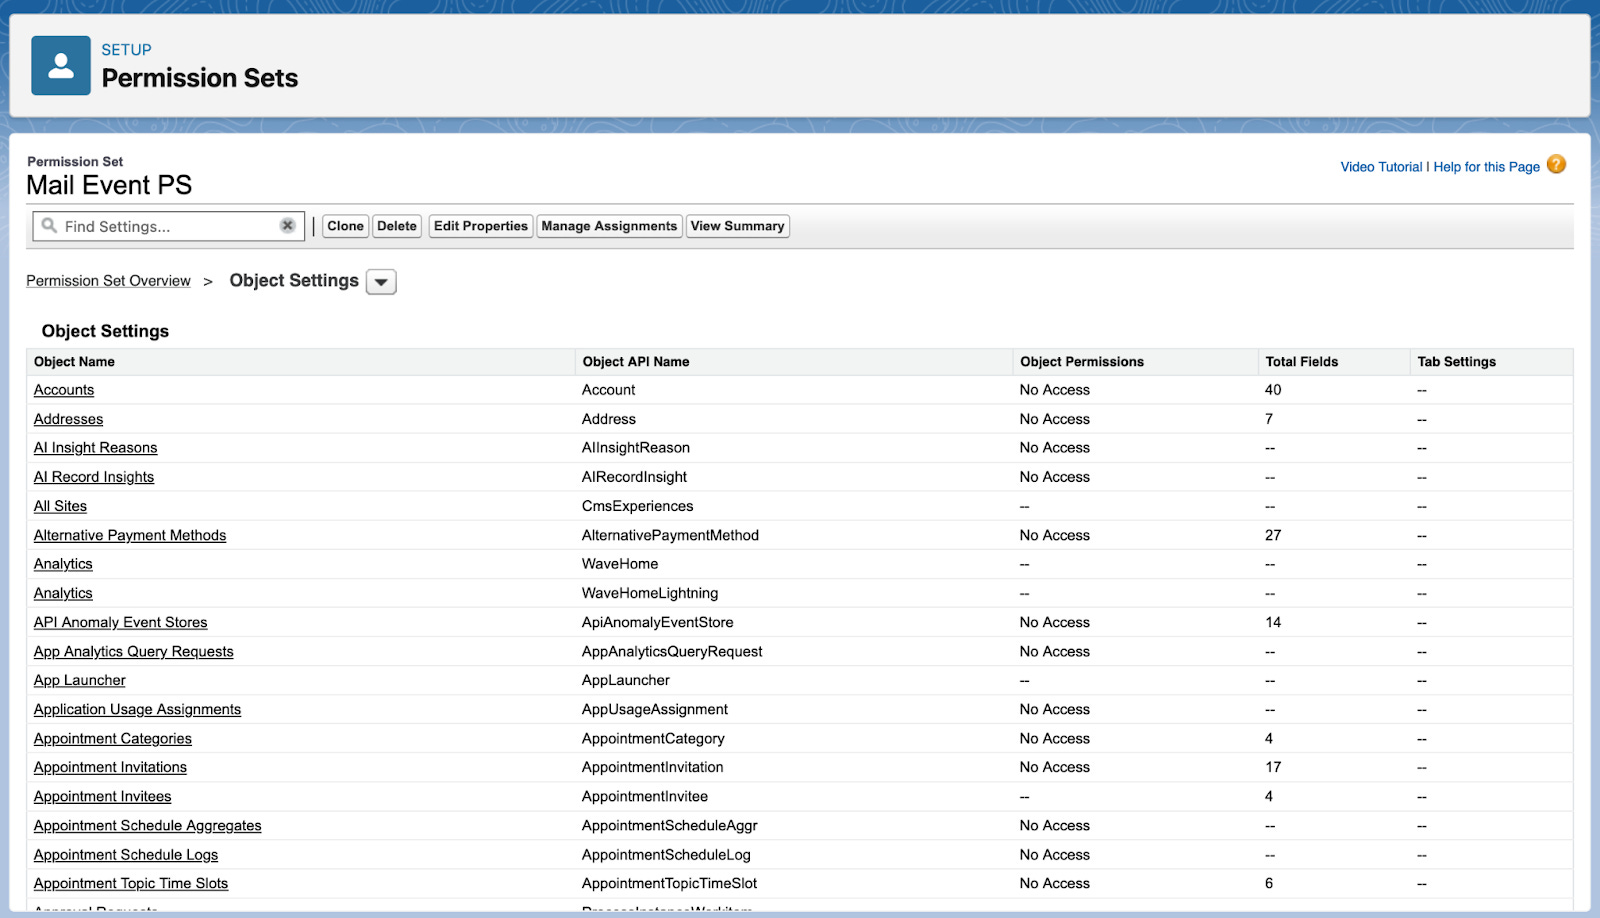
…but cmd/ctrl-f or quick scrolling mouse will reward you:

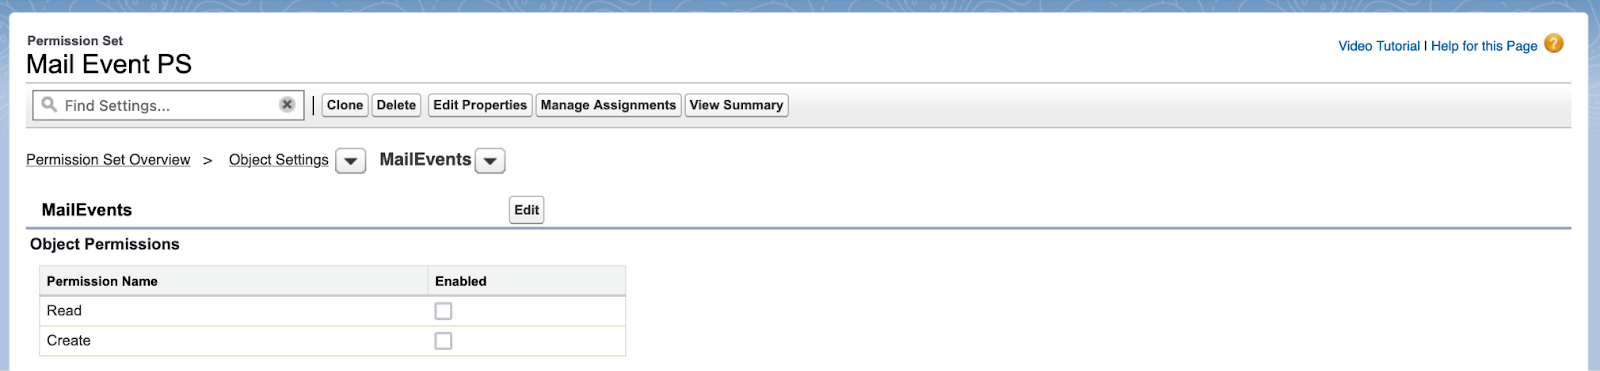
When you click open the Mail Events object, you’ll see that there are no settings for field level security (nor should there be) - just Create and Read. Click on Edit, check both and save.
Once you’ve done that, we could, for a good measure, add permissions to run flows, to be sure that the user has the ability to execute the screen flow through which we’ll be sending the emails, but the users probably have it already defined somewhere else, so we can skip it.
Now we just need to assign that permission set either directly or via permission set group(s) to users who need to be sending emails with this route - do remember to do that.
Email Template
So we need to have the email template exist in order to use one, so let’s create it.
Heretic and user friendly wizard that I am, I’ll be using the Email Templates, formerly known as Lightning Email Templates, which have since been downgraded, but specifically I’m not using the Classic Email Templates, because I find them clunky, and this is coming from a decade of using ‘em, so…
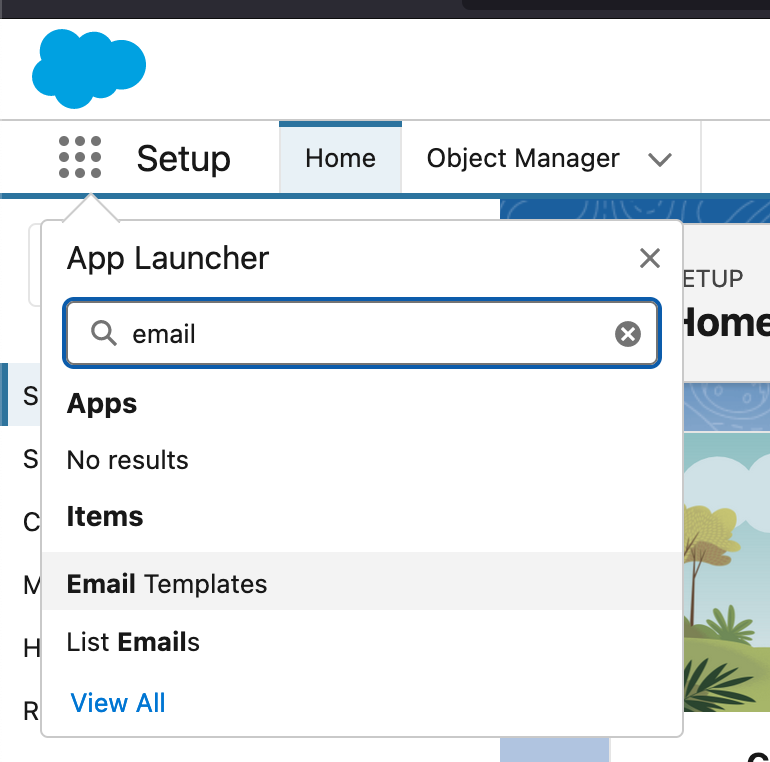
Anyway - the email templates can be managed through the Email Templates tab, which can be accessed through the App Launcher and either scrolling or typing in the magic word (see above).
Once there, we have - surprise - an empty page:

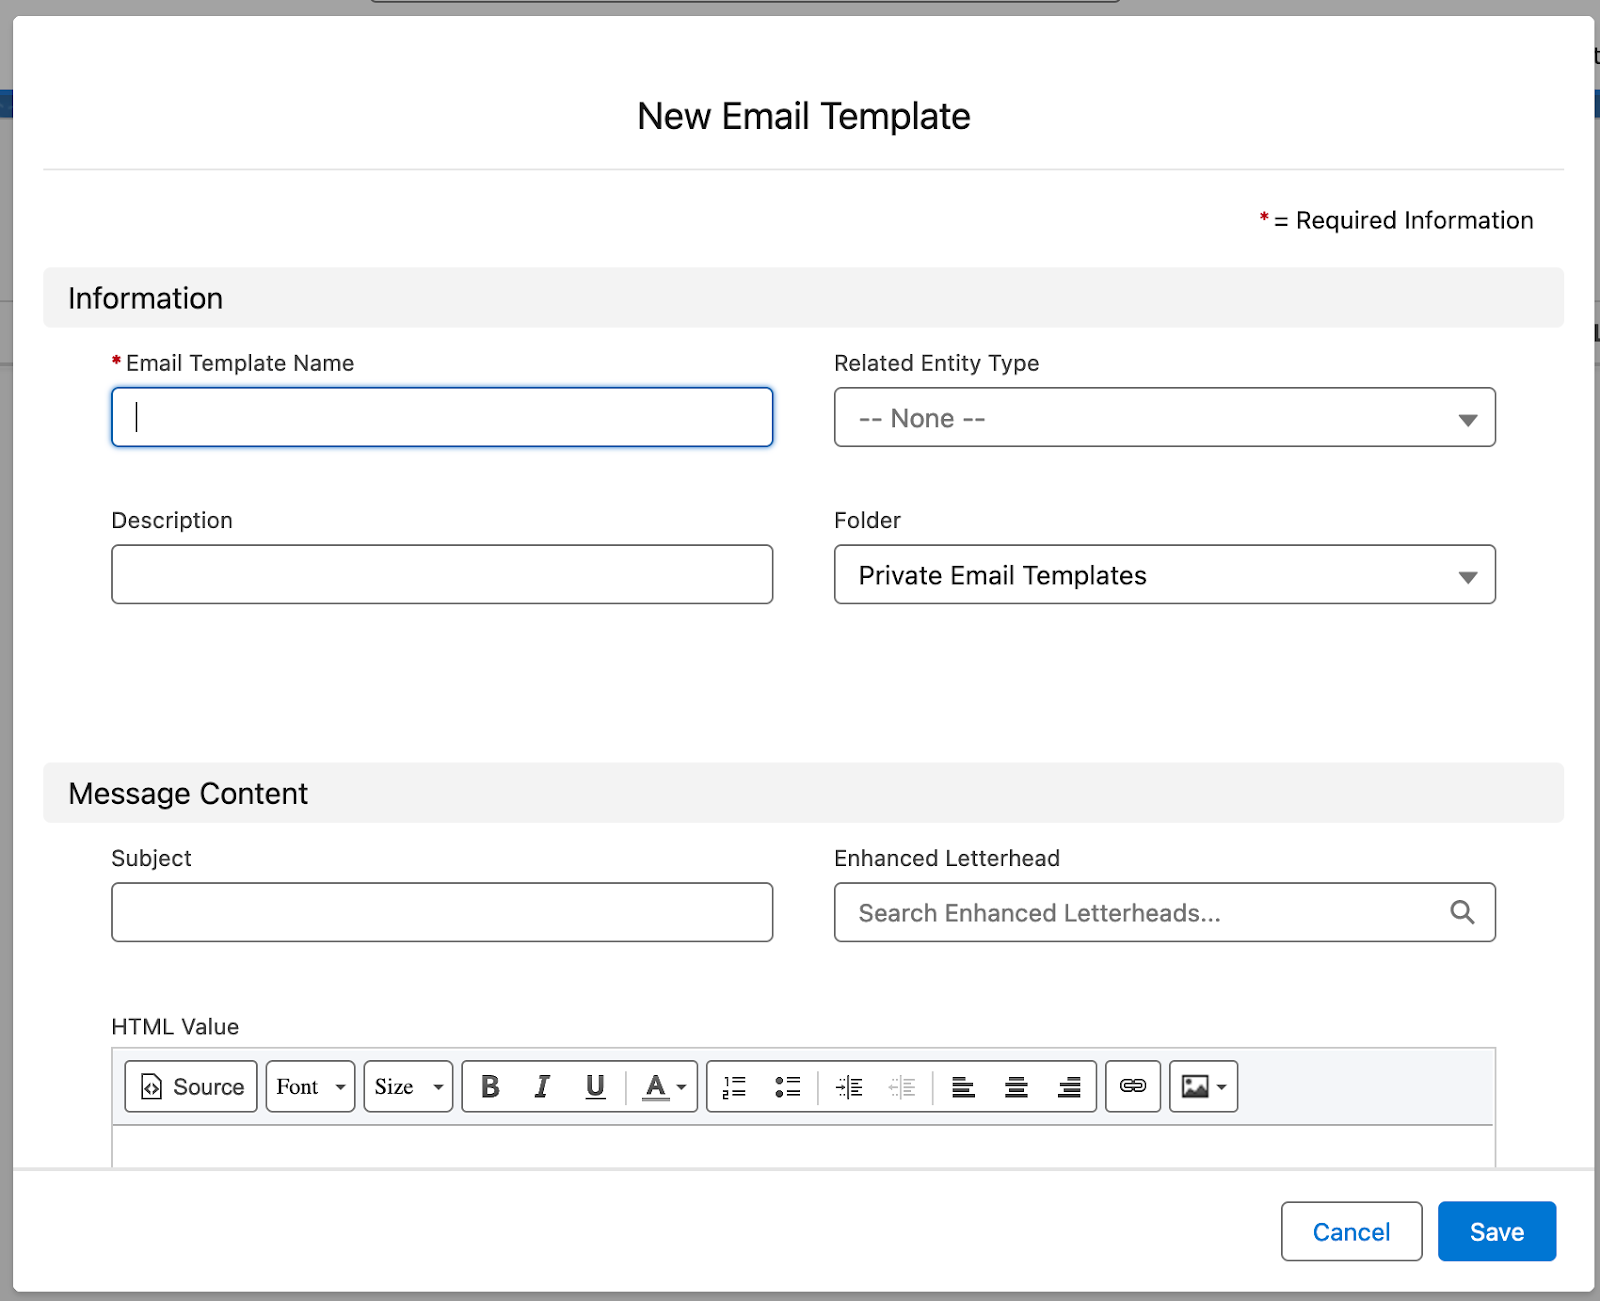
…so click on the top right corner’s New Email Template button to get started.
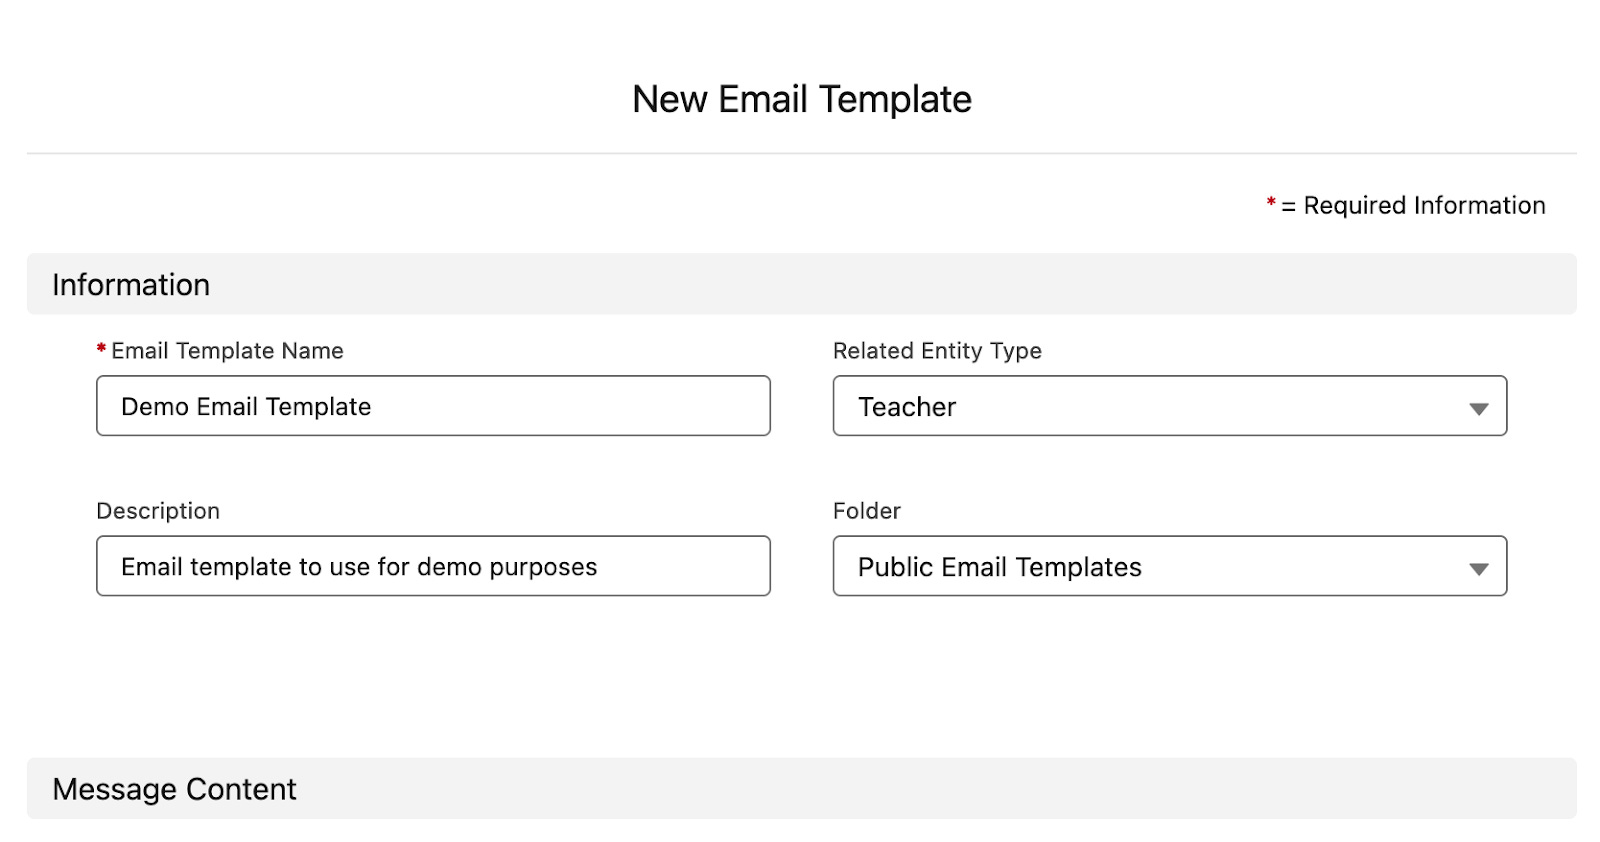
The first half of the page has all of six fields - only the name is required. So fill in a suitable name and select Related Entity Type, if you have one; I happen to have a leftover object from my previous article called Teacher, so I’ll use that to make out some points.
Description is also again good - and if you want other users to be able to use your template, be sure to change the folder to either public folder or a shared one, depending on what your need is.
Enhanced letterhead are a bit like this email template, only in that they define the header and footer that this email template will then use, if you want to use one - I don’t need to, so I won’t use one (saves me time from defining one more thing 😋).
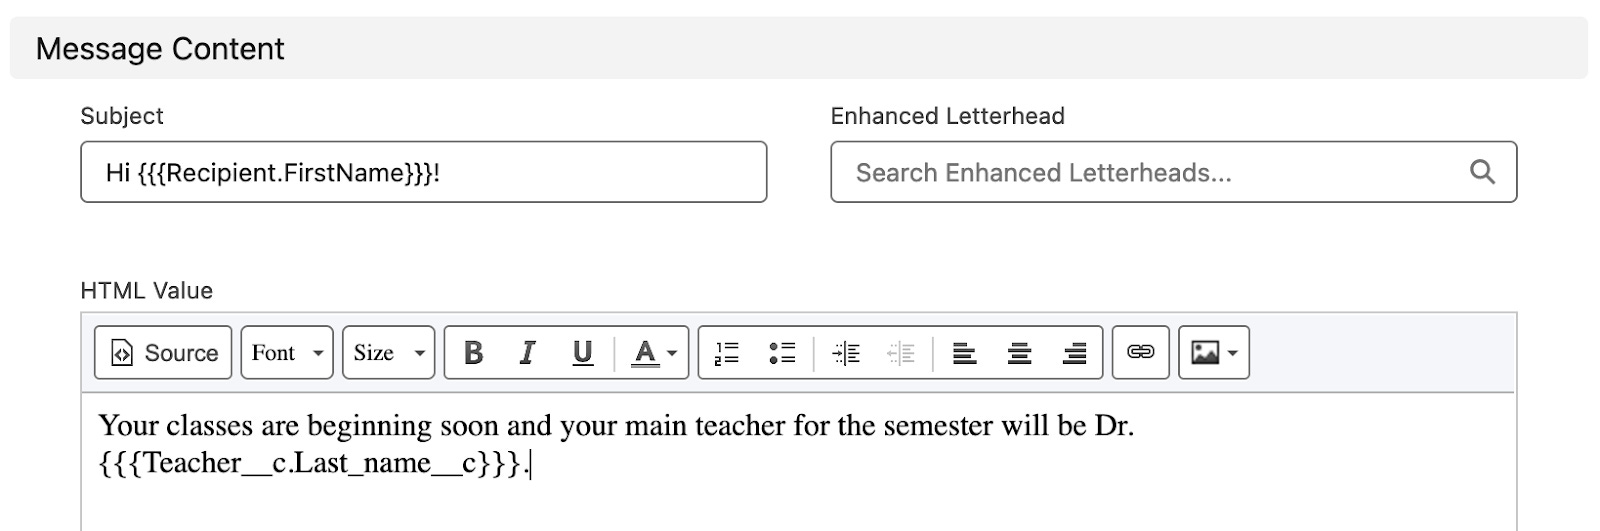
Subject and HTML I’ll pick up on in a bit, but here’s a sneak peek of my template:
So - subject and HTML Content. As you can see, at the bottom of the HTML Value field you have this small { } icon; when you click on that, you’ll get access to all the goodness of Merge Fields of the Recipient, Sender, Organization, and the related record:
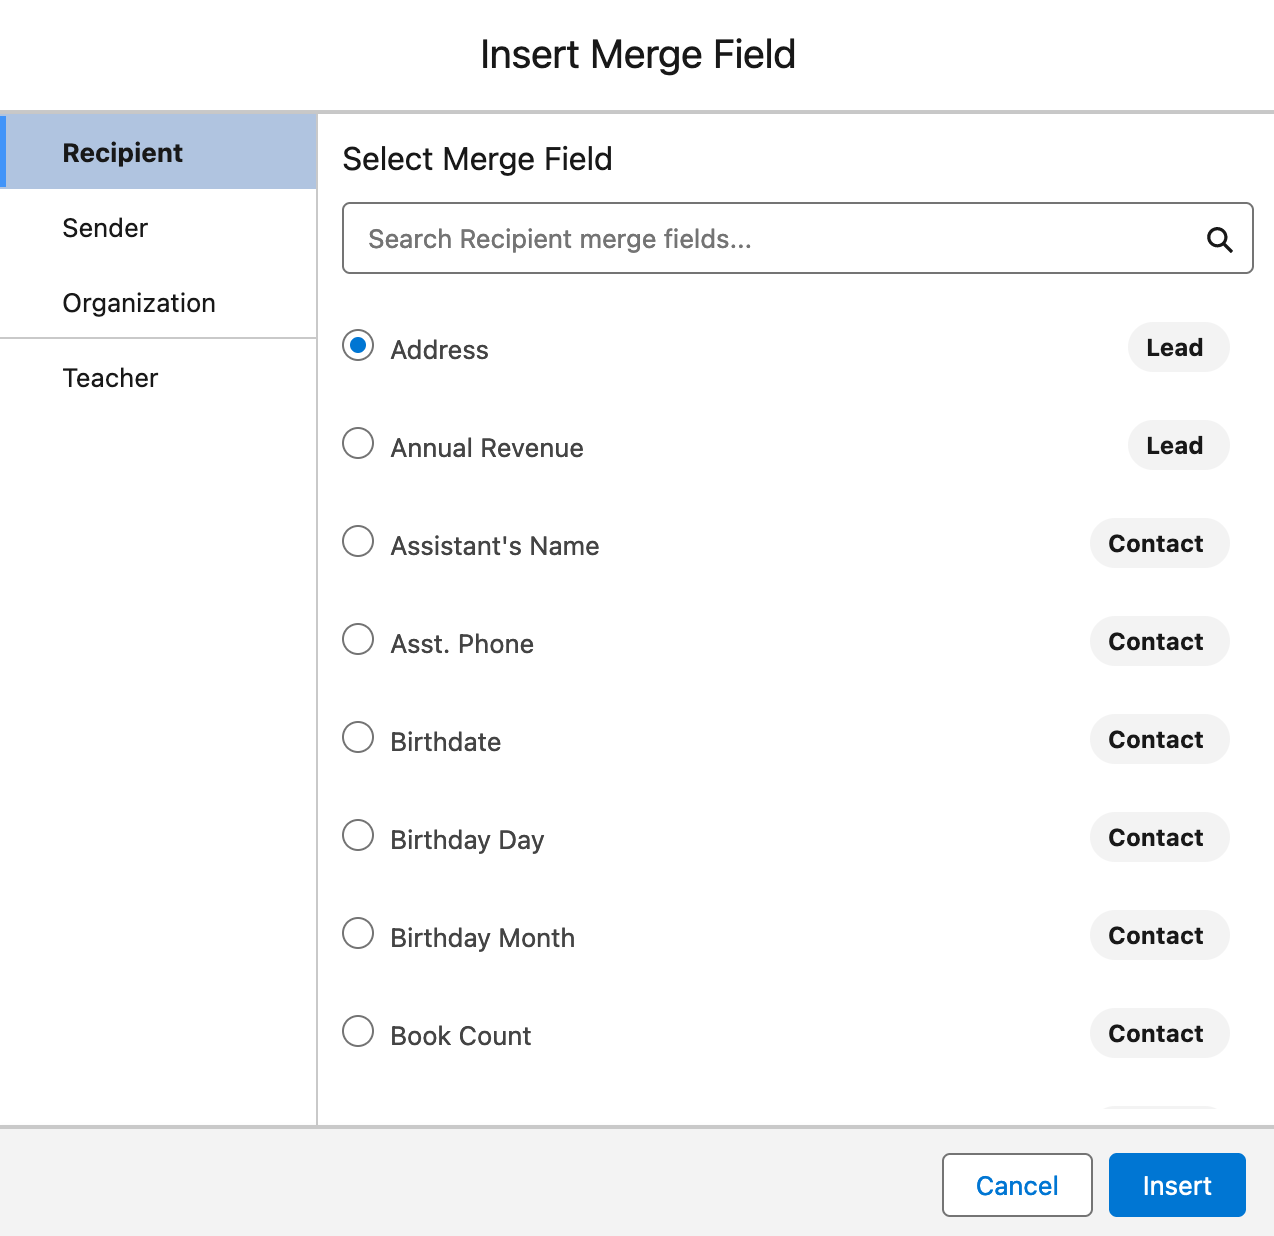
You’ll see that some of the fields of the Recipient are from Lead, some from Contact, and if you scroll down a bit, you’ll see also some shared fields.
I’ll go ahead and add a field First Name - just select the radio button and click Insert, and you’ll see something like this:
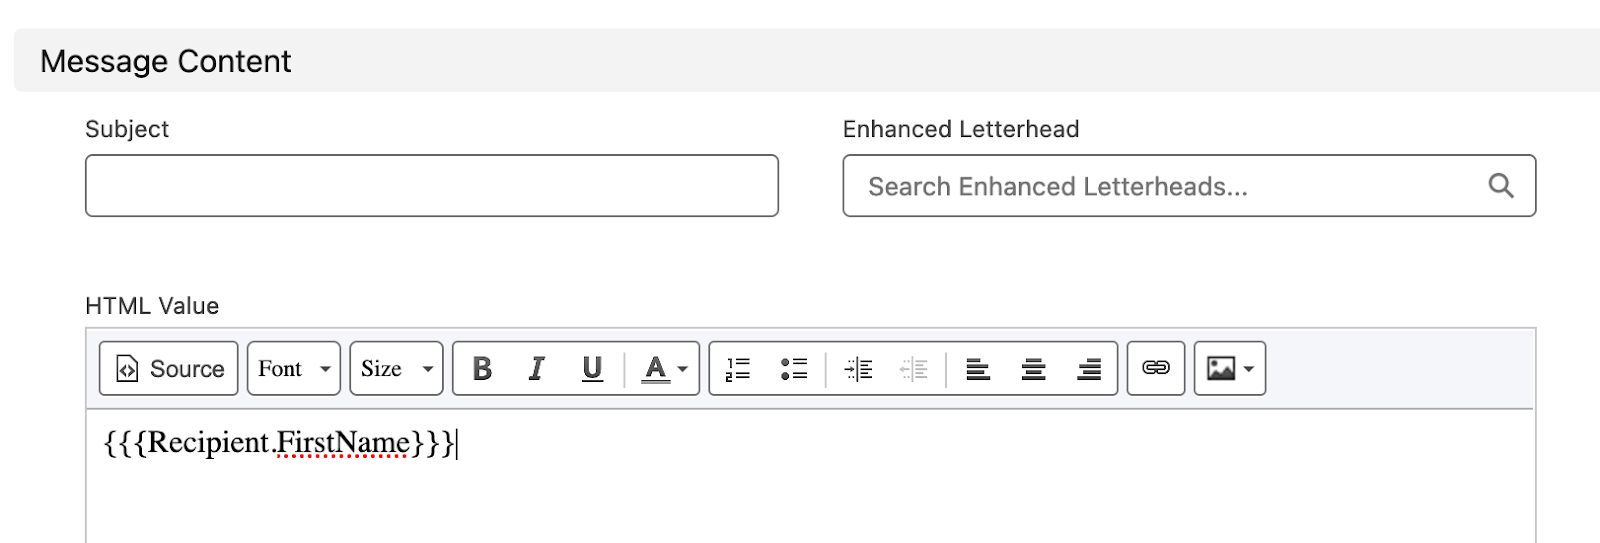
Now - why I drew out the subject so long is to show that the merge fields can also be inserted there, so I’ll just cut & paste the merge field there, add another merge field into the text and add a bit of text around it:
Now… just in case you just created a new object for the sake of completeness, do grant permissions to yourself to that as well, and to get meaningful results, go ahead and also create a record for the object… 🙂
Anyway - next up are the flows.
Event Creating flow
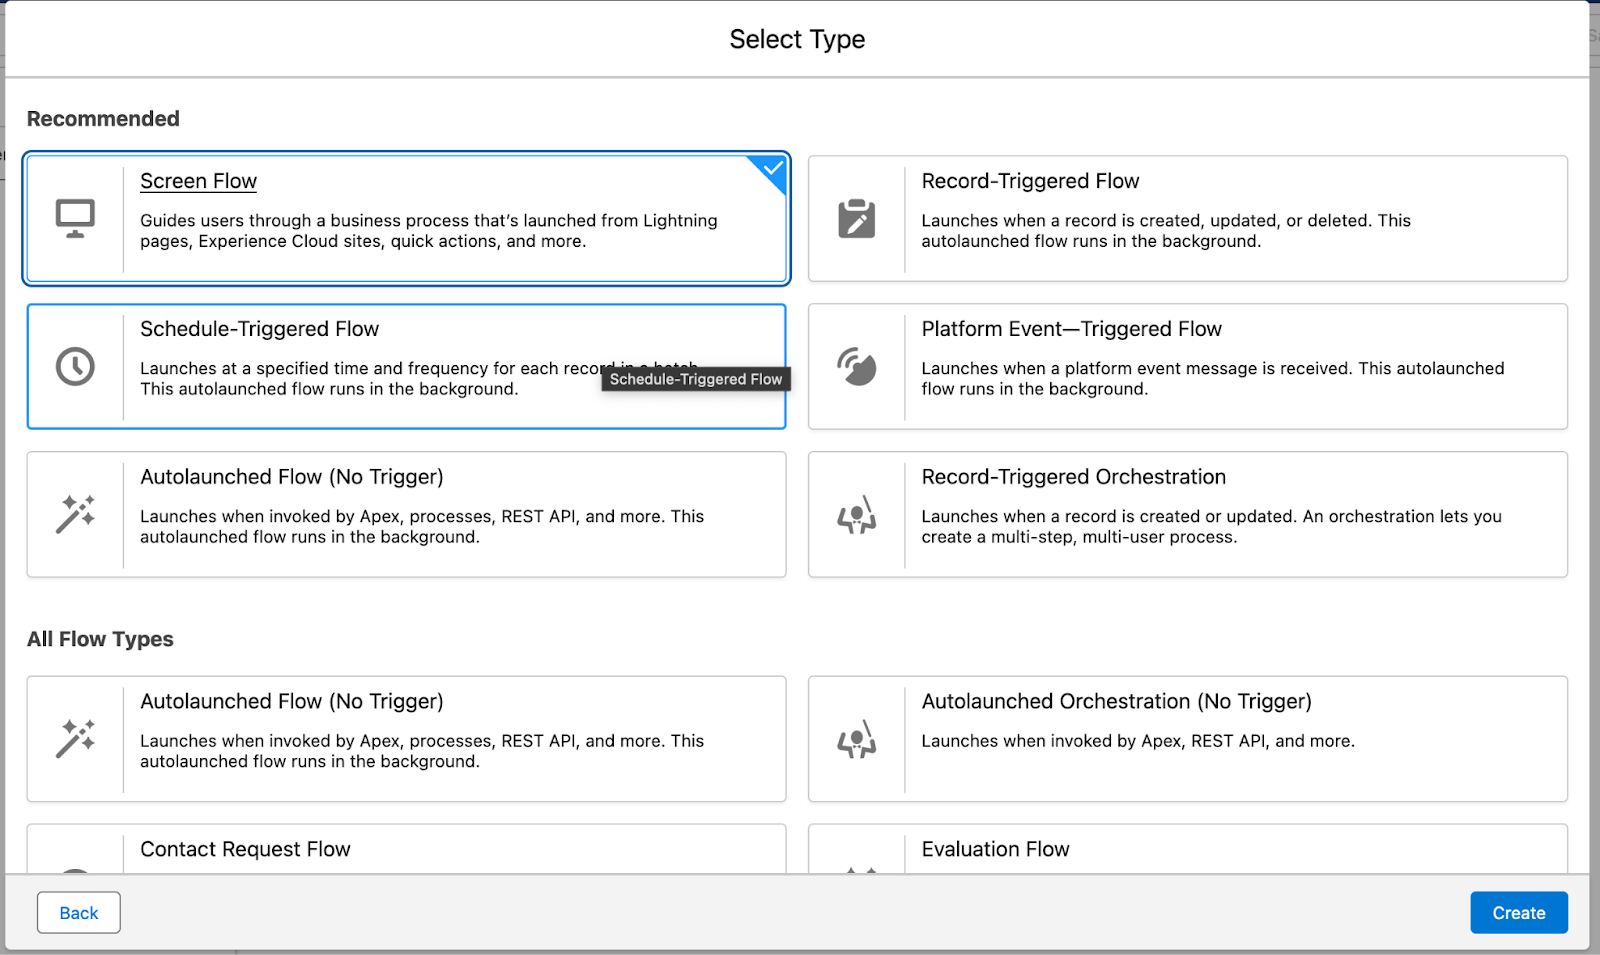
Time to get to business - Setup, type Flows and then hit on the New Flow button in the top right corner:

Once the dialogue pops up, first select “Start from scratch”, hit Next, then select “Screen Flow” and hit Create:
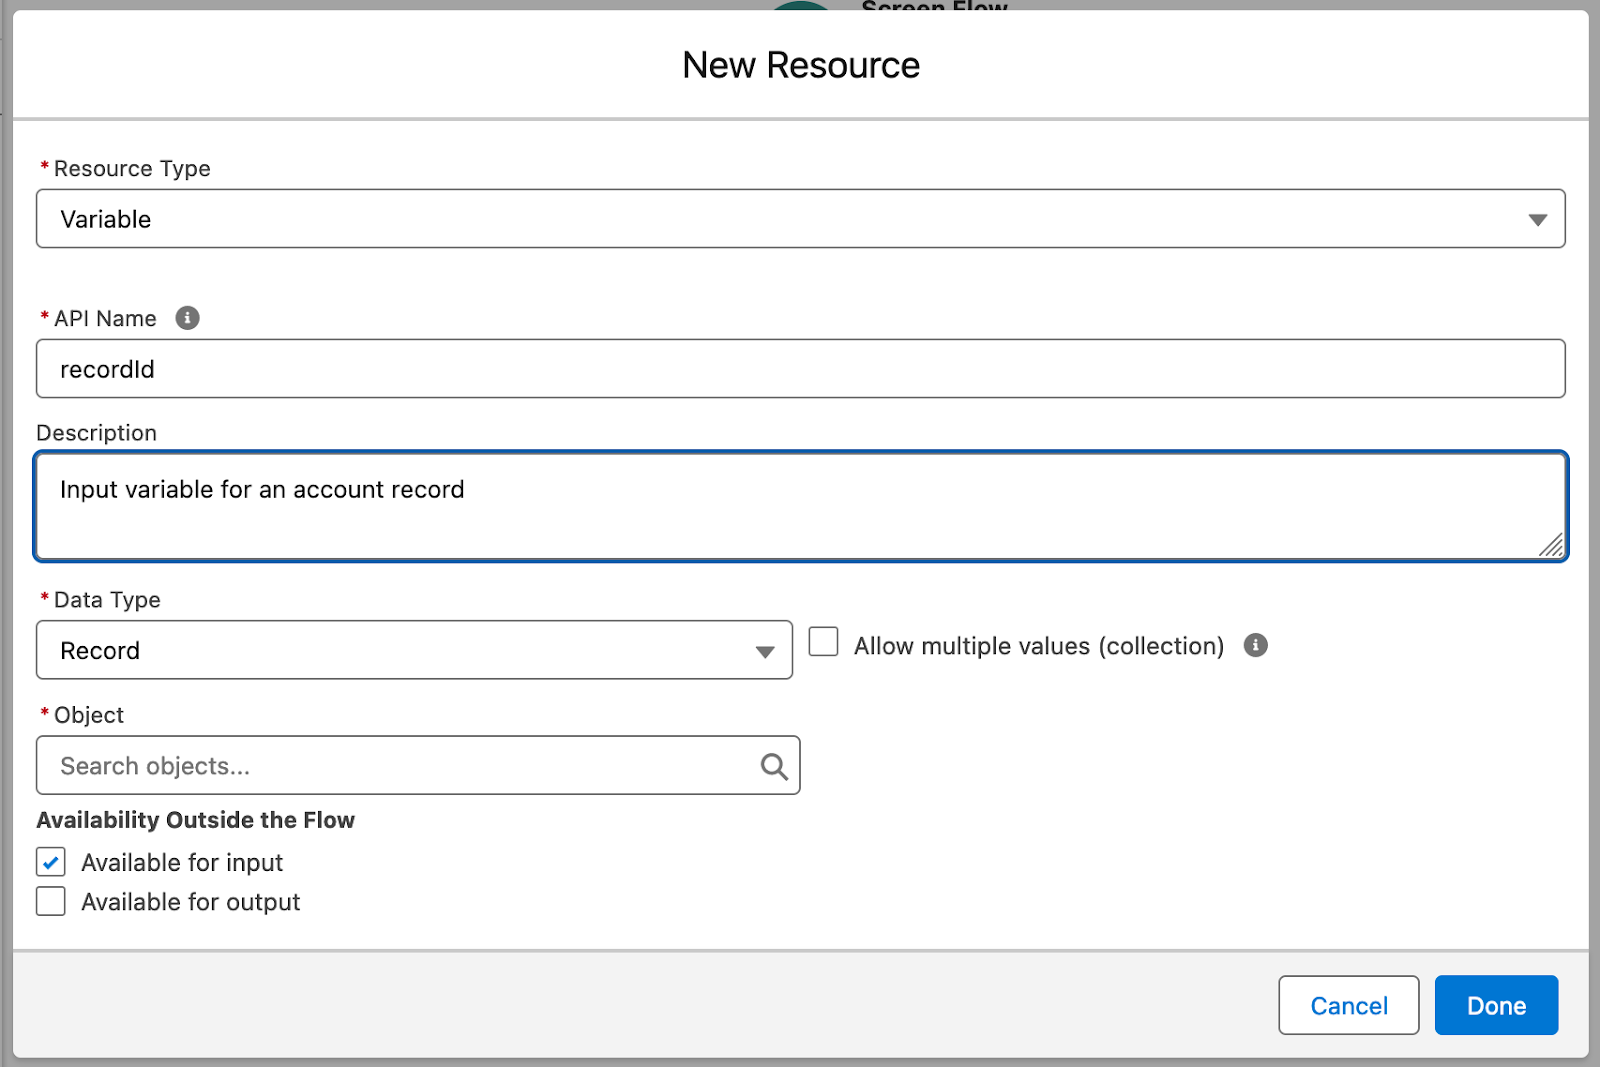
Now - there’s this not super known screen flow trick known as “recordId”.
In screen flows, you’re mostly dealing with something in the UI; let’s say, for example, that we want to update an account with a screen flow, so we probably want to have a way to push that account’s details into the screen flow.
We can do that super easily by defining a variable in the flow called recordId (sic). Now, in their wisdom, the developers of Salesforce have not restricted the type of the variable, so that we can define it as text or just easily as a record variable (could be that other types are possible too, but I haven’t had any use cases for those).
Anyway - what that does in the context of screen flows is, that when you launch the flow from a record page in the UI (or Experience Cloud), that parameter will receive either the text ID of the record you’re launching it from, or, if you define it as a record variable, the whole record, every field, every value, nothing missing.
If you know that you’ll always and only be inserting a record of a certain object, say, Account, you can define it as a record variable, click on the “Available for input”...
…or you can do the same and instead of Record data type, define it as Text data type:
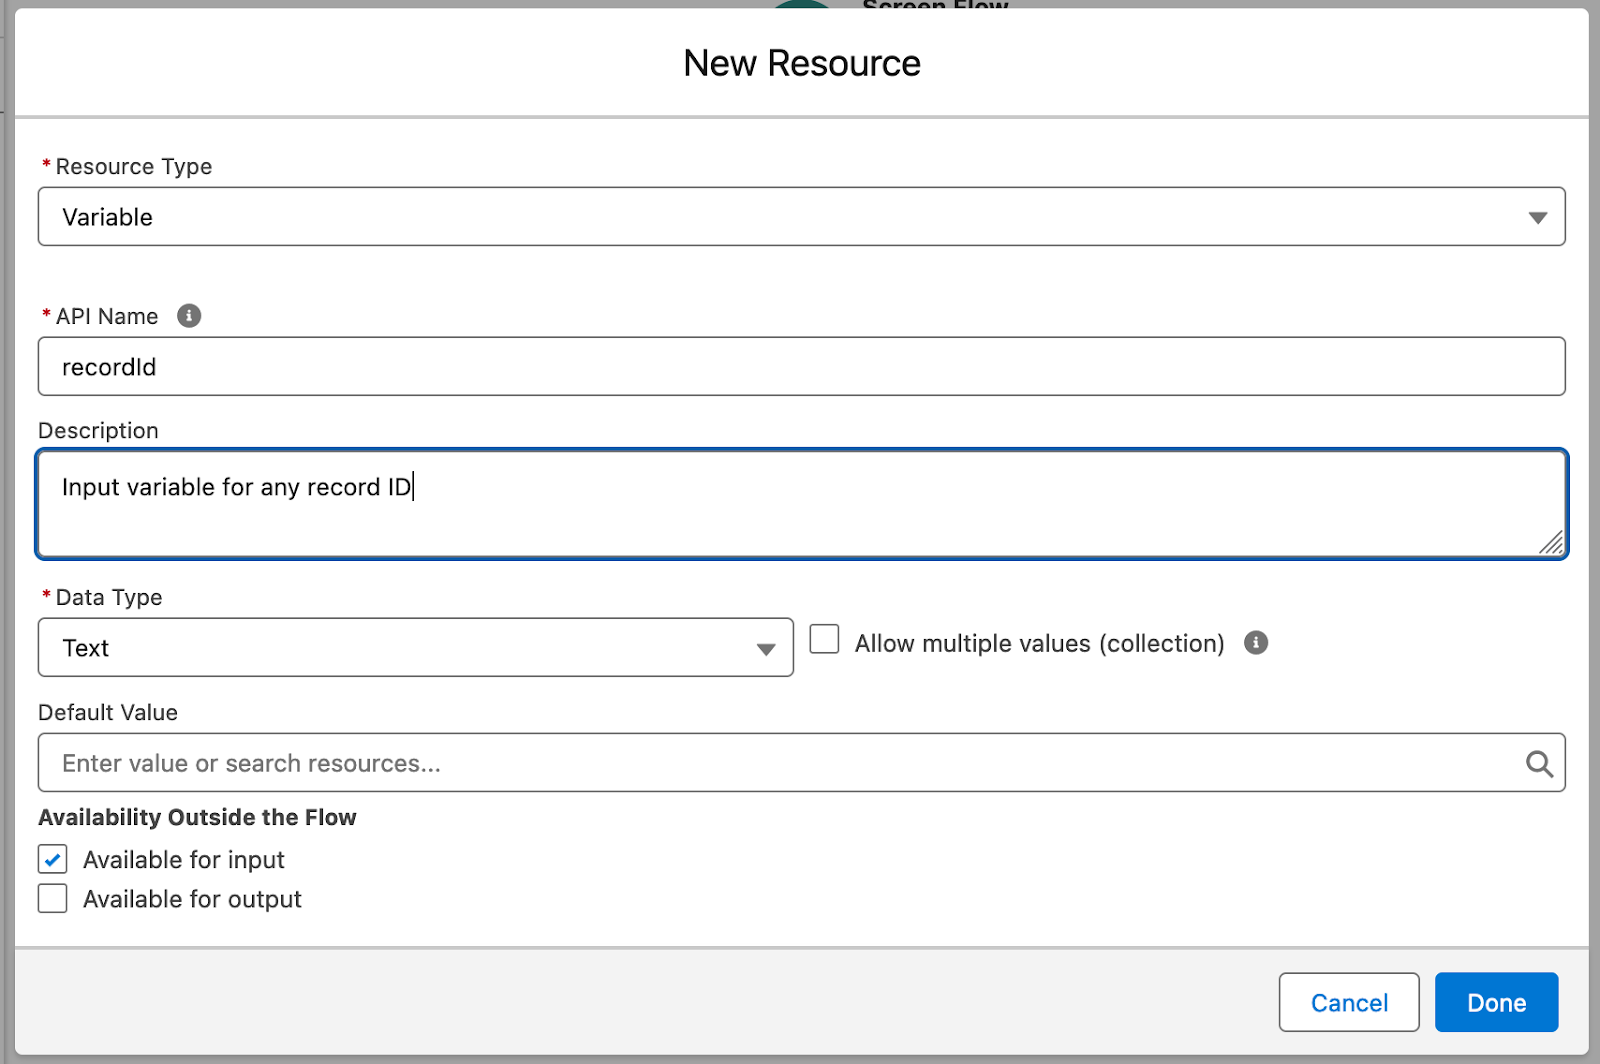
The difference is in the use cases and flexibility; if you know you’ll always run this screen flow from Account pages and deal with those, it makes sense to define the recordId variable as a record variable - but if you are planning for a screen flow to run from multiple different objects, say Accounts, Contacts, Leads and Opportunities, you can define it as text and then just build logic to identify the type of the object (my favorite is “starts with 001 = account” and so on) - and then do a Get to the the correct type of a record for further processing.
Anywho - I’m here defining it as a record variable of type Account, because I’ll build a flow that sends email to all contacts of an account, so I’ll know I’ll always start from the Account:

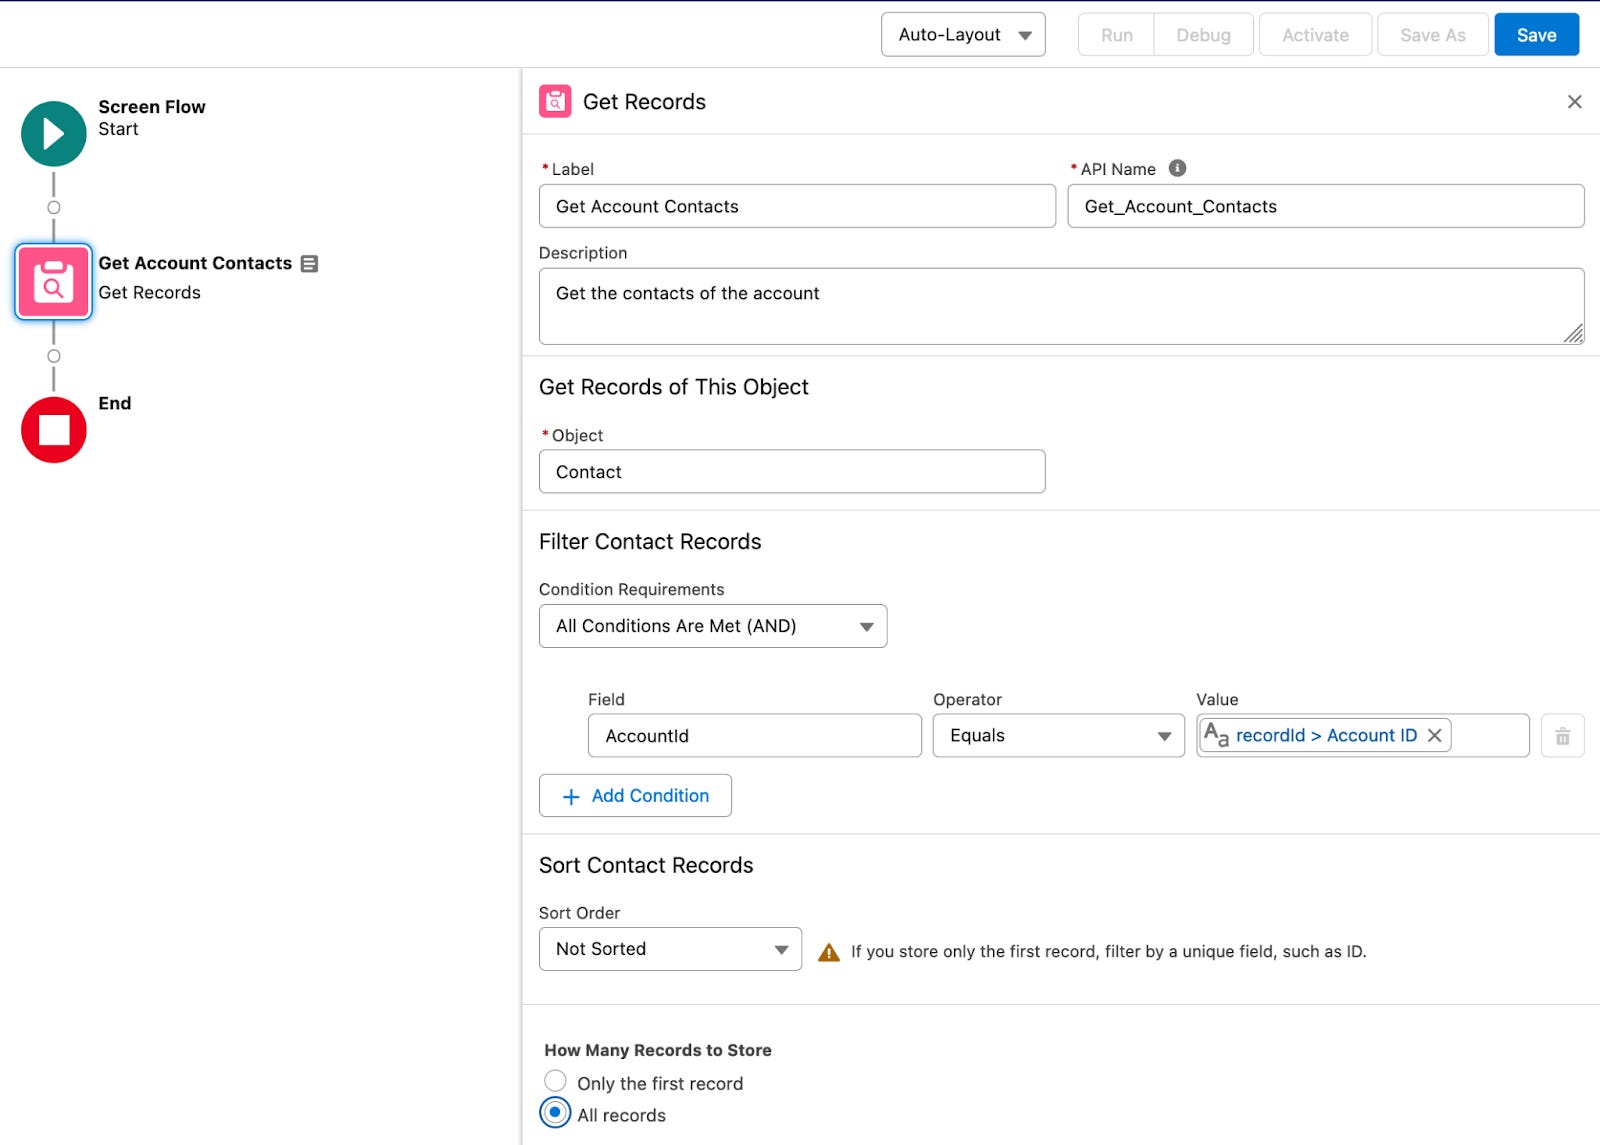
Next up we’ll do a Get operation to get the contacts of the account - do remember to include all of the results to make the result a collection variable:
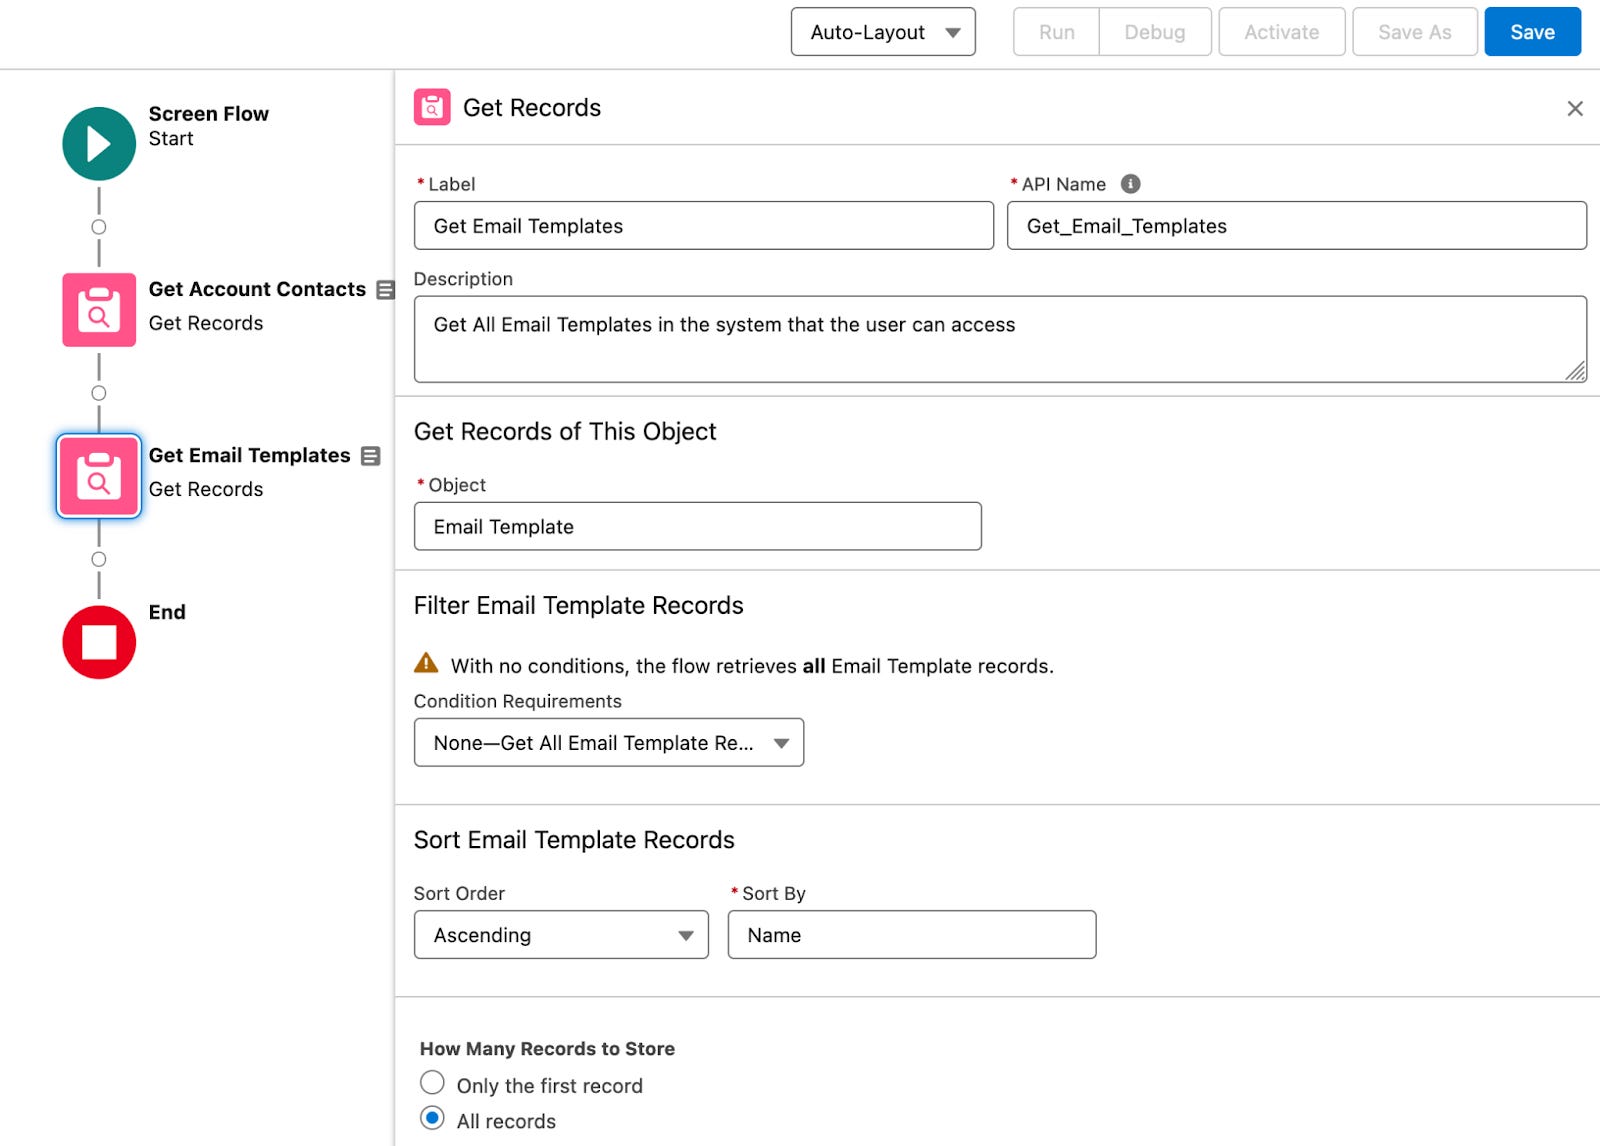
Let’s then get the email templates we have in the system and show them to the user for selection:
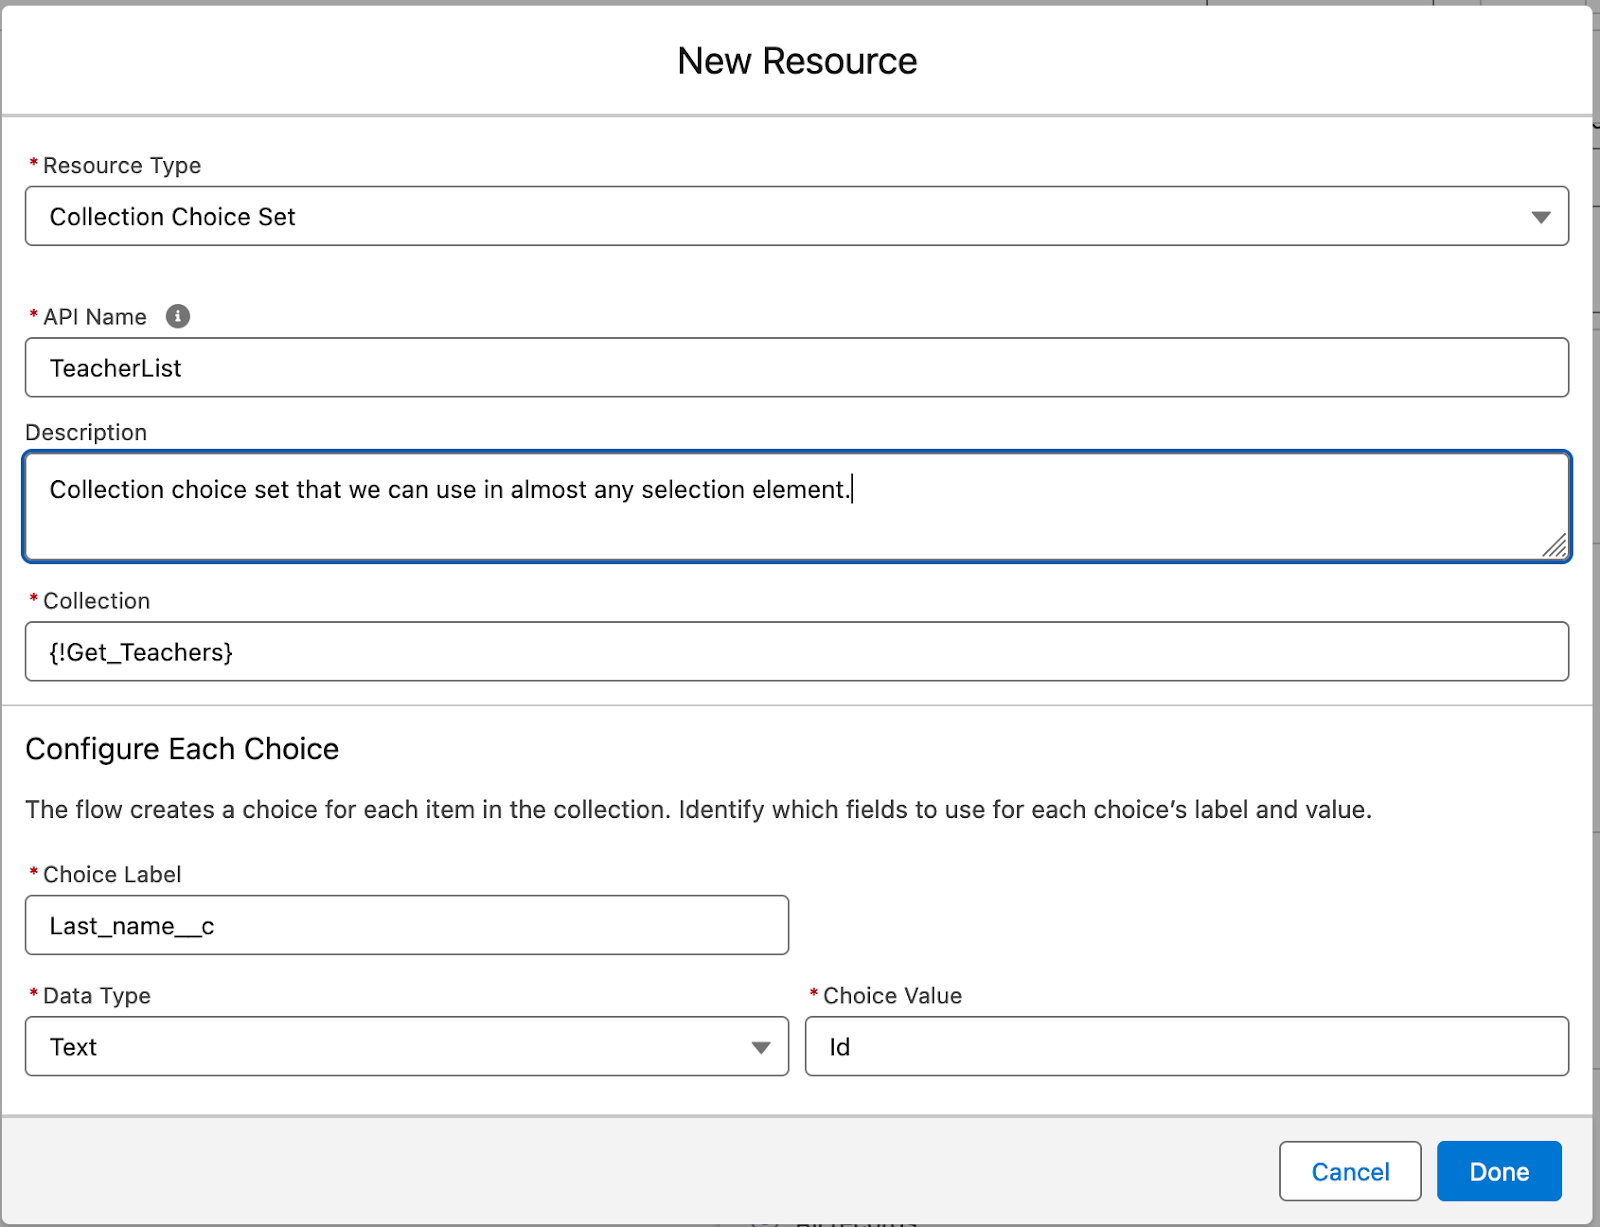
…and we’ll also need to have our pick from the teachers of the system:
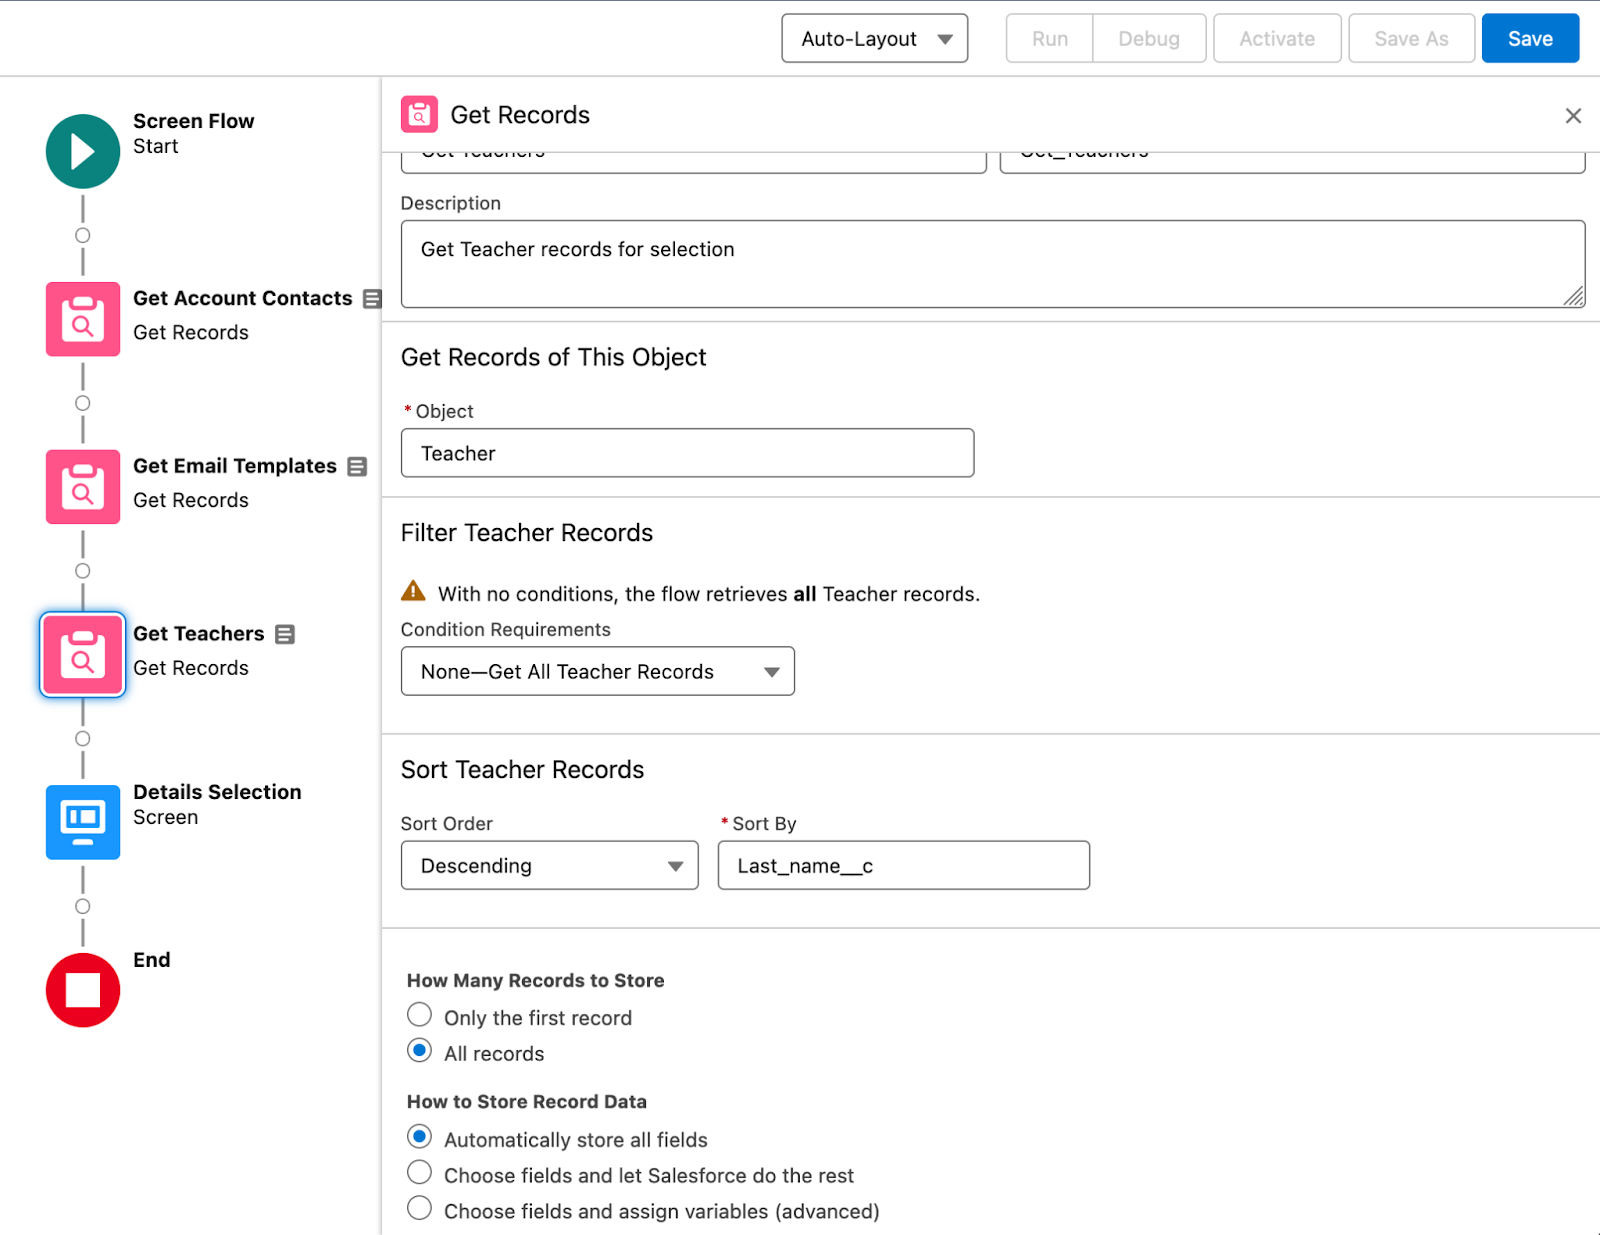
Now, we want a little bit of variety, so let’s create a record collection of the teachers:
So, on to the screen definition, but let’s first save the flow, lest we lose precious work…
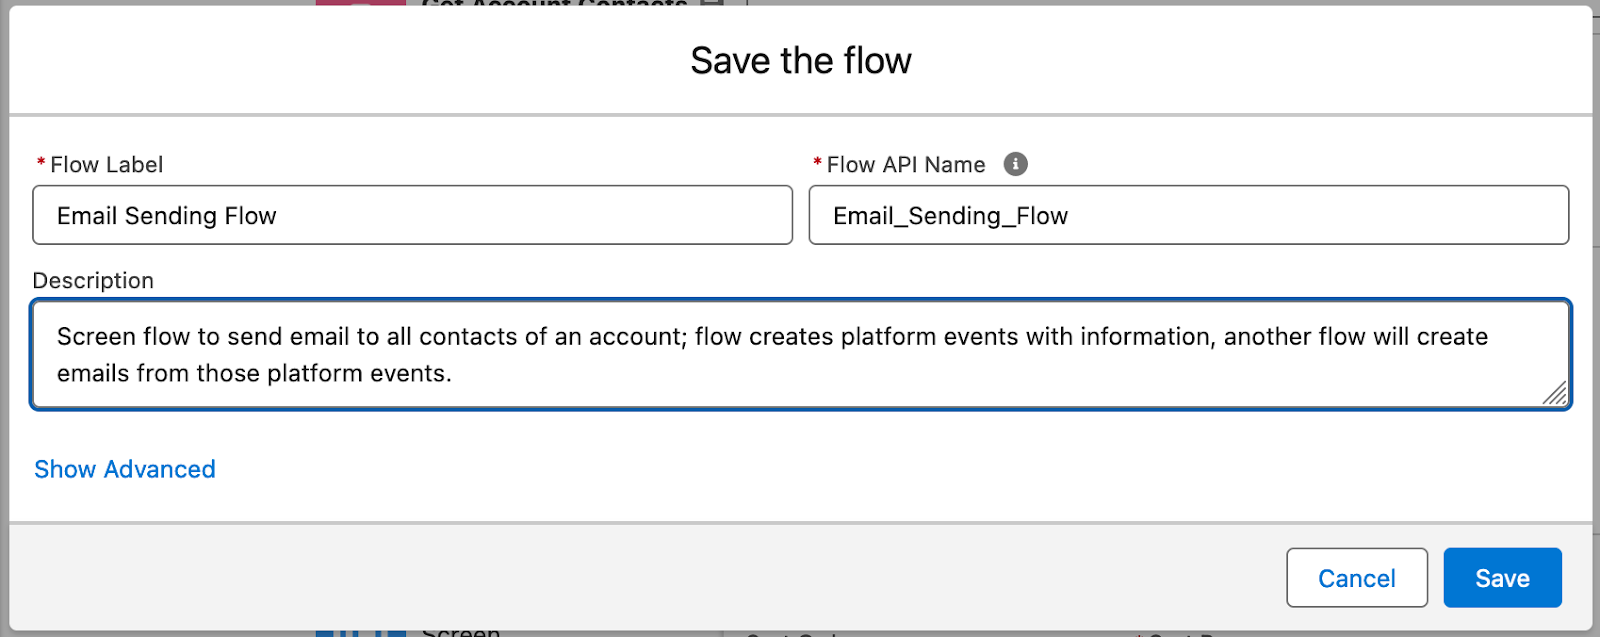
Now, that’s saved, phew.
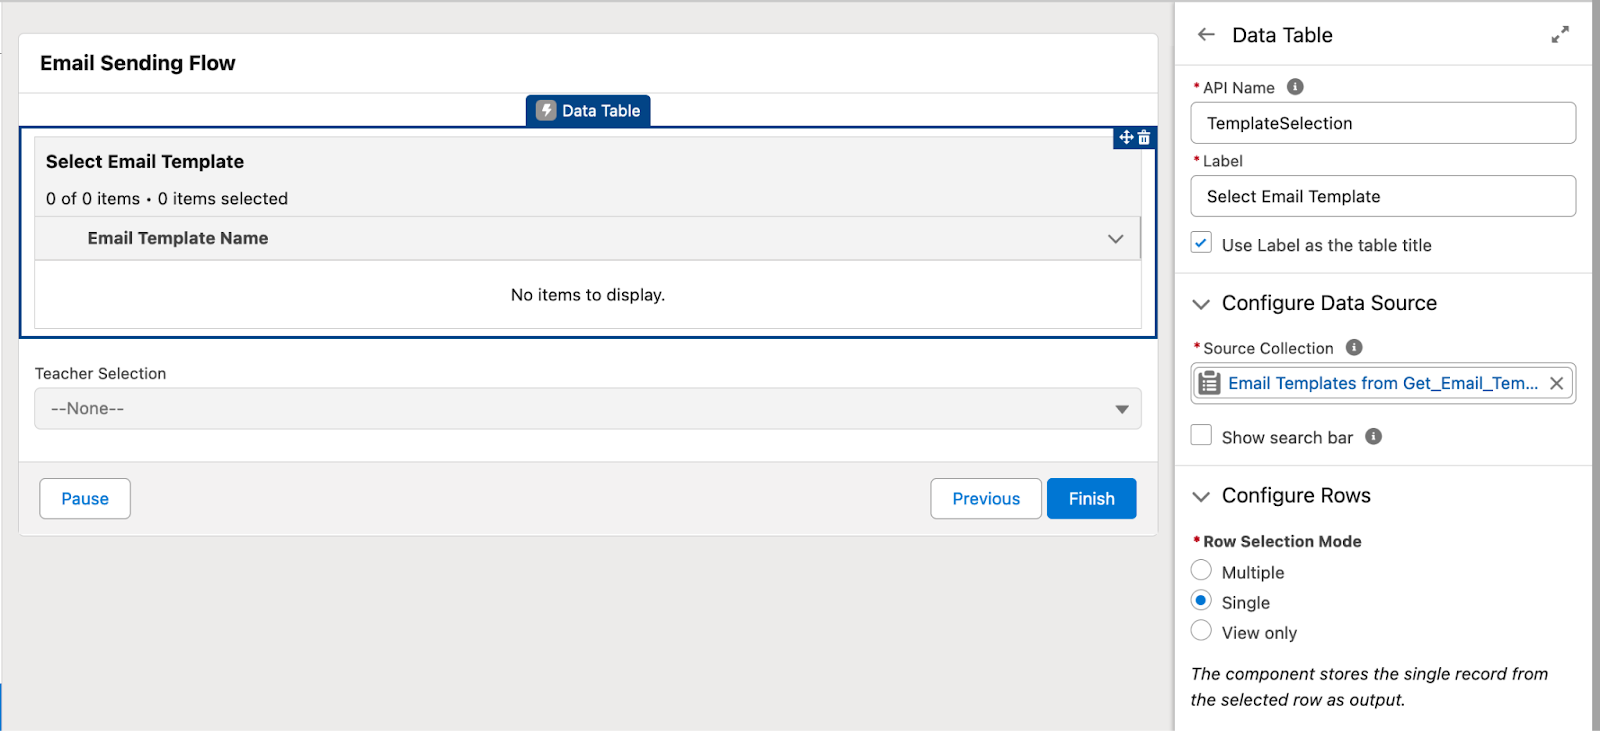
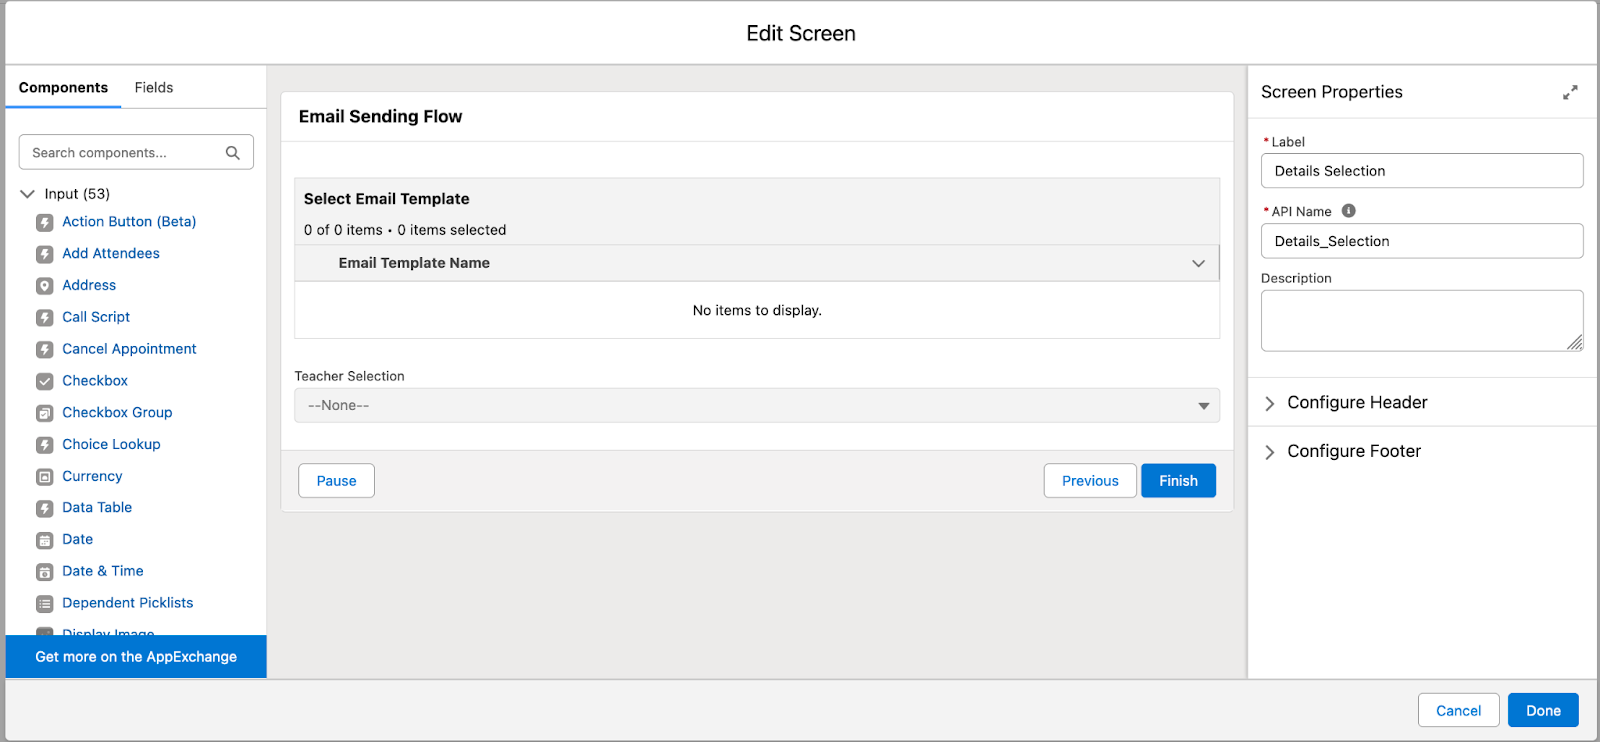
For the screen, nothing really fancy, just a data table for selecting the email template and as we know that we don’t have that many teachers, a picklist will do:

For the data table, I’m only adding one column - the email template name, and I’m also both requiring the user to make a selection and restricting their selection to a single one:
Teachers will do with a picklist, for which the choices will be the teacher collection we picked up earlier:
Okay, so now we have all the pieces in place, so we can create the email sending events. Because we don’t want DMLs in loops, we’ll run just the assignment in a loop.
Remember - save early, save often, as they used to say in Sierra Quest manuals 😄
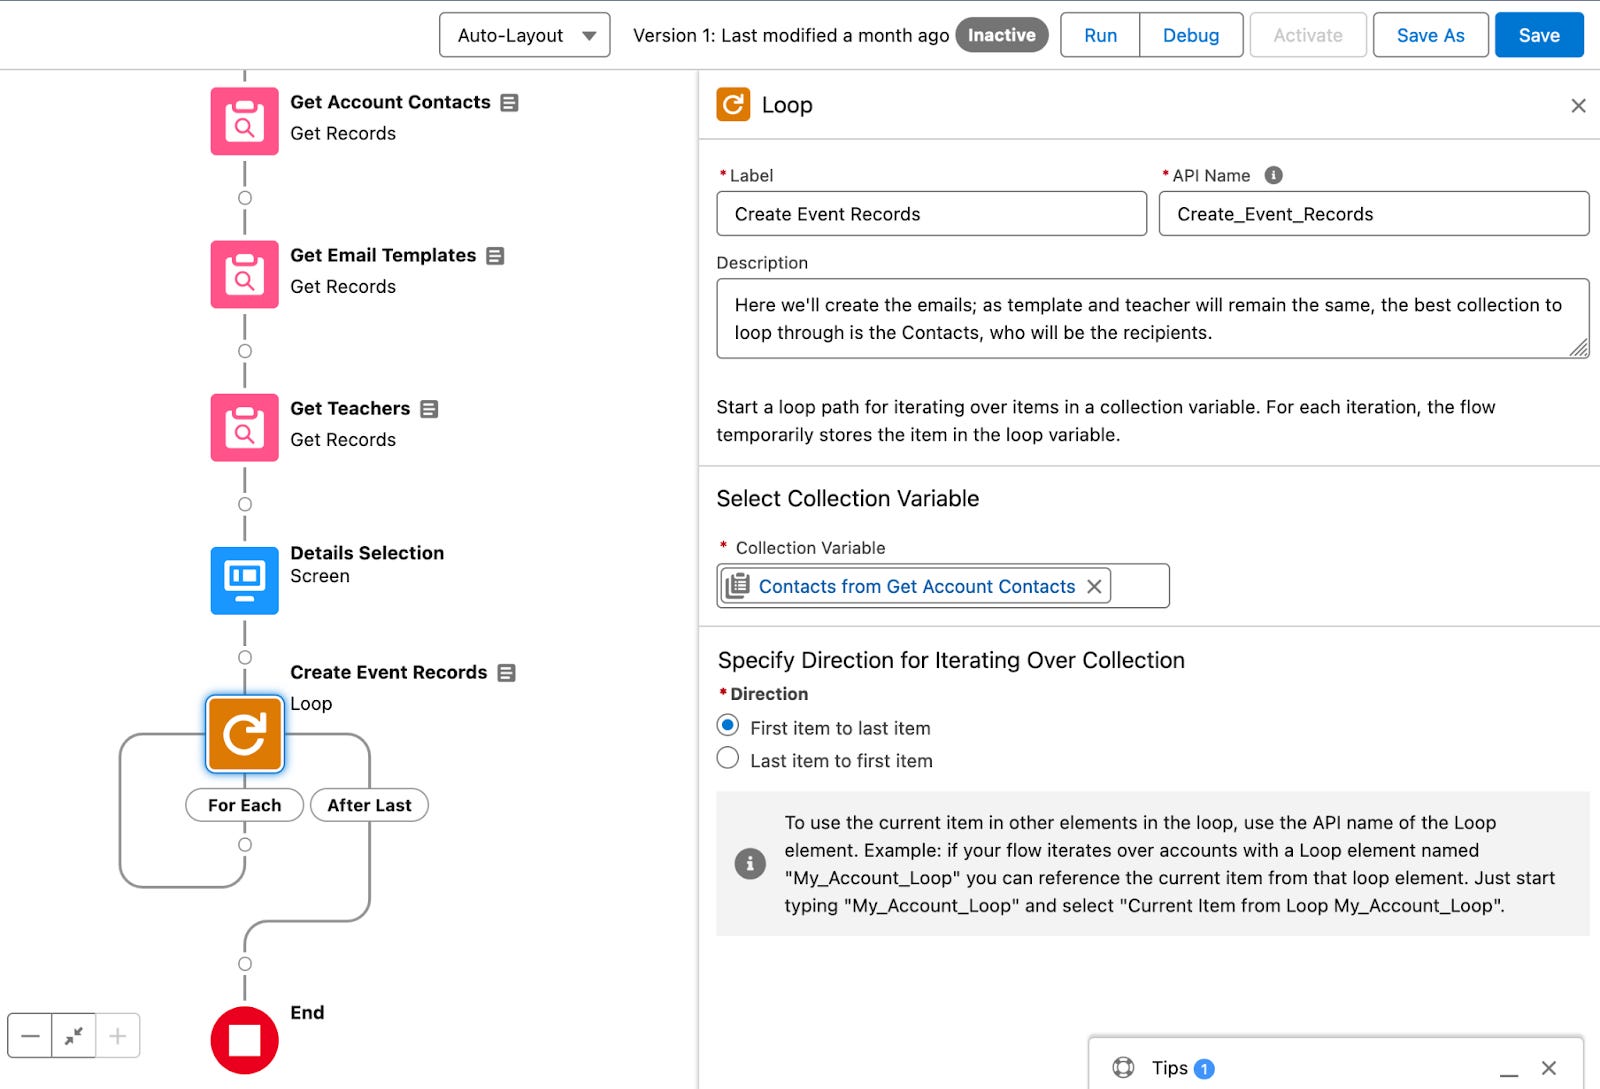
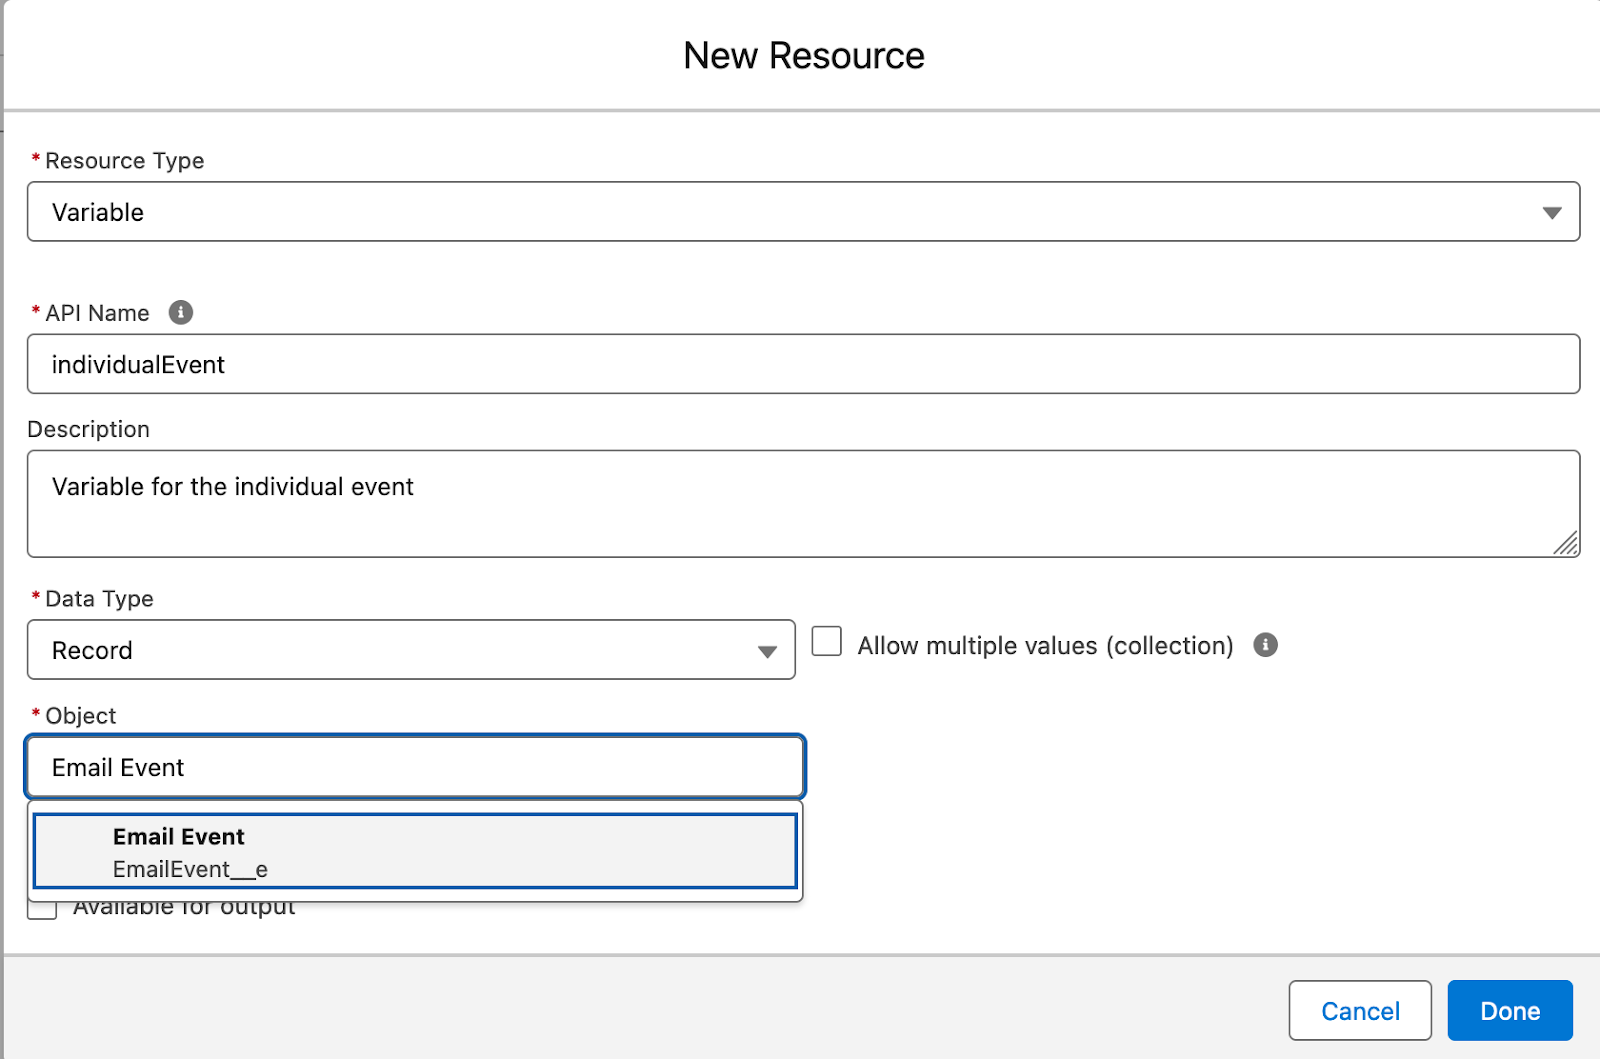
Now, within the loop we’ll need two assignments; one to create the record, another to push it into a record collection, from where we can then create all of the events. But as we haven’t yet created event variable, let’s do that - nothing spectacular, just a regular Record type variable, only for the object we select the EmailEvent__e instead of a regular record:
…and then we’ll get to the assignment part. Remember - we’re assigning three values:
“Additional value” (teacher)
Recipient (contact or lead)
Template ID
First off, the teacher selection - easy & simple:

Next, a bit trickier, the selected email template:
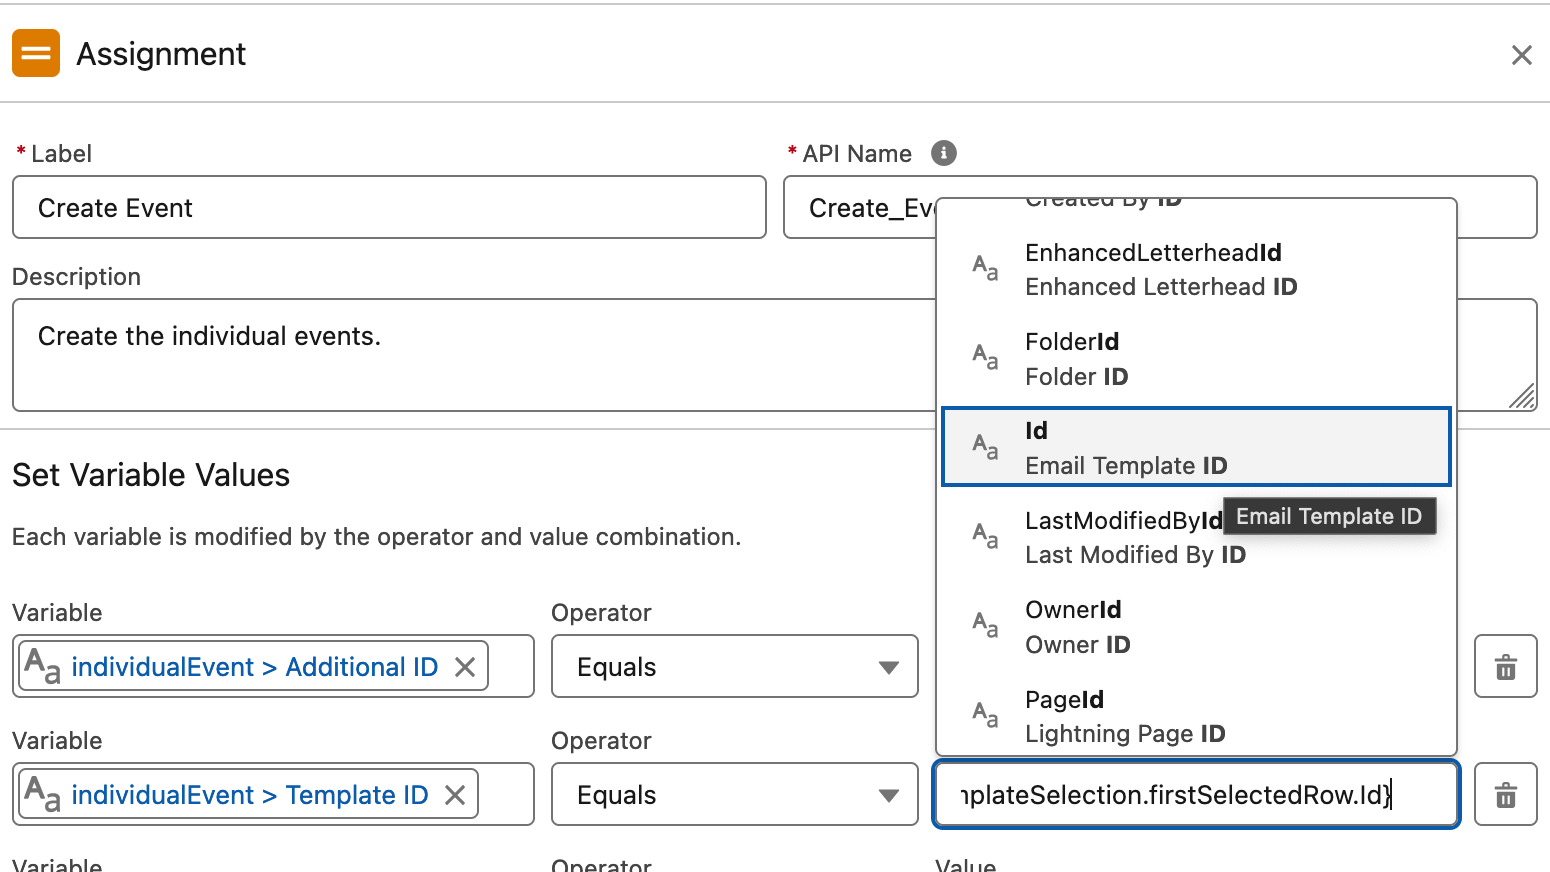
As you can see from the “Aa” icon there, we defined the field as type text, so we could also insert any other value, but the ID is the most surefire and simple one to do - that way we can just hand over the ID in the sending flow and don’t need to do any Get operations.
Last but not least, the recipient:

The recipient will be pushed in also as an ID, and it can only be either Contact or a Lead. Even if you have Person Accounts, you’ll still need to give the person account’s Contact ID.
Then we’ll create a list variable and push the current value set of the individualEvent into the collection record.
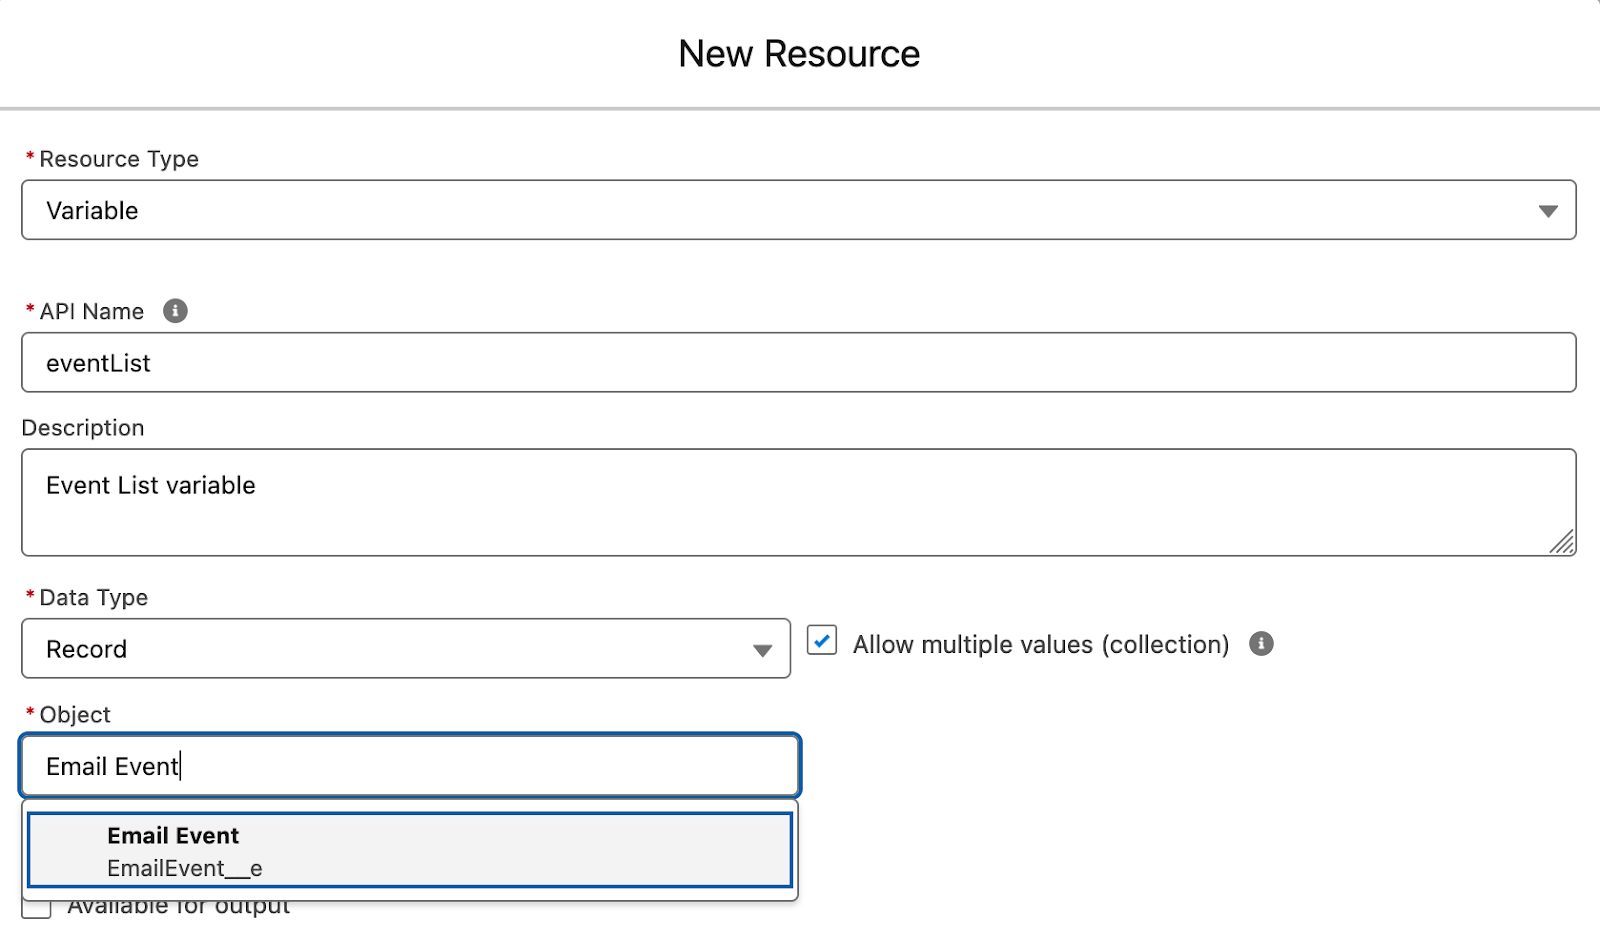
…just another record variable of type EmailEvent__e. Remember to check the “Allow multiple values” box to make it a collection variable.
…and then the assignment. Salesforce tends to expect you to insert a value from the record, when you select a record variable, but just remove the dot from the end and you’re good to go.
Also - remember to select the ADD as operator in this assignment, as we want to keep adding records into the collection variable, until we run out of recipients:
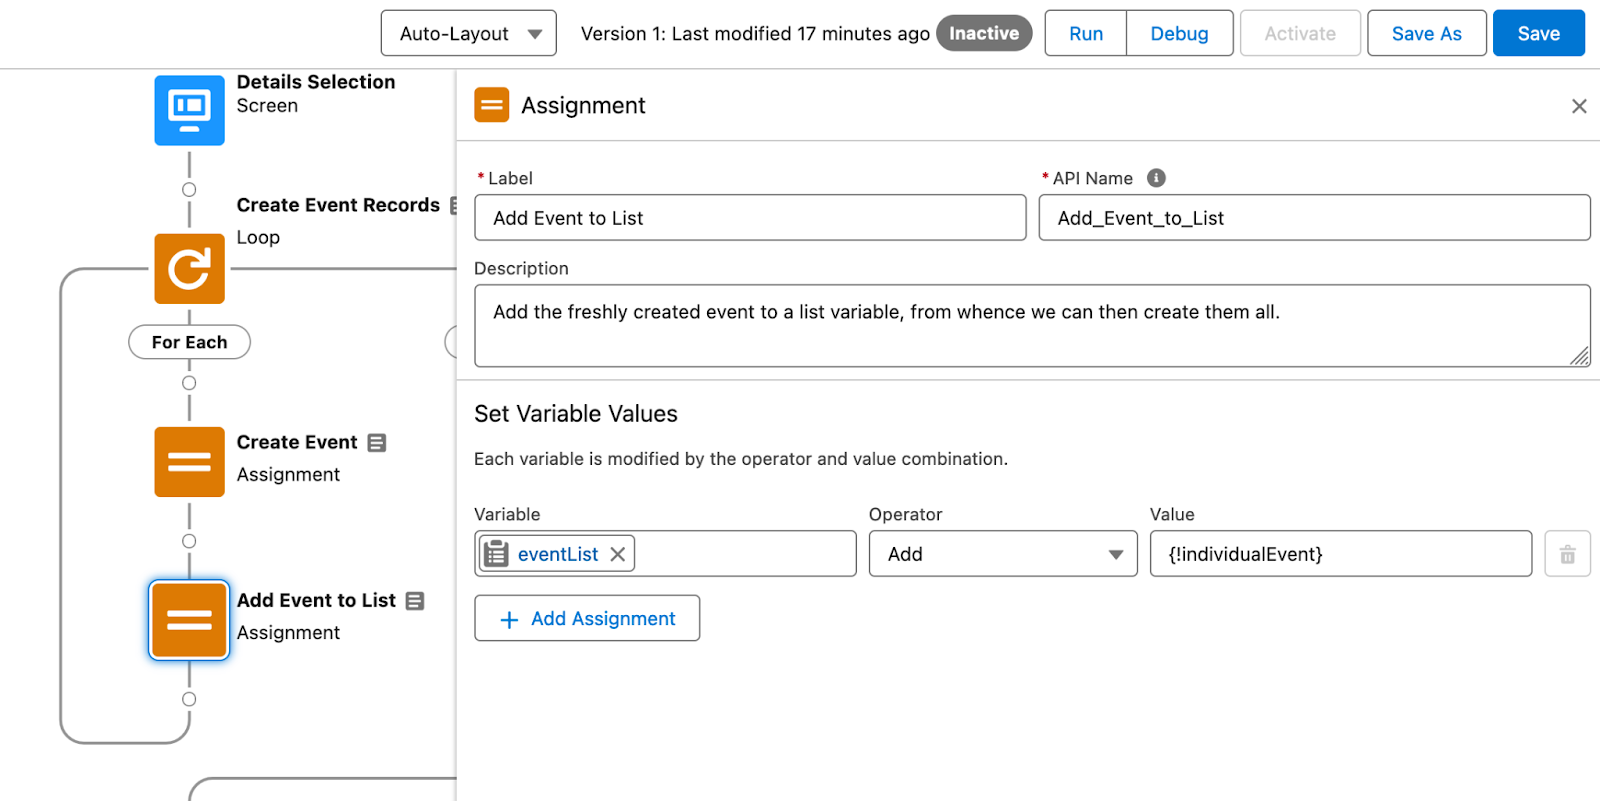
(not one or three times when I’ve started debugging to find “Equals” instead of “Add” in some assignment box like this…)
Anyway - now we can create the events; veery simple, as we’re creating multiple records, the only option left for us is to use a record collection, to which we’ll obviously select the eventList one:
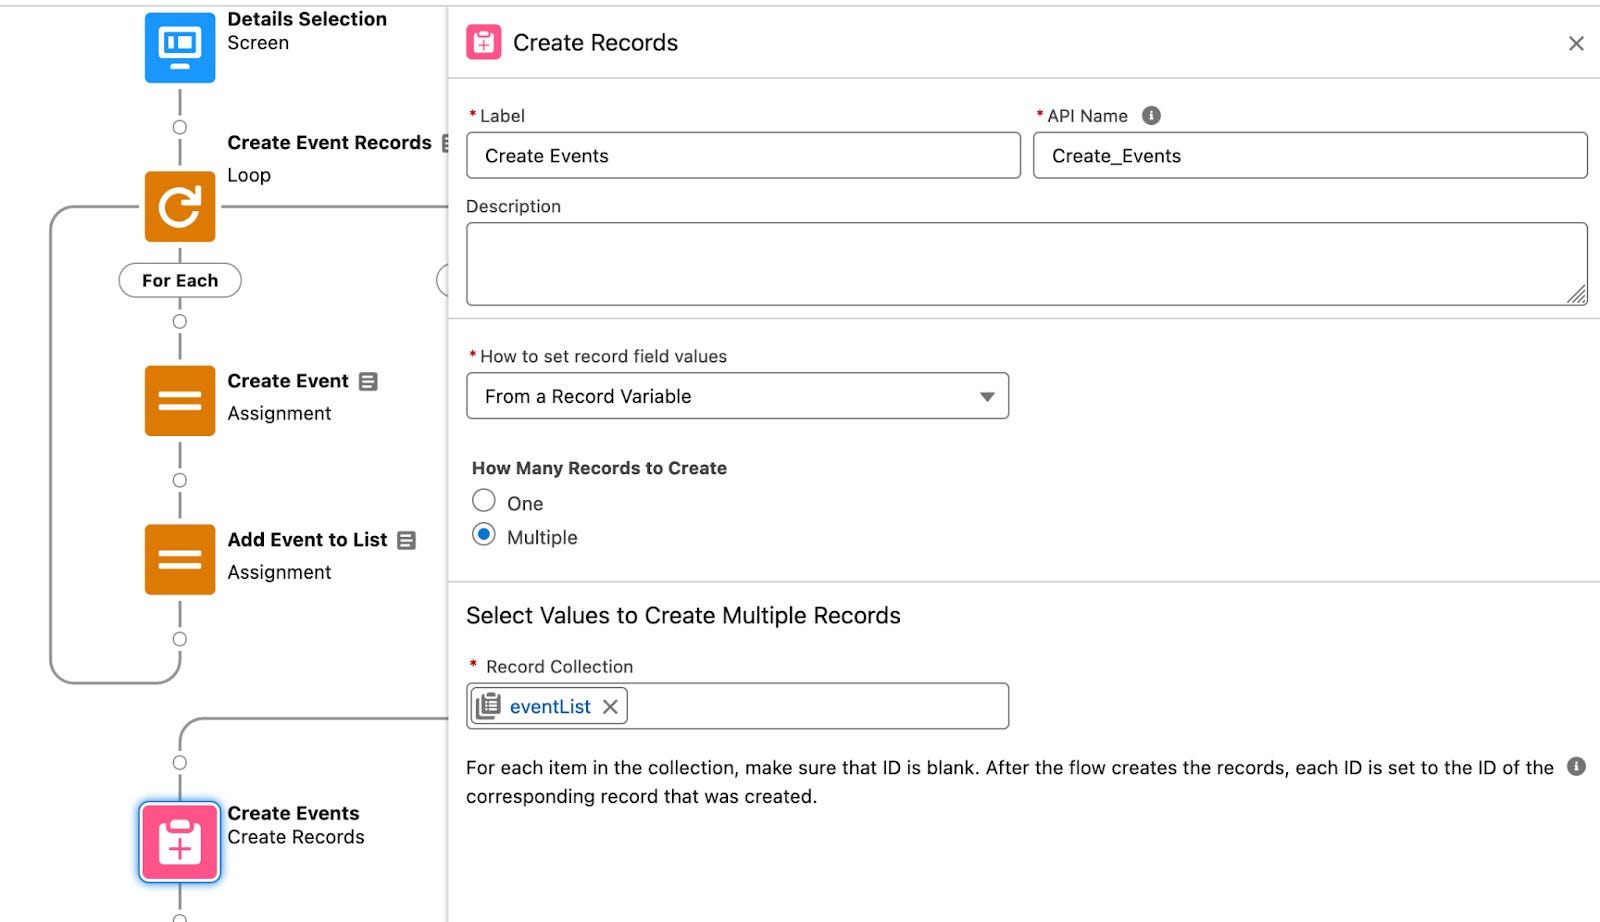
…and that’s it, save & activate & we’re done with this one (well, debug run or three wouldn’t hurt, but this is good to go).
Email Sending flow
Aight, same drill as before: Setup, flows, create new flow, from scratch - then, except instead of screen flow or record triggered flow, we’ll select the Platform Event triggered flow:
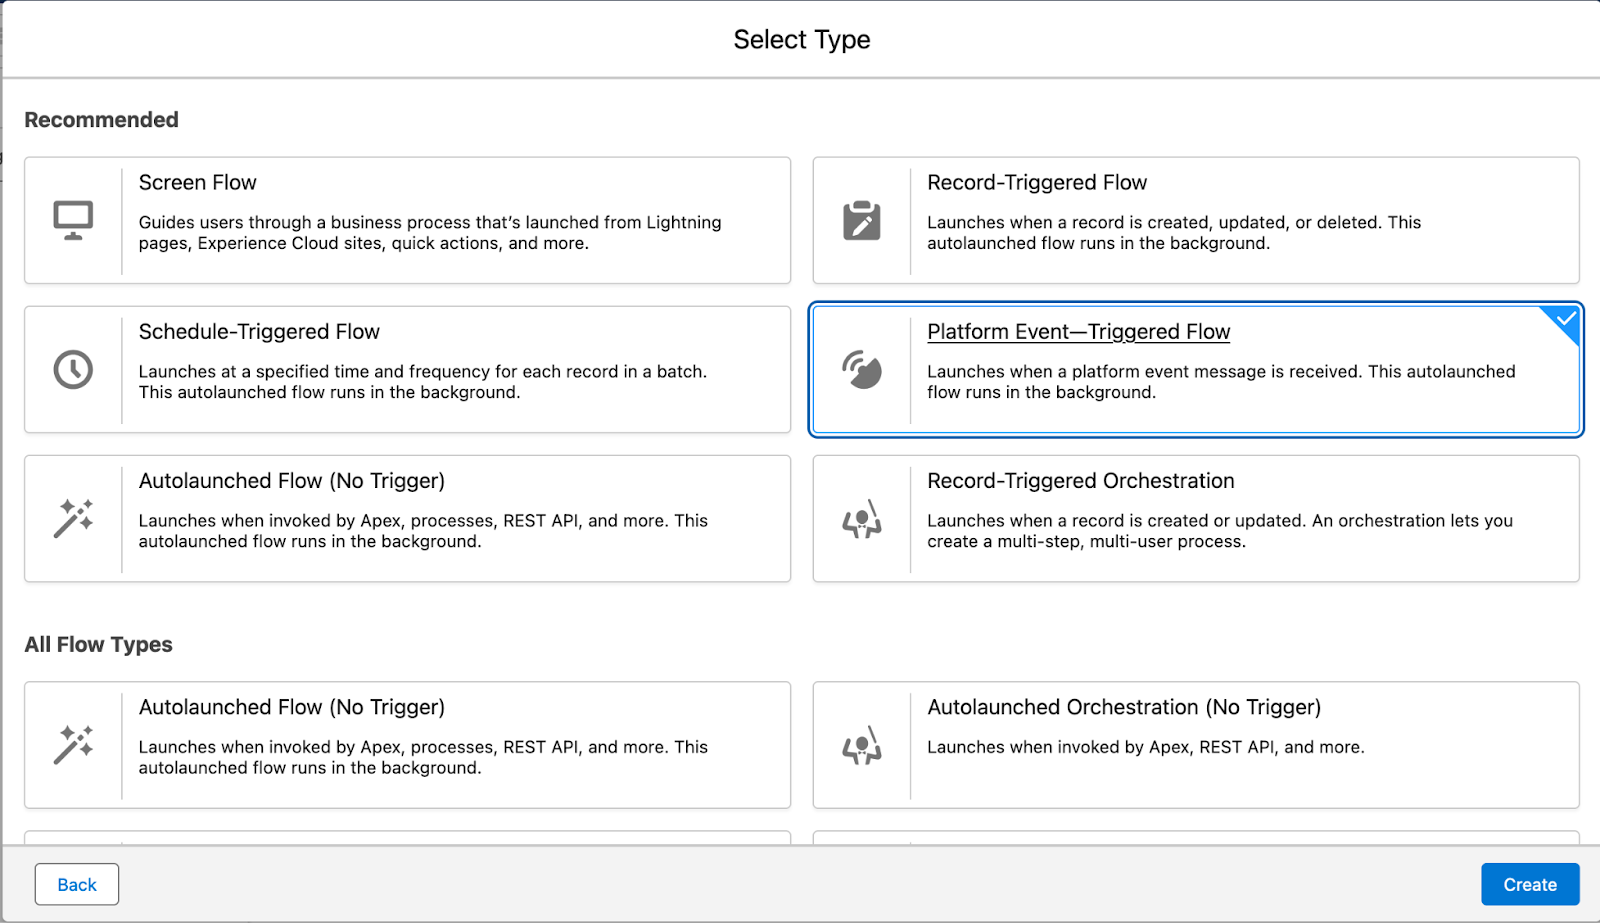
Once we’re past that, we get to select the Event from which we trigger the flow - and that’d obviously now be the EmailEvent:
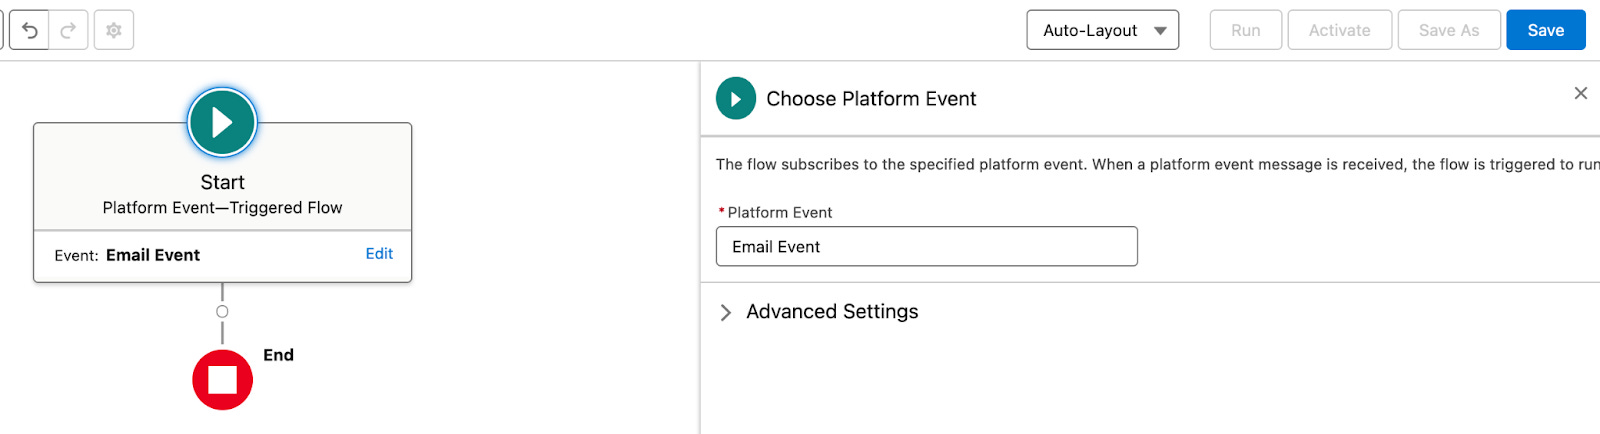
The advanced section lets you select whether you’ll run the flow as the user who triggered the flow - i.e. whoever ran the screen flow, but you can also select the default workflow user; in this case it doesn’t matter, ‘cos both would end up being me.
As we know that we already have all the details coming in, we can directly jump to sending the email part:
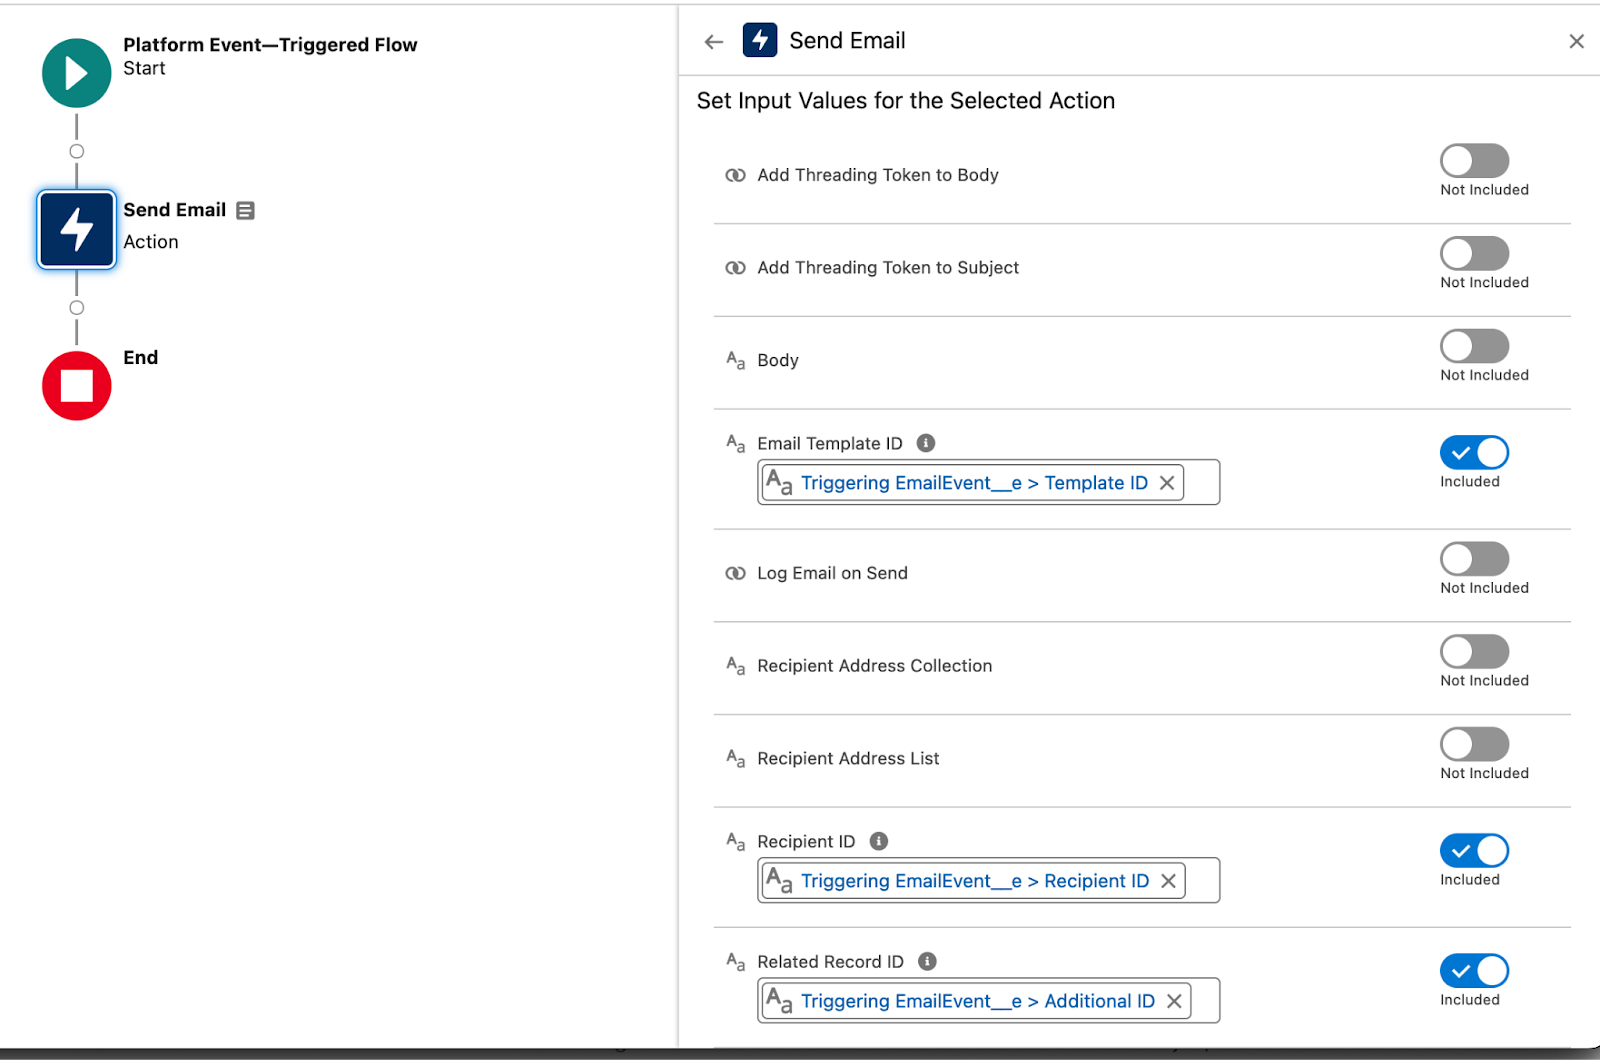
Of course you’ll need to give the action a label, API name and preferably also a description, but here you can see that we get all the details directly from the inputs, i.e. the triggering emailEvent__e record.
As we know that we’ll get the data from the record creating flow (or won’t get), and all incoming data is directly in compatible format, we don’t really need to do anything except save & activate.
Adding the Action
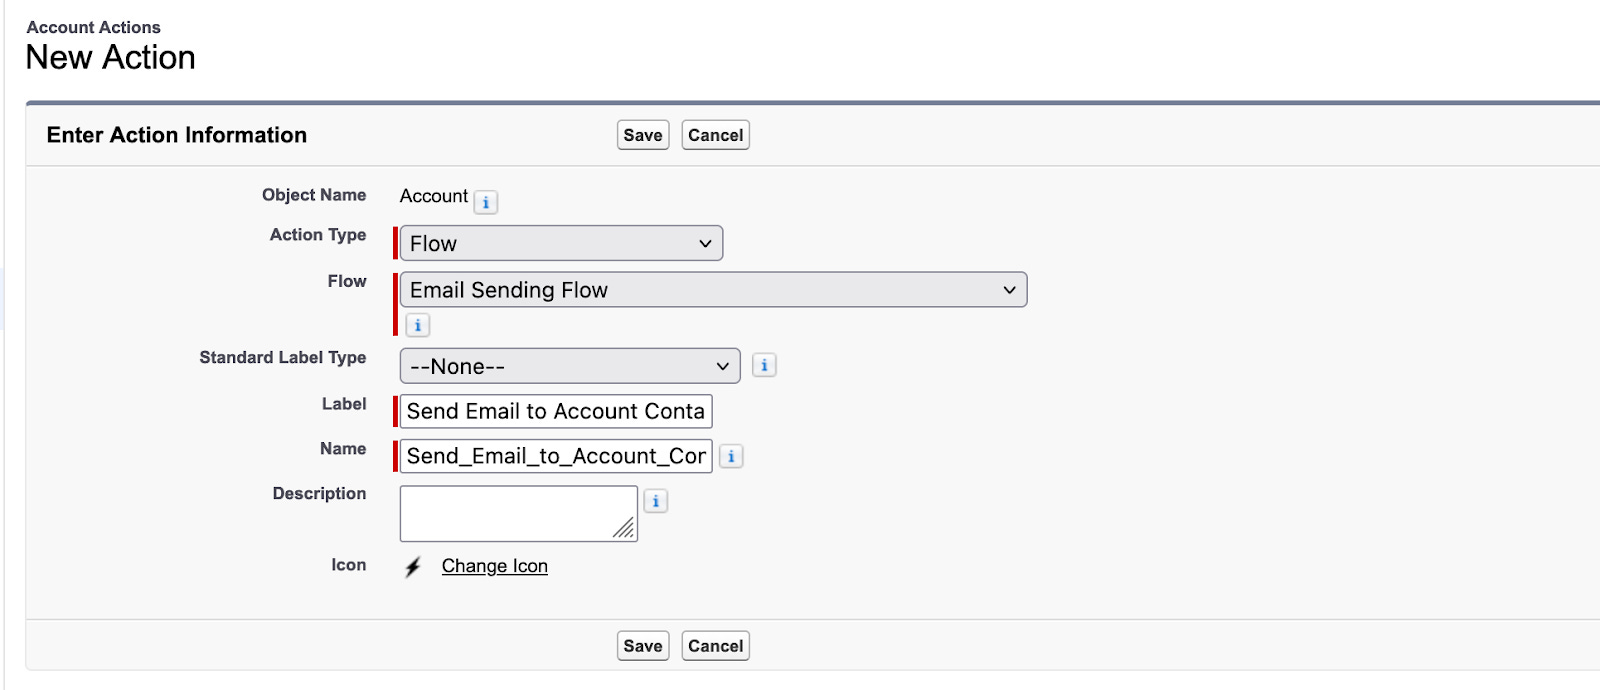
So now we’ve got almost all the pieces in place, but no way to run or test it, so let’s add an action to Account object; the usual, go to setup, object damager, then click on Buttons and Actions, then click on the “New Action” button on the right:

Once there, select Flow as the Action Type, then select your flow, None for the Standard Label Type and add a Label and Name - then just Save.
Adding Action to Lightning Record Page
Now that’s done, so navigate to an account page of your choosing, then click on the Setup cog icon, but don’t go to Settings. Of course you can do that too, but there’s a shortcut to access the current Lightning Record Page, which can often be handy - just click on the Edit Page link in the Setup menu:

(never mind how the page looks, I probably was testing something weird here…)
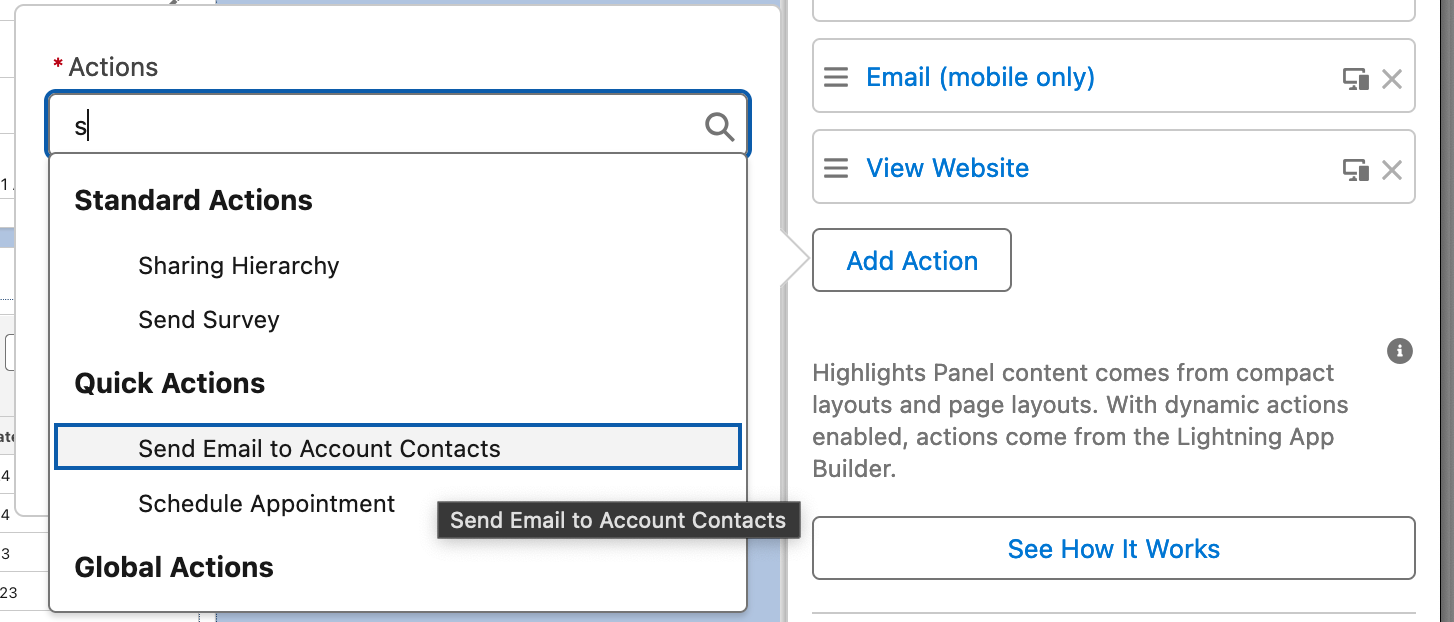
Anyway - if you have switched to using Dynamic Actions, you can select them right on the LRP:
If you haven’t well, then you’ll have to add the action to the Classic page layout (easy, just google it).
Anyway - remember to save the LRP (or Classic Page Layout) before you exit it.
Testing
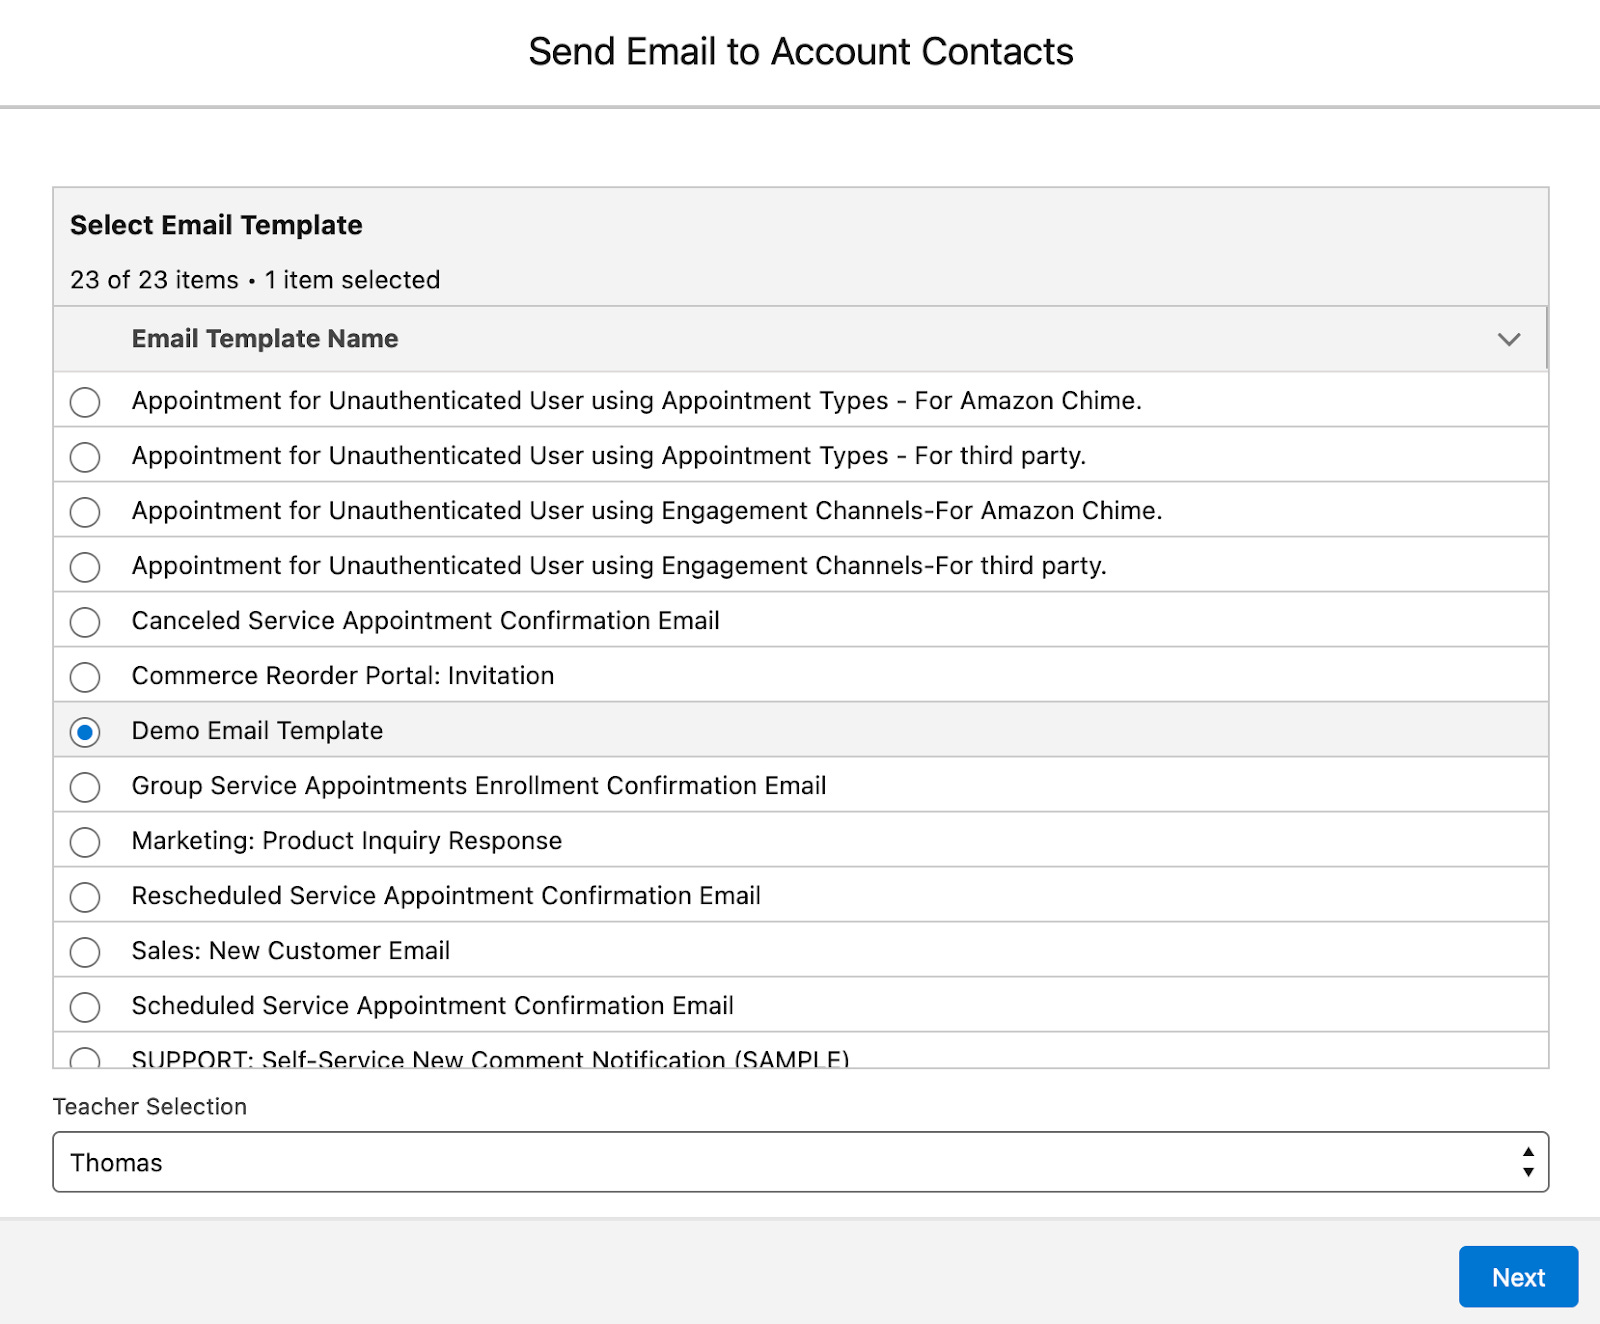
Okay, so here I have clicked on the button on the Account page and can see the list of email templates in the data table and I have selected the demo template we created earlier - and one of the teachers in the system:
After I click next, the flow gets the account contacts and sends them email, doesn’t give any feedback or anything, because we didn’t build it to give any feedback - in real live system I probably would create a screen that lists all the recipients and might give user an option to deselect some of them in another datatable to improve the setup’s usability.
In the meanwhile I went and changed the email addresses of the contacts under the account I launched this flow from, so they’ll end up in my inbox for review:


So - to sum it up, everything worked as it should have, both contacts of the account got emails (the four there is because I ran the flow a few times to be sure…) - and we were able to send multiple recipients an email, using an email template, which isn’t directly supported by Salesforce.
Happy hacking 🙂